Rod's 84 BabyBajaF100

User avatar
AussieRod
Posts: 2818
Joined: Sun Sep 05, 2010 1:43 am
Bronco Info: 81 Bronco XLT, 250 alloy head crossflow 6, NP435/NP208, 4:10 gears, 31-10.5R15 M/Ts.
Location: Downunder

Re: Rod's 84 BabyBajaF100

Post by AussieRod »

September 1 SPRING TIME!!!:
After a bit of pissing around this morning, I got started. It's been raining again, but most of this work can be done under cover. Drilled the holes for the fuel pump and mounted it up, but realised I now had two distinct problems: 1/ I'd mounted the pump on it's bracket the wrong way around, so I had to remove it and re-orientate it, and 2/ the filter was too close to the pump to get the hose on. Luckily, there were 2 holes further back that were on a slight angle and fitted the mount almost perfect, so I moved the filter back and carefully bent the mount to push the filter as far into the chassis rail as I could, without pinching the wiring harness above it:
P1010135.JPG
P1010135.JPG (71.29 KiB) Viewed 2450 times
That made it easier the plumb the filter to the pump, so I used teflon tape on the pump fittings (they had a taper seat on the ends to match the pump tappings), screwed them in and fitted the hose. The hose was a tight fit, but a little WD 40 helped them slide neatly on. I then realised I didn't have any 2 pin Deutsch plugs left, but I fitted the pins/sleeves and connected them, insulating the positive wire for now until I can buy some on Monday (or salvage some from work at Cloncurry):
P1010136.JPG
P1010136.JPG (84.15 KiB) Viewed 2450 times
My 9" needs a pinion skid plate (someone didn't deliver, did they?):
P1010137.JPG
P1010137.JPG (85.64 KiB) Viewed 2450 times
Body mounts tightened down:
P1010138.JPG
P1010138.JPG (68.96 KiB) Viewed 2450 times
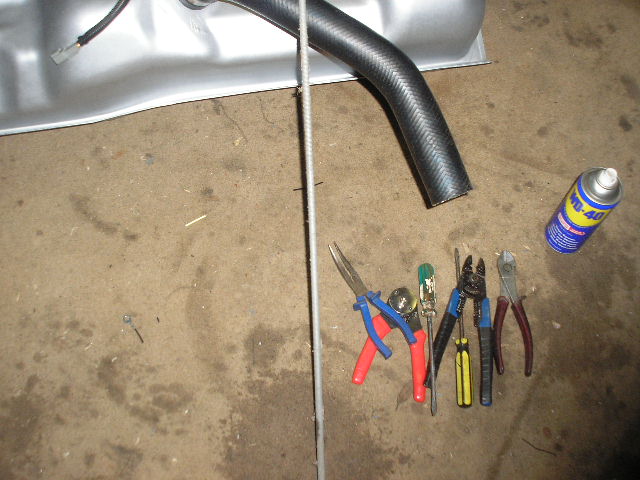
I re-measured all the body to chassis, then carefully pushed it as far back as the holes and mounts would let me and still stay aligned. I then carefully blasted them down with the rattle gun, making sure to compress them to the directions supplied. Using the old wiring harness section, I hot wired the pump using the old battery from the Triton and emptied to rear tank into a jerry can. That made it easy to just hold the tank up with my knee while I removed the strap bolts and straps and lowered it down, feeding the fill hose out from the LHS. The mud wasps have been using the space on top of the tank to build a shit load of egg cases, which I smashed off once the tank was down. That's the dirt you can see on top of the tank. I carefully wedged out the breather valve and fited it to the side tank, it's now ready to fit tomorrow once I stick the rubber to the straps and chassis. During a break in the rain, I quickly whipped out the sandblaster, cleaned the straps and hit them with a coat of engine enamel:
P1010141.JPG
P1010141.JPG (81.64 KiB) Viewed 2450 times
Even though they are galvanised, I felt this would help them stay cleaner longer. I also finally found a piece of threaded rod to cut tomorrow for temporary bolts to hold the tank straps tight until I grab the correct length and size bolts to secure it permanently:
P1010142.JPG
P1010142.JPG (73.66 KiB) Viewed 2450 times
By then it was dark, so a quick pack up and here I am.
More tomorrow.
User avatar
AussieRod
Posts: 2818
Joined: Sun Sep 05, 2010 1:43 am
Bronco Info: 81 Bronco XLT, 250 alloy head crossflow 6, NP435/NP208, 4:10 gears, 31-10.5R15 M/Ts.
Location: Downunder

Re: Rod's 84 BabyBajaF100

Post by AussieRod »

Cont:
Fuel tank removed:
P1010140.JPG
P1010140.JPG (77.23 KiB) Viewed 2450 times
Plenty of space under there now, for the second propane tank:
P1010139.JPG
P1010139.JPG (79.52 KiB) Viewed 2450 times
I had more pictures, but they are too blurred to put up. I'll re-take them tomorrow and re-post.
Cheers.
User avatar
AussieRod
Posts: 2818
Joined: Sun Sep 05, 2010 1:43 am
Bronco Info: 81 Bronco XLT, 250 alloy head crossflow 6, NP435/NP208, 4:10 gears, 31-10.5R15 M/Ts.
Location: Downunder

Re: Rod's 84 BabyBajaF100

Post by AussieRod »

2 September:
Not much happened this morning, as I spent some time under the truck, wiping off dust and cobwebs, etc., measuring the space where the rear tank was to compare to Mike's Bronco propane tank, tidying up under the truck and getting ready for the tank install.... you know, the usual stuff. I'd just finished lunch when Mike rolled up, I can hear his Bronco coming half a click up the road :D Out here, it's not too bad, but back in suburbia, it's too loud. Need to quieten it down some. Anyway, I got the rear up on stands and changed over the wheels cylinders without any fuss. I did a quick adjustment on the shoes before putting the drums back on and we bled the brakes, before re-fitting the wheels. The PO has had the self-adjusters removed, so whenever I have the drums off, I do a minor adjustment to keep them tight. Now the brake pedal is solid and it stops on a dime, with minor rear wheel lock-up on hard braking.
After we finished, I turned to my truck and we re-bled the brakes. The pedal was very soft and spongy, and there was still a lot of air in the left front and rear circuit. Again, now the pedal is solid and it should be safe for a road trip next break.
I then cut and cleaned the rubber strips for the fuel tank, then glued them on with contact cement:
P1010143.JPG
P1010143.JPG (87.68 KiB) Viewed 2437 times
This was the last pic I got before the bloody batteries went again. Anyway, the tank is under the truck, hanging in it's straps, with temporary bolts holding it up in position. Tomorrow I will get the correct bolts and use Ny-loks and panel washers to secure the straps, remove the muffler and connector to access the top of the tank and re-connect the sender, vent hose and fuel hose. While I'm out, I'll grab a jerry can full of premium fuel to add to the tank along with the fuel from the rear tank and a locking cap for the gas filler. Then I'll trim the filler neck from the rear and fit it up. Then, a leak test, run some fuel through the line at the carb to make sure it's clean, then fire it up and see how it runs with it's new supply system.
More tomorrow.
User avatar
AussieRod
Posts: 2818
Joined: Sun Sep 05, 2010 1:43 am
Bronco Info: 81 Bronco XLT, 250 alloy head crossflow 6, NP435/NP208, 4:10 gears, 31-10.5R15 M/Ts.
Location: Downunder

Re: Rod's 84 BabyBajaF100

Post by AussieRod »

3 September:
You're gonna have to forgive the blurry pictures, For some reason the bloody camera won't co-operate.

I continued on this morning, going out to get the correct bolts for the tank straps and an adaptor bush for the oil pressure sender that arrived this morning. Forgot to grab a locking gas cap and fuel while I was out, but did that later in the arvo. Anyway, I crawled under, removed the temporary muffler and finished tightening the the straps to secure the tank. It's nice and snug under there now. Un-did the canister vent line and re-routed that over and connected it, connected both the sender plug and the trimmed fuel hose to the sender. Tied up everything nice and neat and headed out to start playing with the filler tube:
View from outside:
P1010144.JPG
P1010144.JPG (86.12 KiB) Viewed 2424 times
Tank strap bolt(s):
P1010145.JPG
P1010145.JPG (70.63 KiB) Viewed 2424 times
Sender all done (flash didn't work):
P1010146.JPG
P1010146.JPG (65.51 KiB) Viewed 2424 times
Even though I moved the filter back, there is still clearance and I can replace it without losing my knuckles:
P1010147.JPG
P1010147.JPG (60.53 KiB) Viewed 2424 times
The t/case yoke clears nicely:
P1010148.JPG
P1010148.JPG (64.5 KiB) Viewed 2424 times
Plenty of room for the driveshaft, too:
P1010149.JPG
P1010149.JPG (85.91 KiB) Viewed 2424 times
Cont.
User avatar
AussieRod
Posts: 2818
Joined: Sun Sep 05, 2010 1:43 am
Bronco Info: 81 Bronco XLT, 250 alloy head crossflow 6, NP435/NP208, 4:10 gears, 31-10.5R15 M/Ts.
Location: Downunder

Re: Rod's 84 BabyBajaF100

Post by AussieRod »

Cont.
After some measuring and eyeballing, I cut the extended fuel neck back to it's original length, plus 1/2" to make sure it would fit. After welding the nipple back on, a quick clean up with the grinder and a coat of engine enamel silver over the welded area, I fitted it on. Went in spot-on for length and fit.
After trimming and welding:
P1010150.JPG
P1010150.JPG (83.52 KiB) Viewed 2423 times
The modified version and the aus original:
P1010151.JPG
P1010151.JPG (72.85 KiB) Viewed 2423 times
Installed:
P1010152.JPG
P1010152.JPG (84.02 KiB) Viewed 2423 times
After that was done, I poured in the gas from the jerry can, about 3 1/2 gallons, removed the hose from the carb, made a ground wire for the cut-off solenoid and switched on the ignition. Nothing. No pump grown from underneath. Hmmmmm. This had me scratching my head for about 1/2 hour, while I tested all the fuses, connections, etc. I next checked all the plugs where the body joins the chassis and remembered why the EFI pump plug had no power. I'd wired that particular plug so I could add a ECU controlled relay for the EFI HP pump, which I would have added if I was going to use the EEC4 Mustang set-up. The wires were in the chassis side of the plug, but not on the body side. I made a jump wire for the Deutsch plug and sure enough, the pump worked on IO. I made up a wire and terminal, pulled the pin lock and inserted it in the correct spot, then soldered the other end to the outlet power terminal under the relay socket:
P1010153.JPG
P1010153.JPG (87.86 KiB) Viewed 2423 times
I left the wire outside the covering, I'll do that later. All worked as planned, except there was no fuel coming out of the hose at the carb. Even tried pressurising the tank slightly, in case the vane pump didn't like priming, but nothing. I had a brain storm, crawled underneath and reversed the pump connectors and WA LA! Fuel can out of the hose. I connected everything back up and started it up and all was/is well. So, that does it for today, I have to cook dinner and go out early tomorrow to replenish my firewood supply. After that, I'll install the oil pressure sender, guage panel and see what the oil pressure is like on the new engine, compared to pre-rebuild. Then, I have to pack it all away for another 2 weeks and go back to work Wednesday.
More tomorrow.
Cheers. ;)
User avatar
AussieRod
Posts: 2818
Joined: Sun Sep 05, 2010 1:43 am
Bronco Info: 81 Bronco XLT, 250 alloy head crossflow 6, NP435/NP208, 4:10 gears, 31-10.5R15 M/Ts.
Location: Downunder

Re: Rod's 84 BabyBajaF100

Post by AussieRod »

Tuesday 4 September:
No pics today. I fitted the oil pressure sender, after a lot of stuffing around, mostly due to me. I'd taken out the old Ford sender to fit the VDO one, had a reducer to do the job and found the sender wouldn't screw into the reducing bush more than 1/2 a turn. GGRRRRRR! Went back to the store, looking for a correct adaptor, which I found, returned the reducer bush and came home the fit the sender. Bugger me dead, the oil light switch was also 1/8"bsp! I also had the same bloody adaptor already in the engine, so that stuffed me up. I fitted the VDO sender, but had to re-fit the Ford sender until I get a reducer that works, or the correct 1/4" bsp type oil light switch. Anyway, I started it up and cold, it has 500kpa (80 psi) oil pressure cold. :shock: Once it warms up, it's closer to 60 psi, which is good news, compared to what it was coming home in the Bronco (zero over 2000 rpm).
I backed it into the garage, made sure everything is covered and there it stays until I return. I have 1 day at home next R&R. then off to Sydney for 4 days. Once I'm home, I will continue from there.
More in 2 - 3 weeks.
Cheers. ;)
User avatar
AussieRod
Posts: 2818
Joined: Sun Sep 05, 2010 1:43 am
Bronco Info: 81 Bronco XLT, 250 alloy head crossflow 6, NP435/NP208, 4:10 gears, 31-10.5R15 M/Ts.
Location: Downunder

Re: Rod's 84 BabyBajaF100

Post by AussieRod »

Sunday Sept 16:
A quick update, as I am just about to crawl into bed. My new carb is on it's way, along with my mandrel bends for the exhaust. The windshield is tentatively ordered for the Monday before I go back to work. Hopefully, I can get it together enough to drive it out on the road properly for the first time in 6 1/2 years, before I go back to work. The Sydney could stretch out to 5 - 6 days yet, so I'm not optomistic on how much time I'll have to work on the truck, but I'll have a good go at it.
More on Thursday. ;)
User avatar
AussieRod
Posts: 2818
Joined: Sun Sep 05, 2010 1:43 am
Bronco Info: 81 Bronco XLT, 250 alloy head crossflow 6, NP435/NP208, 4:10 gears, 31-10.5R15 M/Ts.
Location: Downunder

Re: Rod's 84 BabyBajaF100

Post by AussieRod »

Thursday September 20:
Picked up my carb, 3"resonator and my door clips this morning from the post office. My bends should be in tomorrow, but I'll be half way to Sydney by then. Took off the 2 bbl holley and multiple adaptors, fitted the new Edelbrock carb with the spacer and started connecting it up. A lot of things needed to change: the fuel inlet is now on the right side, so I had to extend/change the fuel line from the lock-off valve. The PCV comes out the front, so a new piece of hose, a new PCV valve and a modified vent cap went on. I need to fab a small mounting bracket to hold the lock-off and re-route the fuel hose a little, as it moves around too much for my liking. As the booster already has a fitting, I used the port at the rear of the carb for a 3/16" barb to feed the heater tap, jury-rigged the accellerator cable and tuned the key. Nothing. The battery from the Bronco was stone dead. OK, I grabbed the Triton battery out of the bed, jumper cabled it and tried again. Watched as the fuel filter filled with gas, gave the pedal a few pumps to get gas into the pump squirters and she fired right up. It was a little unsteady, as the carb filled all it's passages and got used to running gas through it's veins, but after a few tweeks, it idles nice and has good response. Turned it off, covered it all up and will continue next week when I get home. My parents will stay over to look after the house and the chickens, while I go look at investment properties up north. Saturday, I start on the exhaust and TV cable/accell cable install, fit a 'screen (maybe) the following week and give a run before I go back to work. It's getting closer. ;) More next week.
Cheers.
User avatar
AussieRod
Posts: 2818
Joined: Sun Sep 05, 2010 1:43 am
Bronco Info: 81 Bronco XLT, 250 alloy head crossflow 6, NP435/NP208, 4:10 gears, 31-10.5R15 M/Ts.
Location: Downunder

Re: Rod's 84 BabyBajaF100

Post by AussieRod »

Friday 28 September:
Back from Shit-ney. What a f***ed up place that is. :evil: Wasted an entire week, and on top, lost my keys somewhere. Hopefully, at our friends place, but that means I have to break into the garage to get my angle grinder, so I can cut the padlock off the entry door (and my gun safe, etc.). Not happy. Anyway, I'll continue on tomorrow afternoon after I access the garage and buy a heap of new locks. (Not taking any chances). I have a line on a spare F100 SWB chassis, but haven't the spare cash right now. I'll wait and see if it sells, but I've made him an offer on the rear mount propane tank and brackets for my truck.

I'm tired, more tomorrow.
User avatar
AussieRod
Posts: 2818
Joined: Sun Sep 05, 2010 1:43 am
Bronco Info: 81 Bronco XLT, 250 alloy head crossflow 6, NP435/NP208, 4:10 gears, 31-10.5R15 M/Ts.
Location: Downunder

Re: Rod's 84 BabyBajaF100

Post by AussieRod »

Saturday 29 September:
A little update today. Got the garage open (not telling how) without smashing anything, cut off the lock and got access. Had a bit to do this morning, and finally got to getting the truck out and back under the carport. I plan on tidying up a few things later and tomorrow, as well as getting a start on the exhaust (depending on whether Mike wants the resonator on his Bronco or not). Doesn't matter much, though, I'll make a provision for it in the front section if I feel I need it. Some wiring needs tidy up, the exhaust, the TV cable set-up, etc. The windscreen will wait until next break, along with the new tyres, Achilies Desert Hawk M/T's in 33-12.5R15 on my Alcoas. The Edelbrock carb is just like the Holley, a bugger until the engine warms up a little, but I'll get used to it. Besides, it will run mostly on propane once the engine is bedded in properly, so it won't be any problem. Anyway, I thought I'd throw in some pics, to keep y'all interested:
Holley and adaptor stack:
P1010156.JPG
P1010156.JPG (74.73 KiB) Viewed 2262 times
Edelrock height (installed):
P1010158.JPG
P1010158.JPG (79.77 KiB) Viewed 2262 times
Installed and running:
P1010159.JPG
P1010159.JPG (75.41 KiB) Viewed 2262 times
Exhaust stuff ready for tomorrow:
P1010157.JPG
P1010157.JPG (83.75 KiB) Viewed 2262 times
Tyres I'm planning to use:
Achilies Desert Hawk.jpg
Achilies Desert Hawk.jpg (205.85 KiB) Viewed 2262 times
I'm gonna have a break this arvo, I'm still stuffed from the long drive home yesterday. I'll have more updates tomorrow.
Cheers. ;)
User avatar
AussieRod
Posts: 2818
Joined: Sun Sep 05, 2010 1:43 am
Bronco Info: 81 Bronco XLT, 250 alloy head crossflow 6, NP435/NP208, 4:10 gears, 31-10.5R15 M/Ts.
Location: Downunder

Re: Rod's 84 BabyBajaF100

Post by AussieRod »

Sunday 30 September:
Spent a few hours on Mike's Bronco first, getting some issues out of the way, then attacked the exhaust on my truck. I had originally planned to run the exhaust out the rear, as standard, but the Flowmaster wouldn't fit between the chassis and driveshaft without rotating it vertically. That made it hang down and I didn't like it, so I brought it forward up the conector closer to the transfer case, which allowed me the run a 90 deg bend out under the frame in front of the spring hanger. After tacking the muffler and connector together and to the flange on the engine pipe, I started trimming and tacking on a series of 45 deg bends out the side. To make an exit, I hole sawed a 4" hole in the bedside and bugger me dead if the 2 bends didn't line up PERFECTLY with the hole I cut, pointing down and rearward at 20 deg angles each. After tacking them all together, I just had to start the truck up to hear what it sounded like. The sound it makes is GLORIOUS! Once it settled to an slow idle, the cam lope was perfect, we both looked at each other, big grins breaking out and we both said "YEAH!" The rasping, metallic, throaty noise this makes is pure Flowmaster! It's too bloody loud, but I've left room in front of and behind the muffler for those 12" bullets to go in to quiet it down if I have to. The new exhaust has also changed the character of the engine entirely. Without that restrictive shitheap muffler, the engine now idles easily cold, starts better and revs much cleaner. The truck EASILY lays rubber from a standing start without the brake, so I'm thinking I am going to enjoy driving this thing :D .
After cutting the hole in the bedside:
P1010163.JPG
P1010163.JPG (81.4 KiB) Viewed 2238 times
Connector, muffler and tailpipe welded up, ready to fit:
P1010164.JPG
P1010164.JPG (72.52 KiB) Viewed 2238 times
The tailpipe exit:
P1010166.JPG
P1010166.JPG (67.86 KiB) Viewed 2238 times
I need to add an inch or 2, then once I make an aluminium checker plate trim for it, I'll carefully angle cut it to match the body angle leaving it out 3/4" and paint it all heatproof black. Tomorrow, if I have time, I'll fit/weld on some hangers and secure it up, add the piece to the end, paint it and install it and then find a piece of plate to make the trim panel. Tomorrow, wiring, TV cable, tidy up a few other things and start getting ready to pack it all up for my return to work.
More soon.
Cheers. ;)
User avatar
AussieRod
Posts: 2818
Joined: Sun Sep 05, 2010 1:43 am
Bronco Info: 81 Bronco XLT, 250 alloy head crossflow 6, NP435/NP208, 4:10 gears, 31-10.5R15 M/Ts.
Location: Downunder

Re: Rod's 84 BabyBajaF100

Post by AussieRod »

Tuesday 2 October:
Between shopping, the weather and the idiot Handbrake, I didn't have time until this afternoon with a break in the weather to get the exhaust hanger installed. I'd bought this last R&R, so I trimmed it up, utilised an existing hole in the chassis and once the tailpipe was lined up, I welded it on. I'll pick up a couple more hangers to install, to make sure the weight of the exhaust doesn't rip it loose, then it will get painted, re-installed with sealer and I'll call it done for now. Some exhaust pics:
A bit blurry, but you get the idea:
P1010167.JPG
P1010167.JPG (66.09 KiB) Viewed 2213 times
Room for a bullet resonator if needed:
P1010169.JPG
P1010169.JPG (84.74 KiB) Viewed 2213 times
Just tilted enough to clear everything with finger space:
P1010170.JPG
P1010170.JPG (87.28 KiB) Viewed 2213 times
Hanger close-up:
P1010172.JPG
P1010172.JPG (78.84 KiB) Viewed 2213 times
Clears the spring hanger nicely:
P1010173.JPG
P1010173.JPG (88.27 KiB) Viewed 2213 times
Tucks up out of the way where it can't get hooked up:
P1010168.JPG
P1010168.JPG (88.07 KiB) Viewed 2213 times
User avatar
AussieRod
Posts: 2818
Joined: Sun Sep 05, 2010 1:43 am
Bronco Info: 81 Bronco XLT, 250 alloy head crossflow 6, NP435/NP208, 4:10 gears, 31-10.5R15 M/Ts.
Location: Downunder

Re: Rod's 84 BabyBajaF100

Post by AussieRod »

The business end (bird's eye view):
P1010174.JPG
P1010174.JPG (66.58 KiB) Viewed 2213 times
I'm flying out Friday this swing, as all the flights were booked out. That means I miss a couple of days pay, but I work a couple less and get an extra day or two on the truck. It was raining when I took the pics, so if the weather is good tomorrow, I'll turn the truck around and do some wiring, get the TV cable fitted up and adjusted (will pick up a pressure guage along with heat proof paint tomorrow), run the 5mm twin core into the cab for the accesories, radio, etc. then work on fitting the propane mixer together and prep that for install. I still have a lot of loose ends to tie up, but most are done now and it's safe to drive once the 'screen gets fitted.
More tomorrow.
Cheers ;)
User avatar
S00TLYFE
Posts: 1076
Joined: Mon Mar 02, 2015 10:14 am
Bronco Info: IT RAPTOR NOW
Location: Buena Park

Re: Rod's 84 BabyBajaF100

Post by S00TLYFE »

looks good Rod
https://donttellmywiferacing.bigcartel.com/ (We have shirts, stickers, saginaw pumps, and other Bronco/OBS goodies)
User avatar
AussieRod
Posts: 2818
Joined: Sun Sep 05, 2010 1:43 am
Bronco Info: 81 Bronco XLT, 250 alloy head crossflow 6, NP435/NP208, 4:10 gears, 31-10.5R15 M/Ts.
Location: Downunder

Re: Rod's 84 BabyBajaF100

Post by AussieRod »

S00TLYFE wrote:looks good Rod
Thanks, Mate. :D It's getting there, slowly. Underlay and carpet, windshield, tyres........ a few adjustments and I can take it out for it's first adventure in almost 7 years.
User avatar
AussieRod
Posts: 2818
Joined: Sun Sep 05, 2010 1:43 am
Bronco Info: 81 Bronco XLT, 250 alloy head crossflow 6, NP435/NP208, 4:10 gears, 31-10.5R15 M/Ts.
Location: Downunder

Re: Rod's 84 BabyBajaF100

Post by AussieRod »

Wednesday 3 October:
Did a trip to the parts store, picked up some heatproof black and a pressure guage for the auto set-up, forgot the trans fluid for top-up and the extra hangers I wanted. D'oh! :oops: Doesn't matter, I came home, ran the 5mm cable from the battery to the under dash for proper permanent power, chose a spot for the UHF radio and finished off the cooling fan plug and wiring. I need some clips to secure it correctly, as zip ties won't do. I also installed the trans end of the Lokar cable for the TV actuator and trimmed the top section down to suit, it's all ready for tomorrow to try and set it up correctly. However, I still have to fab the little rocker piece for the carb lever, to allow both cables to share the same stud area. The accell cable bracket needs to be changed slightly, too. I still need some more yellow crimp terminals, as I didn't have enough to finish the power cable install. I'll have to make another trip tomorrow morning. :oops: :roll: I also need to get a short co-ax extention, or relocate the UHF to the passenger side, I'll see what I can get first. Not sure how much time I'll have to get much done, but I will have a good go at it. I'll post up pics tomorrow, I let it get too dark and the camera blurs in the dark, for some reason.

Cheers.
User avatar
AussieRod
Posts: 2818
Joined: Sun Sep 05, 2010 1:43 am
Bronco Info: 81 Bronco XLT, 250 alloy head crossflow 6, NP435/NP208, 4:10 gears, 31-10.5R15 M/Ts.
Location: Downunder

Re: Rod's 84 BabyBajaF100

Post by AussieRod »

Thursday 4 October:
Made another trip to the parts store today and got the stuff I forgot yesterday, plus a couple of extras. I spent the arvo just doing the electrical I hadn't finished or started and some other small things, too.
Made a small aluminium bracket to hold the gasoline lock-off and re-routed the hoses a little. Now I don't need the ground wire to it and it doesn't flop around:
P1010179.JPG
P1010179.JPG (83.89 KiB) Viewed 2177 times
P1010181.JPG
P1010181.JPG (77.6 KiB) Viewed 2177 times
Trimmed a 7/16" UNC bolt and fitted the Mk1 coil bracket I'd made, drilled it for a 5/16" UNC bolt and mounted the coil like it was previously. I also re-did the plugs and wiring to neaten things up:
P1010180.JPG
P1010180.JPG (87.55 KiB) Viewed 2177 times
Re-positioned the fan wiring, the clips are $2 each, so zip ties will do for now:
P1010182.JPG
P1010182.JPG (82.95 KiB) Viewed 2177 times
Finished off the power connector in the ashtray area and now I can listen to a CD whilst working:
P1010183.JPG
P1010183.JPG (87.21 KiB) Viewed 2177 times
That troublesome vent flap, after the repair:
P1010184.JPG
P1010184.JPG (84.54 KiB) Viewed 2177 times
cont:
User avatar
AussieRod
Posts: 2818
Joined: Sun Sep 05, 2010 1:43 am
Bronco Info: 81 Bronco XLT, 250 alloy head crossflow 6, NP435/NP208, 4:10 gears, 31-10.5R15 M/Ts.
Location: Downunder

Re: Rod's 84 BabyBajaF100

Post by AussieRod »

The fan wiring isn't important, as I may still go back to the factory thermo-clutch fan and shroud, if it can't handle the summer.
The vent door open:
P1010185.JPG
P1010185.JPG (66.03 KiB) Viewed 2177 times
Found a male and female 2 pin Deutsch plug set, de-pinned them and installed the outers and locks onto the fuel pump connection. All good now:
P1010186.JPG
P1010186.JPG (83.18 KiB) Viewed 2177 times
Picked up an extra exhaust hanger, and a choke cable, to use for the lift ring on the Inpco CA300 mixer. That allows me to run gasoline without the restriction of the gas mixer venturi blocking airflow:
P1010187.JPG
P1010187.JPG (72.54 KiB) Viewed 2177 times
I also grabbed some longer carb studs, as the lock-off bracket and Lokar bracket didn't leave me with too many threads on the old ones. These replaced the RHF and LHR studes and gave me plenty of thread to make sure they didn't come loose and lose the nut, etc.:
P1010188.JPG
P1010188.JPG (77.73 KiB) Viewed 2177 times
P1010189.JPG
P1010189.JPG (73.06 KiB) Viewed 2177 times
I put in a couple of shelves and did a clean-up of my bench before putting the truck away. Now, at least, I can actually work here:
P1010177.JPG
P1010177.JPG (75.05 KiB) Viewed 2177 times
Well, now that the truck is safely parked away, that's all for this episode. I'll be back in 12 days and start again. Gotta cook my dinner and start getting ready for an early start tomorrow.
Catch y'all later :D
User avatar
yikes
Founder
Posts: 4138
Joined: Sun Dec 06, 2009 7:51 am
Bronco Info: 1996 with tires and stuff
Location: Yucaipa, CA

Re: Rod's 84 BabyBajaF100

Post by yikes »

I see reloading stuff...
User avatar
AussieRod
Posts: 2818
Joined: Sun Sep 05, 2010 1:43 am
Bronco Info: 81 Bronco XLT, 250 alloy head crossflow 6, NP435/NP208, 4:10 gears, 31-10.5R15 M/Ts.
Location: Downunder

Re: Rod's 84 BabyBajaF100

Post by AussieRod »

yikes wrote:I see reloading stuff...
Yep. That's also my reloading bench. The Lyman press is out of shot to the right, mounted on the same plate, next to the Simplex press. I recently invested in the Hornady auto charge kit, so I can speed up my reloading. It gets tiring measuring each charge on the scales. There is a lot of other stuff hidden away, until I set up the bungalow for my man cave and reloading centre. ;)
Post Reply