The Beast
-
Hauls Assington

- Posts: 295
- Joined: Wed Oct 23, 2013 5:44 pm
- Bronco Info: Under Construction
- Location: Las Cruces , NM
Re: The Beast
Thanks RMC, that is very helpful!
-
Hauls Assington
- Posts: 295
- Joined: Wed Oct 23, 2013 5:44 pm
- Bronco Info: Under Construction
- Location: Las Cruces , NM
-
Hauls Assington
- Posts: 295
- Joined: Wed Oct 23, 2013 5:44 pm
- Bronco Info: Under Construction
- Location: Las Cruces , NM
Re: The Beast
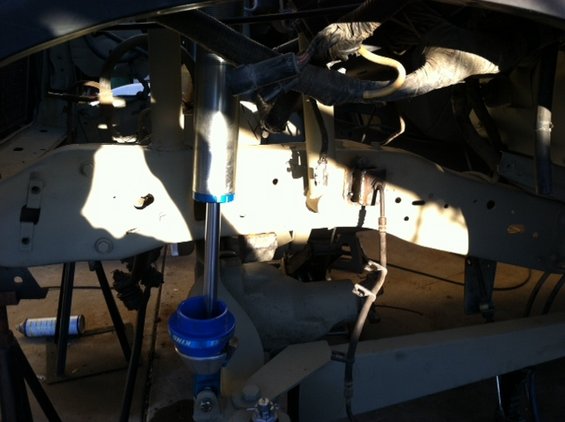
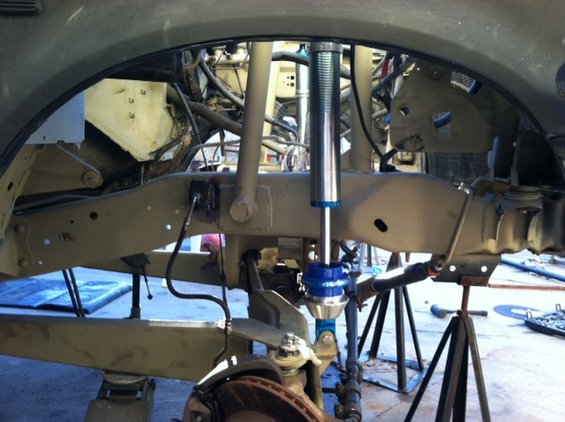
I got the front brakes done, lines are run, brackets welded, new pads installed. Front upper shock mounts are done, after I install the motor, I am going to run a cross bar. Then I guess I will have an engine cage. Limit straps are installed, I found out that I can get about 12" of travel with 4x4, and 15.5 in two wheel drive, so I made two places for the limit strap to mount. It has race mode, and rock crawler mode, lol.
I put a tire on, and realized how bad the current alignment settings are. The top of the tire is sticking out, while the bottom is in.
I need to get learned up on alignment.
I put a tire on, and realized how bad the current alignment settings are. The top of the tire is sticking out, while the bottom is in.
I need to get learned up on alignment.
-
Hauls Assington
- Posts: 295
- Joined: Wed Oct 23, 2013 5:44 pm
- Bronco Info: Under Construction
- Location: Las Cruces , NM
Re: The Beast
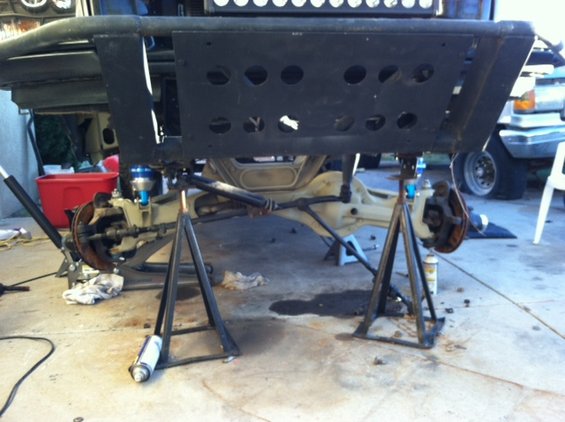
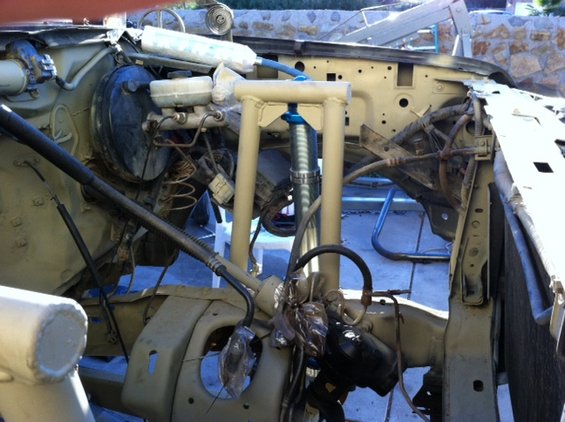
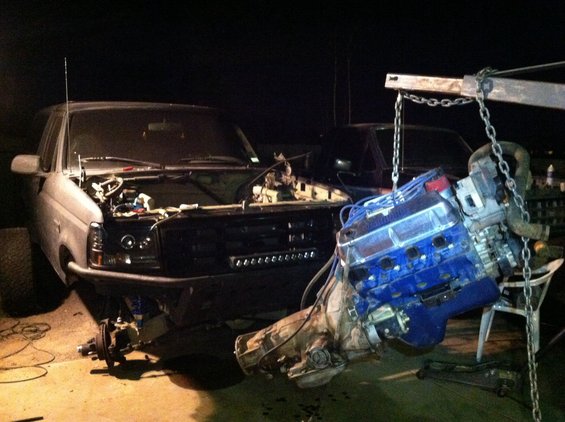
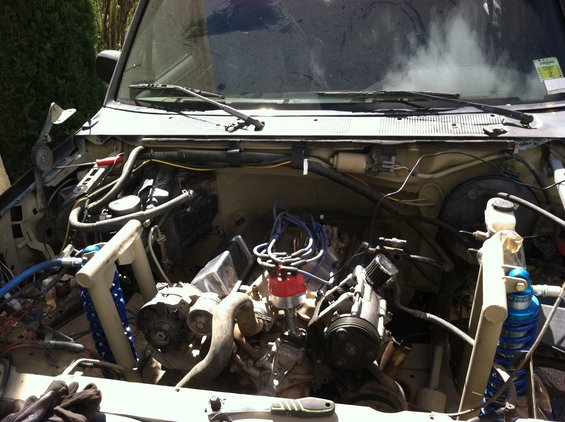
I got the front suspension done crossmember is done motor in. Radiator, alternator, ps pump, ac comp installed. Pics to come.
-
Rmc
- El Jefe
- Posts: 6026
- Joined: Tue Oct 09, 2012 10:22 pm
- Bronco Info: 94 bronco xlt prerunner
- Location: IE SoCal
- Contact:
Re: The Beast
Are you going to add more support to that shock mount?
-
dtbback
- Posts: 1677
- Joined: Mon Mar 03, 2014 8:45 am
- Bronco Info: 1996 EB 351W!! First Bronco!! Plan: Prerunner/ Trail Rig/ SHTF All around Rig
Re: The Beast
Rmc wrote:If you drew a line from from the beam eye ( frame end pivot) to the radius arm eye ( hiem at the frame side radius arm end) and took that line and devided it by 2, and marked it ( if you used string or whatever) then took the beam to full bottom out (full up travel position) then fully compressed the shock. At this point you could set both the full tuck position and then set the shock perpendicular ( 90 degrees) to all planes involved. The reason for the marked string is 90 to this string location would define the correct upper shock eye location. full bump and bolted up it should be 90 degrees to the beam in 4 directions. This adds no additional ratio for spring rate and mechanical resistance. The ratio effect would come into play as you move the bottom shock eye in as tight to the frame as possible at full tuck length wise down the beam toward the wheel or toward the frame. So ideal is 90 to everything but it's not always possible to do this cause of brake booster, ac blower box, battery ect. It's kinda hard to explain in words but that's the reason you see some guys shocks pointed back and in at the top on some long travel beam set ups. The beam was at full tuck and the shock set to 90 before the upper shock mount was placed.
In theory that marked spot on the string represents the centerline of the plane rotation of the combined suspension arm. See the arms and tires are more or less rotating at 45 degrees to the beam end. Eyeball page 11 on of the swingsets steering thread, my sketches will show centerline and stuff like that.
RMC, What are the 4th plane you're referring to? I get 90 to the beam eye, the radius arm eye, and the midpoint between the two but still can't figure out the 4th.
-
Rmc
- El Jefe
- Posts: 6026
- Joined: Tue Oct 09, 2012 10:22 pm
- Bronco Info: 94 bronco xlt prerunner
- Location: IE SoCal
- Contact:
Re: The Beast
I think how I wrote that might not make too much sense but what I was trying to describe was a line lengthwise down the radius arm, a line lengthwise down the beam ( those 2 intersect at the knuckle) and a third line that intersects the other 2 also at the knuckle that originates at the halfway point between the 2 pivots ( beam and radius arm pivots) so that's 3 imaginary lines that intersect at a single point ( the knuckle) the last line would go vertically at 90 degrees to the other 3. It's actually a single plane with a verticle line through it perpendicular. this line would represent ideal unratioed shock position. Now placement in and out ( closer to the frame or farther away still at 90 though to the previously described plane) is the key. This plane will rotate upon it's axis ( shared centerline) to the full droop position. Shock placement being key means the shock body and or coils need to not contact the frame through the plane rotation. Perpendicular at tuck and perpendicular at droop with the upper difference devided by 2 is how most do it, I just set 90 at tuck and as long as it clears I'm cool with it.
Anyway it's 3 lines intersecting at the knuckle with a perpendicular line intersecting it at 90 it's only 2 theoreticle planes. Sorry for the confusion.
Anyway it's 3 lines intersecting at the knuckle with a perpendicular line intersecting it at 90 it's only 2 theoreticle planes. Sorry for the confusion.
-
dtbback
- Posts: 1677
- Joined: Mon Mar 03, 2014 8:45 am
- Bronco Info: 1996 EB 351W!! First Bronco!! Plan: Prerunner/ Trail Rig/ SHTF All around Rig
Re: The Beast
RMC,
Thanks for the explanation. That definitely made the description for ideal shock positioning clearer for me. Thanks again!
Thanks for the explanation. That definitely made the description for ideal shock positioning clearer for me. Thanks again!
-
Hauls Assington
- Posts: 295
- Joined: Wed Oct 23, 2013 5:44 pm
- Bronco Info: Under Construction
- Location: Las Cruces , NM
Re: The Beast
quote="Rmc"]Are you going to add more support to that shock mount?[/quote]
Yes, I am going to do a full engine cage tied into the cab cage, i wanted to get the motor in and happy first so that I dont weld myself into a corner lol.
Yes, I am going to do a full engine cage tied into the cab cage, i wanted to get the motor in and happy first so that I dont weld myself into a corner lol.
-
Hauls Assington
- Posts: 295
- Joined: Wed Oct 23, 2013 5:44 pm
- Bronco Info: Under Construction
- Location: Las Cruces , NM
Re: The Beast
I had to paint everything because it keeps raining and I hate rust.
-
Rmc
- El Jefe
- Posts: 6026
- Joined: Tue Oct 09, 2012 10:22 pm
- Bronco Info: 94 bronco xlt prerunner
- Location: IE SoCal
- Contact:
Re: The Beast
You are a hard worker my friend. I'm very curious to see your progress pics.
-
Hauls Assington
- Posts: 295
- Joined: Wed Oct 23, 2013 5:44 pm
- Bronco Info: Under Construction
- Location: Las Cruces , NM
Re: The Beast
I Really, REALLY want to haul some ass in this thing, so I have been putting in some hours on it! Tonight I got the fuel pump off the donor truck, and looked at where to mount it, but decided I need to do the rear suspension first.
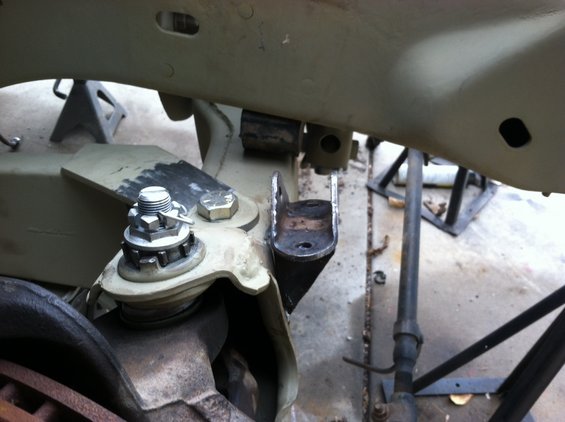
Rmc, I have a question for you, on the upper ball joint where the alignment adjuster thing is, I feel like I have them pretty close to where they need to be, but they don't want to push down all the way. I have the nuts on pretty tight, should I ease it around the block to get those to settle in, or am I doing something wrong? They seem to go in fine when they are not in the right position.
Rmc, I have a question for you, on the upper ball joint where the alignment adjuster thing is, I feel like I have them pretty close to where they need to be, but they don't want to push down all the way. I have the nuts on pretty tight, should I ease it around the block to get those to settle in, or am I doing something wrong? They seem to go in fine when they are not in the right position.
-
Rmc
- El Jefe
- Posts: 6026
- Joined: Tue Oct 09, 2012 10:22 pm
- Bronco Info: 94 bronco xlt prerunner
- Location: IE SoCal
- Contact:
Re: The Beast
Did you get a drift and try to tap them down? Are you fighting the knuckle via rusted in place ball joints or tie rod? Check for burrs on the outside of the sleeve. They should slide in pretty easily.
-
Hauls Assington
- Posts: 295
- Joined: Wed Oct 23, 2013 5:44 pm
- Bronco Info: Under Construction
- Location: Las Cruces , NM
Re: The Beast
Yeah, they go in smooth and easy in every position, except the one I think it needs to be in.
While I had the knuckles off, I got new ball joints pressed in, I woneder if maybe they could have pressed the top ones in too far? It seems like the angle the upper balljoints is a little extreme. I hope that is not the case, because that will be a PITA to have to go through all that again.
I will take some pics.
Does anyone have any advice for notching a piece of tubing to be a rear end truss? I have ruined a lot of pipe so far. My china junk notcher won't do an angle that severe, so I tried with a plasma cutter, a grinder, and cut off grinder, and keep failing. Is there an easy way to measure or mark the pipe so you can know what you need to cut?
-
Hauls Assington
- Posts: 295
- Joined: Wed Oct 23, 2013 5:44 pm
- Bronco Info: Under Construction
- Location: Las Cruces , NM
Re: The Beast
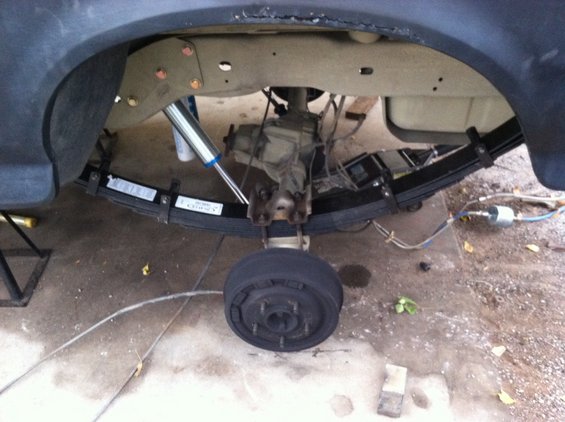
Got the leaf springs off. It was easy on one side, nothing was tooo frozen. However the drivers side was a pita. I was trying to hammer the bolt out of the front, and smashed the b-jesus out of my thumb with the mini sledge. I was two handing it, and missed and got my thumb between the hammer handle and the edge of the leaf. So we started out on the wrong foot. Turns out the bolt was frozen to the bushing inside the rubber, so it would give instead of getting hammered out.
I ended up sawzalling the bolt in two places.
The factory shock mounts didn't want to come off, but they couldnt handle the "come along", and rivet drilling I dealt them.
Threat shock mount bolted right up. I shot some paint on everything, and I am about to install the shocks and springs.
I ended up sawzalling the bolt in two places.
The factory shock mounts didn't want to come off, but they couldnt handle the "come along", and rivet drilling I dealt them.
Threat shock mount bolted right up. I shot some paint on everything, and I am about to install the shocks and springs.
-
Hauls Assington
- Posts: 295
- Joined: Wed Oct 23, 2013 5:44 pm
- Bronco Info: Under Construction
- Location: Las Cruces , NM

-
Rmc
- El Jefe
- Posts: 6026
- Joined: Tue Oct 09, 2012 10:22 pm
- Bronco Info: 94 bronco xlt prerunner
- Location: IE SoCal
- Contact:
Re: The Beast
Get ready for a night and day difference over a stock bronco ride. Can't wait for testing.
-
Hauls Assington
- Posts: 295
- Joined: Wed Oct 23, 2013 5:44 pm
- Bronco Info: Under Construction
- Location: Las Cruces , NM
Re: The Beast
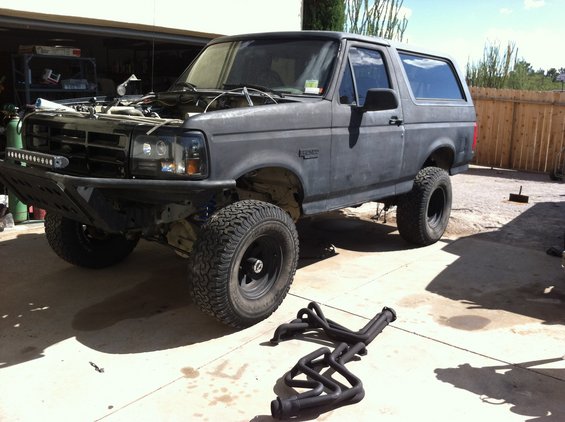
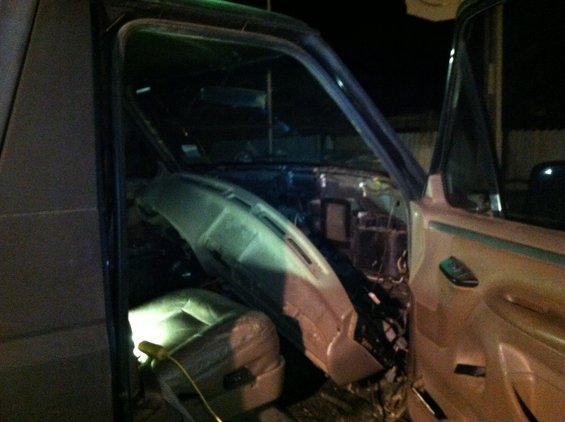
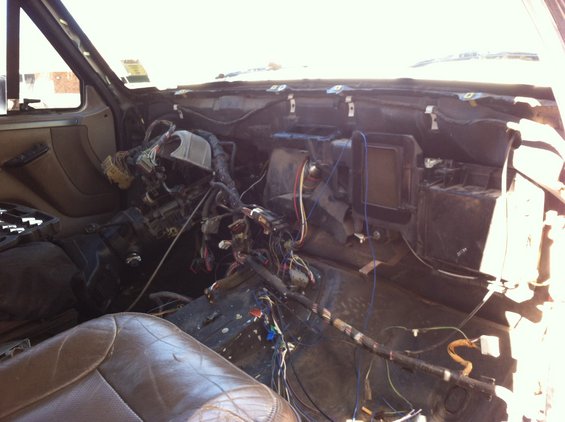
We are getting close, I'm working on the interior, it's time for a cage, dash and seats.
Things I have left
-carb install
-drivelines
-rear brake lines
-gauges
-interior
-wiring (kicking my a$$)
-cage (lol this should be a snap)
-seats
-paint
-alignment
I am going to have to go back in and clearance the passenger side axle joint. It is limiting my front travel to 11.5", when I can get over 16" in 2wd.
I
-
Hauls Assington
- Posts: 295
- Joined: Wed Oct 23, 2013 5:44 pm
- Bronco Info: Under Construction
- Location: Las Cruces , NM
-
Smith racing
- Posts: 140
- Joined: Sun Apr 14, 2013 8:49 am
- Bronco Info: 1978 bronco class 3 and 8 smith racing was inspired from Moss Brothers
Re: The Beast
Its looking good, you were right the dash looks like a pain in the butt, and keep up the good work so next time we come down to El Paso you can race it or just come out and screw around or if you can make it to the next TDRA race in a couple months.