HTO'S BRONCO BUILD
-
hobbyturnedobsession

- Posts: 4619
- Joined: Tue Apr 27, 2010 8:34 am
- Bronco Info: 96 c/o w/ 5.0
- Location: High Desert CA
Re: HTO'S BRONCO BUILD
Thank you Philo!!! I'll definately find it. I wasn't sure what color it was. Do you think that possibly the calipers need to be rebuilt? I notice with the tire in the air the brake seems to hang a little more than I like. I've rebled them twice and I noticed before that when I was driving up the street they seemed to be up against the rotors a bit.
I'm just here for the views. It helps me feel wanted.
-
johncharlesb
- Posts: 510
- Joined: Fri Mar 12, 2010 7:59 pm
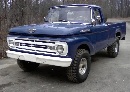
- Bronco Info: 1962 f100, 1995 Bronco
Re: HTO'S BRONCO BUILD
Depneding on the amp load of the fan (most fans suck some juice) you may be better off setting up a relay off the switched power source from the ignition. I would put in a temp switch too, if you were not already planning on it, to keep the fan from running all the time, but I don't live in sunny California either.
Is it squeaking while you are moving only, or at rest too? I would look at in order: tie rod end dry, balljoint dry, caliper loose, and then all the little crap on the axle and body at that corner. If the caliper is loose on its mount, bleeding will have no effect on it. 'See if the caliper is moving about and check the mounting bolts for tightness You should look at it after it has been sitting for a couple hours so there is no residual pressure in the brake system or even better would be to remove the pads and remount the caliper without them and inspect.. The caliper should be able to move freely, but not be loose. You can grease or oil the balljoints and tie rods to see if they quit making noise to help locate the squeak.
Everything is looking good HTO, keep up the good work.
-
hobbyturnedobsession
- Posts: 4619
- Joined: Tue Apr 27, 2010 8:34 am
- Bronco Info: 96 c/o w/ 5.0
- Location: High Desert CA
Re: HTO'S BRONCO BUILD
Thank you John! It came with a temp switch which I will say is a huge relief. I'll definately start with the greasing and double checking everything. Then go from there. As for running the fan off the relay box, how can I do that?
I'm just here for the views. It helps me feel wanted.
-
johncharlesb
- Posts: 510
- Joined: Fri Mar 12, 2010 7:59 pm
- Bronco Info: 1962 f100, 1995 Bronco
Re: HTO'S BRONCO BUILD
The relay is a high amperage switch that is powered by a low amp circuit. This will allow you to keep all the big wires in the engine bay and use a small wire with little load (from your ignition circuit) to power the relay. This does a couple of things. One, it keeps you from having to run a 30A circuit through the cockpit. Two, you can protect the switch sourced of power from high loads and damage (your ignition switch again).
You will take power from the battery or starter solenoid and bring it out to the main power input to the engine bay mounted relay. This wire should have a fuse or breaker in it. The main output of the relay will then go to the fan. The relay will need a small power input to activate it (i.e. from your ignition) and a ground. When you energize the relay it will activate an internal switch to handle the high load of your fan (or lights, stereo, etc.), when you de-energize the relay (turn off your ignition) its internal switch will open and your fan will turn off.
The relay has three inputs and one output. 1, the main power in. 2, the ground. 3, the small power to tell the relay when to activate. Finally, the relay output to whatever you are trying to power.
The thermostat and a manual overide switch should be in the small power line between your ignition circuit and the relay. If you power both of these from the same source, that is it. If you take the power for your overide switch from someplace different than your thermostat, it will need a diode so you don't backpower stuff.
30A relays from radio shack are 6 bucks. Summit has generic ones for 6 bucks too. There are also kits to do this.
http://www.summitracing.com/parts/PRF-30101/
http://www.summitracing.com/parts/DER-16763/
If this is too confusing just say so and I will draw you a little diagram and it will be clear.
-
hobbyturnedobsession
- Posts: 4619
- Joined: Tue Apr 27, 2010 8:34 am
- Bronco Info: 96 c/o w/ 5.0
- Location: High Desert CA
Re: HTO'S BRONCO BUILD
Can you? I'm sorry I'm kind of simple minded... I've never understood relays diodes and such. I've always tried to just make it work. I want to do it right this time.
I'm just here for the views. It helps me feel wanted.
-
RyanDS650X
- Posts: 1868
- Joined: Sun Dec 13, 2009 11:13 am
- Bronco Info: Autofab '96 XLT 5.8
- Location: Mesa, AZ
- Contact:
Re: HTO'S BRONCO BUILD
http://www.offroaders.com/info/tech-cor ... wiring.htm
This is a pretty good write up and should get you in the right direction. It does help to have someone help you that knows what they are doing for your first time though. Do you have any HVAC or electrician buddies?? They would be able to help.
This is a pretty good write up and should get you in the right direction. It does help to have someone help you that knows what they are doing for your first time though. Do you have any HVAC or electrician buddies?? They would be able to help.
'96 XLT 5.8l lil edelbrock, lil Autofab, LOTTA fun.
"I wouldnt even call adding beer as part of a prep...its like putting tires on the vehicle, you just do it."
-shockseals.com
"I wouldnt even call adding beer as part of a prep...its like putting tires on the vehicle, you just do it."
-shockseals.com
-
hobbyturnedobsession
- Posts: 4619
- Joined: Tue Apr 27, 2010 8:34 am
- Bronco Info: 96 c/o w/ 5.0
- Location: High Desert CA
Re: HTO'S BRONCO BUILD
Yeah plus I've done alot of wiring just want to see really how its done. I get what hes talking with the relay which seems, to me, the way to go.
I'm just here for the views. It helps me feel wanted.
-
RyanDS650X
- Posts: 1868
- Joined: Sun Dec 13, 2009 11:13 am
- Bronco Info: Autofab '96 XLT 5.8
- Location: Mesa, AZ
- Contact:
Re: HTO'S BRONCO BUILD
Relays are always the way to go when dealing with a load that draws high amps, the last thing you want is a fire!
'96 XLT 5.8l lil edelbrock, lil Autofab, LOTTA fun.
"I wouldnt even call adding beer as part of a prep...its like putting tires on the vehicle, you just do it."
-shockseals.com
"I wouldnt even call adding beer as part of a prep...its like putting tires on the vehicle, you just do it."
-shockseals.com
-
hobbyturnedobsession
- Posts: 4619
- Joined: Tue Apr 27, 2010 8:34 am
- Bronco Info: 96 c/o w/ 5.0
- Location: High Desert CA
Re: HTO'S BRONCO BUILD
No joke. I've done the relays before. Where do most tap into their key on wire?
I'm just here for the views. It helps me feel wanted.
-
johncharlesb
- Posts: 510
- Joined: Fri Mar 12, 2010 7:59 pm
- Bronco Info: 1962 f100, 1995 Bronco
Re: HTO'S BRONCO BUILD

There you are, Sir.
A bigger or multiple fans may require a 40A circuit. Fans load spike when they startup.
If you put the toggle on a separate circuit a diode will be needed just past the thermal switch. The diode will need to be pointed in the direction of desired current flow.
-
hobbyturnedobsession
- Posts: 4619
- Joined: Tue Apr 27, 2010 8:34 am
- Bronco Info: 96 c/o w/ 5.0
- Location: High Desert CA
Re: HTO'S BRONCO BUILD
Thank you John! Thats awesome, I'll make sure to have this open this weekend when I tackle the fan!
I'm just here for the views. It helps me feel wanted.
-
ChaseTruck754

- Spy/Ninja
- Posts: 9194
- Joined: Thu Jan 28, 2010 9:46 am
- Bronco Info: Don't have one - just old Ford trucks
- Location: Huntington Beach, CA
Re: HTO'S BRONCO BUILD
Read:
1st one is semi long but had good info with pics & diagrams
http://www.ford-trucks.com/forums/10263 ... ation.html
http://www.fordmuscle.com/archives/2003 ... /index.php
http://www.ford-trucks.com/forums/81875 ... fan-4.html
1st one is semi long but had good info with pics & diagrams
http://www.ford-trucks.com/forums/10263 ... ation.html
http://www.fordmuscle.com/archives/2003 ... /index.php
http://www.ford-trucks.com/forums/81875 ... fan-4.html
Owner of only dead and forgotten projects
-
hobbyturnedobsession
- Posts: 4619
- Joined: Tue Apr 27, 2010 8:34 am
- Bronco Info: 96 c/o w/ 5.0
- Location: High Desert CA
Re: HTO'S BRONCO BUILD
Thank you Steve! I'll read up.
I'm just here for the views. It helps me feel wanted.
-
hobbyturnedobsession
- Posts: 4619
- Joined: Tue Apr 27, 2010 8:34 am
- Bronco Info: 96 c/o w/ 5.0
- Location: High Desert CA
Re: HTO'S BRONCO BUILD
Some stuff I've been working on.
- Attachments
-
- just had her washed.
- bronco clean.jpg (49.07 KiB) Viewed 3110 times
-
- Not the bronco but I built it myself!! New addition
- work bench.jpg (241.75 KiB) Viewed 3110 times
I'm just here for the views. It helps me feel wanted.
-
hobbyturnedobsession
- Posts: 4619
- Joined: Tue Apr 27, 2010 8:34 am
- Bronco Info: 96 c/o w/ 5.0
- Location: High Desert CA
Re: HTO'S BRONCO BUILD
So I picked up an alternator from craigslist, a reworked motorcraft pulling 140 amps. Had it tested and the guy said its working awesome! 40 bucks, so I'm hoping this should help me out. I had problems with the hids the stereo and the heater on at the same time. It was drawing alot of amps. Plus when I pulled the old alternator someone had used butt connectors to run a cheesy alternator. Some plugs that didn't seem to be the right one. Now I'm fixing that. One less thing off the list! It has an internal fan so I was concerned about the way it mounted but took a boat load of measurements and found it will sit right where the old one did where the belt rides so I should be good. This one has the fan on the inside. The inside looks brand new.
I'm just here for the views. It helps me feel wanted.
-
hobbyturnedobsession
- Posts: 4619
- Joined: Tue Apr 27, 2010 8:34 am
- Bronco Info: 96 c/o w/ 5.0
- Location: High Desert CA
Re: HTO'S BRONCO BUILD
Update again. I put the alternator in and it lines up perfect! Pulled out the crap wiring and ran 2 10g wire to a 150a fuse that can be reset, then 2 10g wiring to the relay. Wow what a difference! With the truck warm the headlights on the stereo on and the a/c on it doesn't move off the m/a on normal. I'm very happy with the outcome. Pics soon!
I'm just here for the views. It helps me feel wanted.
-
hobbyturnedobsession
- Posts: 4619
- Joined: Tue Apr 27, 2010 8:34 am
- Bronco Info: 96 c/o w/ 5.0
- Location: High Desert CA
Re: HTO'S BRONCO BUILD
Well of course in two weeks I'm going to pismo. ( almost 2 months late) The bronco is going to the shop to get the new trans installed (thank you Tony) the rear end sealed a new fuel inlet hose and some others before the trip. Will have pics when it is finished.
I'm just here for the views. It helps me feel wanted.
-
philofab
- Basura Blanca
- Posts: 5643
- Joined: Tue Dec 08, 2009 9:37 am
- Bronco Info: A pile of crap.
- Location: Bullhead, AZ
- Contact:
Re: HTO'S BRONCO BUILD
Who not wait for the official Pismo huckfest?hobbyturnedobsession wrote:Well of course in two weeks I'm going to pismo. ( almost 2 months late) The bronco is going to the shop to get the new trans installed (thank you Tony) the rear end sealed a new fuel inlet hose and some others before the trip. Will have pics when it is finished.
Follow me on Instagram. @philofab1 or Youtube https://www.youtube.com/philofab/
-
hobbyturnedobsession
- Posts: 4619
- Joined: Tue Apr 27, 2010 8:34 am
- Bronco Info: 96 c/o w/ 5.0
- Location: High Desert CA
Re: HTO'S BRONCO BUILD
Because its a family trip and with the way work is and the family schedule it was the only time we had. I wish. I'll see if I can make it out to the huckfest. It'd be nice.
I'm just here for the views. It helps me feel wanted.
-
DukeSky
- Posts: 20
- Joined: Wed Apr 13, 2011 9:16 am
- Bronco Info: 92 4" Rancho, Procomp coils, Sagswa pump, 3G alt, 95 E4OD Built w/computer, locked
- Location: Georgia
- Contact:
Re: HTO'S BRONCO BUILD
Hey HTO do you want to sell them other coil buckets you took off to go C/O? I am very interested.
Thanks
Thanks