krustythebronco a series of facepalms lol

User avatar
Andy Jones
Posts: 2205
Joined: Tue Dec 08, 2009 2:47 pm
Bronco Info: In the Works!
Location: Canyon Lake,ca
Contact:

krustythebronco a series of facepalms lol

Post by Andy Jones »

Tchajagos wrote:I wouldn’t set the pinion angle with just the mono leafs. I’d throw the packs back together and jack it up to ride height. The pinion should be inline with the driveshaft at ride height. If you have the e4od your driveshaft will bind before you droop all the way out with 12s under the bed and Deavers.


Do you mean your shocks are too short at full bump or full droop? Because the mono leafs will droop far more than the full pack will.
Liked!! Lol


Sent from my iPhone using Tapatalk
Deslboy
Posts: 50
Joined: Sat May 02, 2015 2:14 pm
Bronco Info: 1993 XLT 351. Currently being built. Solo c&t beams, solo radius arms, solo shock hoops

Re: krustythebronco a series of facepalms lol

Post by Deslboy »

here is what you need to do to get the pinion angle correct:
Put the leaf pack together completely and bolt it up to the spring perches with the u bolts.
jack up the reared by the axle till you get it to ride height.
you want the pinion to be 2degrees down on the rear yoke of the 3rd member in relation to the driveshaft angle. the reason for this is because under acceleration, the reared will rotate up a few degrees so while driving it will be perfectly in line with the driveshaft.
the pinion angle hardly moves from ride height to full droop.
the problem is from ride height to full compression the pinion angle gets crazy, exactly like your pic. as long as you can spin the driveshaft freely at full compression it will be ok.
i pushed my reared back 2" when i built my rear suspension. I simply re drilled another hole in the spring perches and u bolt plates. any further and your 3rd member will hit the crossmember in front of the gas tank. I had to clearance the crossmember so my fill plug wouldn't hit (i have a 9" in mine).
I had a new driveshaft built that is 3" longer. only 5/8" driveshaft plunge from full compression to full droop.
im also running the huge GIANT MOTORSPORTS link killer spring under kit.
User avatar
Andy Jones
Posts: 2205
Joined: Tue Dec 08, 2009 2:47 pm
Bronco Info: In the Works!
Location: Canyon Lake,ca
Contact:

krustythebronco a series of facepalms lol

Post by Andy Jones »

Deslboy wrote:here is what you need to do to get the pinion angle correct:
Put the leaf pack together completely and bolt it up to the spring perches with the u bolts.
jack up the reared by the axle till you get it to ride height.
you want the pinion to be 2degrees down on the rear yoke of the 3rd member in relation to the driveshaft angle. the reason for this is because under acceleration, the reared will rotate up a few degrees so while driving it will be perfectly in line with the driveshaft.
the pinion angle hardly moves from ride height to full droop.
the problem is from ride height to full compression the pinion angle gets crazy, exactly like your pic. as long as you can spin the driveshaft freely at full compression it will be ok.
i pushed my reared back 2" when i built my rear suspension. I simply re drilled another hole in the spring perches and u bolt plates. any further and your 3rd member will hit the crossmember in front of the gas tank. I had to clearance the crossmember so my fill plug wouldn't hit (i have a 9" in mine).
I had a new driveshaft built that is 3" longer. only 5/8" driveshaft plunge from full compression to full droop.
im also running the huge GIANT MOTORSPORTS link killer spring under kit.
I’m assuming that you’re not running a cardin joint anymore ? I’m not picking up on why you would rotate the pinion angle at 2° I’m running the spring under kit as well. Kept the pinion and driveline on the same plane. Works perfect with no binding whatsoever.


Sent from my iPhone using Tapatalk
Hillbilly Heaven
Posts: 45
Joined: Tue May 24, 2016 12:30 pm
Bronco Info: 1979 Bronco 545 swap 6R80 D60 front and 10.5 rear. Use for expedition camping go fast when at home

Re: krustythebronco a series of facepalms lol

Post by Hillbilly Heaven »

I think he means 2 degrees down from transfer case output angle. With cardan joint it should point directly at the transfer case output, when at ride height with full spring pack.
User avatar
Andy Jones
Posts: 2205
Joined: Tue Dec 08, 2009 2:47 pm
Bronco Info: In the Works!
Location: Canyon Lake,ca
Contact:

krustythebronco a series of facepalms lol

Post by Andy Jones »

Hillbilly Heaven wrote:I think he means 2 degrees down from transfer case output angle. With cardan joint it should point directly at the transfer case output, when at ride height with full spring pack.
Gotcha! My pinion, housing face, and driveline. are all on the same plane up to the cardan.


Sent from my iPhone using Tapatalk
User avatar
Tchajagos
Posts: 2124
Joined: Sat Dec 17, 2011 11:07 am
Bronco Info: 1993 xlt stock on 33' BFGs
Location: Murrieta

krustythebronco a series of facepalms lol

Post by Tchajagos »

Hillbilly Heaven wrote:I think he means 2 degrees down from transfer case output angle. With cardan joint it should point directly at the transfer case output, when at ride height with full spring pack.
2° down at the pinion. His theory is that when you are driving and put a load on the driveshaft the axle wrap will turn the axle up that last 2° to put it inline with the driveshaft. In reality it depends on your spring setup. Over the axle springs with a lot of axle wrap see a ton of pinion change depending on how much throttle you are giving it.
Hillbilly Heaven
Posts: 45
Joined: Tue May 24, 2016 12:30 pm
Bronco Info: 1979 Bronco 545 swap 6R80 D60 front and 10.5 rear. Use for expedition camping go fast when at home

Re: krustythebronco a series of facepalms lol

Post by Hillbilly Heaven »

With a good anti-wrap bar set up you don't need to worry about it.
User avatar
ChaseTruck754
Spy/Ninja
Posts: 9194
Joined: Thu Jan 28, 2010 9:46 am
Bronco Info: Don't have one - just old Ford trucks
Location: Huntington Beach, CA

Re: krustythebronco a series of facepalms lol

Post by ChaseTruck754 »

The worry then becomes bind or limited articulation instead.
Owner of only dead and forgotten projects
Hillbilly Heaven
Posts: 45
Joined: Tue May 24, 2016 12:30 pm
Bronco Info: 1979 Bronco 545 swap 6R80 D60 front and 10.5 rear. Use for expedition camping go fast when at home

Re: krustythebronco a series of facepalms lol

Post by Hillbilly Heaven »

Use a wristed shackle to attach the bar to the crossmember and it will not bind.
Deslboy
Posts: 50
Joined: Sat May 02, 2015 2:14 pm
Bronco Info: 1993 XLT 351. Currently being built. Solo c&t beams, solo radius arms, solo shock hoops

Re: krustythebronco a series of facepalms lol

Post by Deslboy »

Andy Jones wrote:
Hillbilly Heaven wrote:I think he means 2 degrees down from transfer case output angle. With cardan joint it should point directly at the transfer case output, when at ride height with full spring pack.
Gotcha! My pinion, housing face, and driveline. are all on the same plane up to the cardan.


Sent from my iPhone using Tapatalk
I was referring to rotate the rear pinion down 2degrees from the driveshaft angle. when you accelerate or put any load on the reared it will rotate a few degrees up and end up inline with the driveshaft angle.
User avatar
ChaseTruck754
Spy/Ninja
Posts: 9194
Joined: Thu Jan 28, 2010 9:46 am
Bronco Info: Don't have one - just old Ford trucks
Location: Huntington Beach, CA

Re: krustythebronco a series of facepalms lol

Post by ChaseTruck754 »

Driveshaft angle is the same as t-case output angle. You're saying the same thing.

To play devil's advocate here, there is a theory about driveshaft balancing & sequencing that says you do NOT want everything in the same line, or if you do you most definitely have to have the u-joints not in the same alignment. There's a cool video or 2 on u-tube. That being said, Andy's method would be right in this case as the 2* or whatever the pinion rotates at acceleration takes the driveshaft to 2* out of direct alignment and will help things.

I've heard both schools of thought - not sure which I fully I believe, but I set my pinion up aligned/same angle with driveshaft output at t-case at ride height.
Owner of only dead and forgotten projects
User avatar
Tchajagos
Posts: 2124
Joined: Sat Dec 17, 2011 11:07 am
Bronco Info: 1993 xlt stock on 33' BFGs
Location: Murrieta

krustythebronco a series of facepalms lol

Post by Tchajagos »

ChaseTruck754 wrote:.
I set my pinion up aligned/same angle with driveshaft output at t-case at ride height.
That’s good for a normal driveshaft with 2 u joints but on a double cardan joint you want the pinion to be inline with the driveshaft. Reason is the u joints move in an oval at any angle other than straight. Having 2 u joints in phase at the same angle let’s them cancel out each other. A double cardan joint driveshaft has 3 u joints. 2 in the joint that are in phase and at the same angle that counter act each other and 1 that has to be as straight as possible or it will want to wobble around.
User avatar
Bftank
Posts: 76
Joined: Thu Sep 15, 2016 10:17 pm
Bronco Info: 1996 bronco 6 inch dick cepek front, deavers in the rear
Location: Rifle, Colorado
Contact:

Re: krustythebronco a series of facepalms lol

Post by Bftank »

sorry for the delay, personal life got in the way a little bit. back to normal now.

regarding the pinion angle. its in, its done. always going to be a compromise. looks perfect at ride height. i will move the axle back and get a longer driveshaft to help lessen the pinion angle movement. pics to follow.

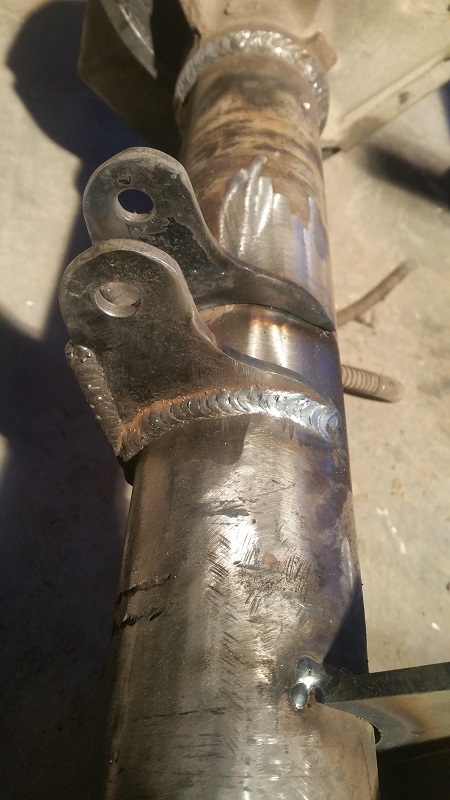
also worked on mounting the shocks. built some lower tabs, used ruffstuff upper tabs.

shocks are walker evans 14". had to change out the fitting on the reservoir hose from a straight fitting to a 90* fitting. I released the excess nitrogen pressure. which was different in each shock. Also there were different quantities of oil in them which I thought was weird. I'm going to see if I can get the specs from walker for oil quantity and depth of the reservoir piston before I add any nitrogen. I've never gone through a set of these before so this will be a learning experience for me.

on to the pics. finished up the shackles with the inner plate.
20190318_093350.jpg
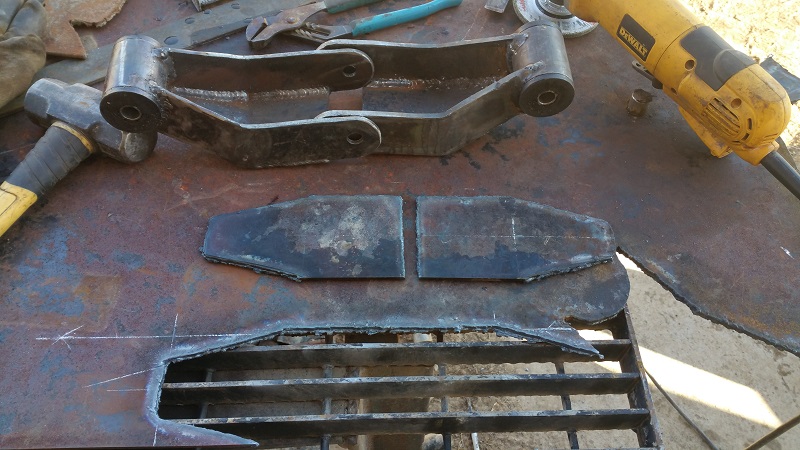
20190318_093350.jpg (159.5 KiB) Viewed 1345 times
20190318_103619.jpg
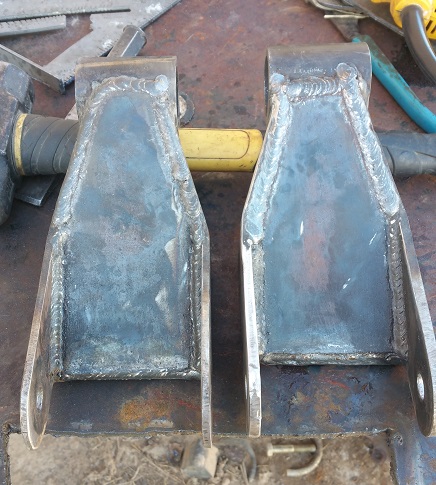
20190318_103619.jpg (105.38 KiB) Viewed 1345 times
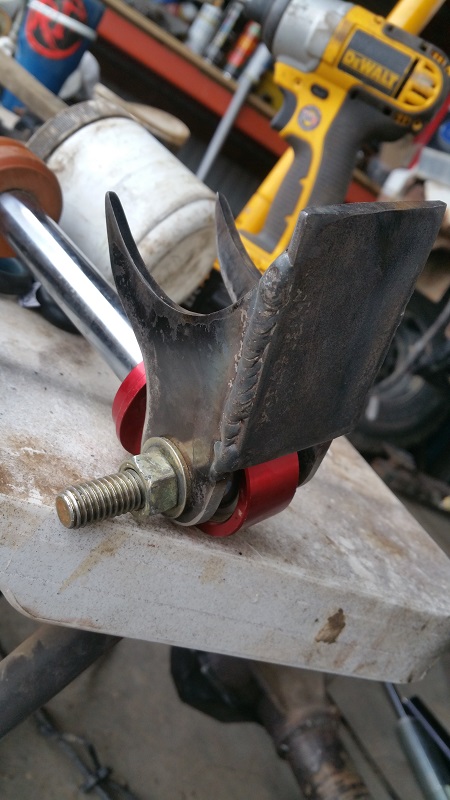
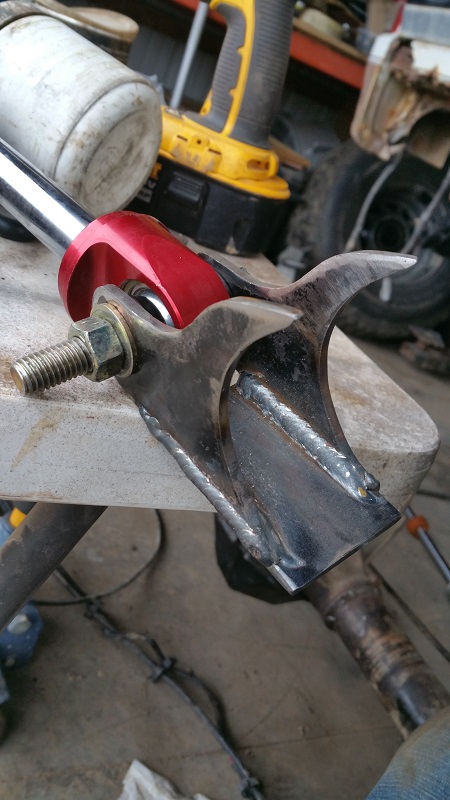
then I worked on the lower shock mounts
20190309_172729.jpg
20190309_172729.jpg (123.4 KiB) Viewed 1345 times
20190309_172620.jpg
20190309_172620.jpg (124.18 KiB) Viewed 1345 times
20190311_192546.jpg
20190311_192546.jpg (120.56 KiB) Viewed 1345 times
20190311_192528.jpg
20190311_192528.jpg (126.41 KiB) Viewed 1345 times
with the lower shock tabs I ended up grinding a lot more clearance into them so that nothing rubbed at full droop or under articulation. Hopefully they hold up. If not, I'll learn from it and make better ones.
@outdoorexplorationgear on Instagram, focused on Krustythebronco, building a towrig, creating a prerunner/rockcrawler business.
User avatar
Bftank
Posts: 76
Joined: Thu Sep 15, 2016 10:17 pm
Bronco Info: 1996 bronco 6 inch dick cepek front, deavers in the rear
Location: Rifle, Colorado
Contact:

Re: krustythebronco a series of facepalms lol

Post by Bftank »

I also got the top mount built. I used some shock mounts I got from ruffstuff, and some 1.75 .120 wall dom.
20190308_133726.jpg
20190308_133726.jpg (157.45 KiB) Viewed 1345 times
20190308_125759.jpg
20190308_125759.jpg (129.5 KiB) Viewed 1345 times
20190316_140729.jpg
20190316_140729.jpg (163.16 KiB) Viewed 1345 times
20190316_141222_001.jpg
20190316_141222_001.jpg (155.71 KiB) Viewed 1345 times
@outdoorexplorationgear on Instagram, focused on Krustythebronco, building a towrig, creating a prerunner/rockcrawler business.
User avatar
Bftank
Posts: 76
Joined: Thu Sep 15, 2016 10:17 pm
Bronco Info: 1996 bronco 6 inch dick cepek front, deavers in the rear
Location: Rifle, Colorado
Contact:

Re: krustythebronco a series of facepalms lol

Post by Bftank »

On all 4s again. Not a good shot, but these are both at ride height with 37s. Seems really tall.
20190321_200825.jpg
20190321_200825.jpg (157.88 KiB) Viewed 1344 times
20190323_202406.jpg
20190323_202406.jpg (77.15 KiB) Viewed 1344 times
My plan is to get it driveable like this and see how it does. That being said, taking out a leaf, and moving the axle back a little definitely look like a good idea at this point.

I also got the fuel pump hatch cut out, and the fuel tank reconnected and strapped in place for now. I am going to make some metal straps to hold it in place, with a beefier skid plate to go over that to protect the tank.
20190325_182712.jpg
20190325_182712.jpg (98.59 KiB) Viewed 1344 times
I welded in some heavier sheeting under the hole to hold the plate up. The hinges will be riveted on, and 2 bolts keeping it closed.
@outdoorexplorationgear on Instagram, focused on Krustythebronco, building a towrig, creating a prerunner/rockcrawler business.
User avatar
Andy Jones
Posts: 2205
Joined: Tue Dec 08, 2009 2:47 pm
Bronco Info: In the Works!
Location: Canyon Lake,ca
Contact:

krustythebronco a series of facepalms lol

Post by Andy Jones »

Bftank wrote:I also got the top mount built. I used some shock mounts I got from ruffstuff, and some 1.75 .120 wall dom.
20190308_133726.jpg
20190308_125759.jpg
20190316_140729.jpg
20190316_141222_001.jpg
Looks like a few more inches to bump that out.?


Sent from my iPhone using Tapatalk
User avatar
Bftank
Posts: 76
Joined: Thu Sep 15, 2016 10:17 pm
Bronco Info: 1996 bronco 6 inch dick cepek front, deavers in the rear
Location: Rifle, Colorado
Contact:

Re: krustythebronco a series of facepalms lol

Post by Bftank »

Andy Jones wrote:
Bftank wrote:I also got the top mount built. I used some shock mounts I got from ruffstuff, and some 1.75 .120 wall dom.
20190308_133726.jpg
20190308_125759.jpg
20190316_140729.jpg
20190316_141222_001.jpg
Looks like a few more inches to bump that out.?


Sent from my iPhone using Tapatalk
Yes, I was getting into reverse arch already with the 2 leafs, and I had run out of jack travel when i took that pic. it has 2 more inches it can go up. and 3+ inches of shock travel. should be ok if it does hit full bump. Down the road I want to get some legit bump stops, instead of poly or rubber.
@outdoorexplorationgear on Instagram, focused on Krustythebronco, building a towrig, creating a prerunner/rockcrawler business.
User avatar
Andy Jones
Posts: 2205
Joined: Tue Dec 08, 2009 2:47 pm
Bronco Info: In the Works!
Location: Canyon Lake,ca
Contact:

krustythebronco a series of facepalms lol

Post by Andy Jones »

Bftank wrote:
Andy Jones wrote:
Bftank wrote:I also got the top mount built. I used some shock mounts I got from ruffstuff, and some 1.75 .120 wall dom.
20190308_133726.jpg
20190308_125759.jpg
20190316_140729.jpg
20190316_141222_001.jpg
Looks like a few more inches to bump that out.?


Sent from my iPhone using Tapatalk
Yes, I was getting into reverse arch already with the 2 leafs, and I had run out of jack travel when i took that pic. it has 2 more inches it can go up. and 3+ inches of shock travel. should be ok if it does hit full bump. Down the road I want to get some legit bump stops, instead of poly or rubber.
Poly or rubber bumps are plenty for these rigs. No need for hydro bumps on the rear.


Sent from my iPhone using Tapatalk
User avatar
Bftank
Posts: 76
Joined: Thu Sep 15, 2016 10:17 pm
Bronco Info: 1996 bronco 6 inch dick cepek front, deavers in the rear
Location: Rifle, Colorado
Contact:

Re: krustythebronco a series of facepalms lol

Post by Bftank »

good to know.
@outdoorexplorationgear on Instagram, focused on Krustythebronco, building a towrig, creating a prerunner/rockcrawler business.
User avatar
Bftank
Posts: 76
Joined: Thu Sep 15, 2016 10:17 pm
Bronco Info: 1996 bronco 6 inch dick cepek front, deavers in the rear
Location: Rifle, Colorado
Contact:

Re: krustythebronco a series of facepalms lol

Post by Bftank »

it's been awhile, June was a crazy month. Dad had a heart attack and quadruple bypass surgery, at the end of May, so I went up and helped him get back on his feet again for a couple of weeks. Then it was catching up around the house and on customer vehicles. Getting closer to the point where I can work on Krusty again.

One of the rigs I got to work on was a 1997 f350 crew cab with a centurion conversion. The driver side door was jacked. The interior door handle was ripped out of the sheet metal so I ordered a reinforcement plate from Solo Motorsports. Definitely going to have to order a set of these for Krusty. Super nice product. Its a pretty straight forward process, but if you want more info I did a write up on my website. link below.

https://outdoorexplorationgear.com/solo ... tallation/

As far as Krusty goes, I got the new tail gate mounted, still need to transfer the guts over, looks way better minus all the rust. No paint just primer right now.
@outdoorexplorationgear on Instagram, focused on Krustythebronco, building a towrig, creating a prerunner/rockcrawler business.
Post Reply