94 Bronco - Budget Build

JonMac31
Posts: 108
Joined: Mon Sep 09, 2013 9:41 pm
Bronco Info: 1994, 351w, 2.5x12" Sway-Away (500/600#), Deaver J40 w/ Camburg ext. Shackle/Bilstein 5100 14"
Location: Albuquerque, NM

94 Bronco - Budget Build

Post by JonMac31 »

Hey guys!

I have been a long time follower of this site and thoroughly love seeing all of the builds and knowledge shared - which prompted me to start my own build thread. I have had my bronco for about 4 years or so, and have only started getting into the gofast realm for about the last 2 years. Money is tight as I am a full-time college student, so I can't build the truck as quickly as I would like. My end goal is for it to be a moderate-prerunner, but of course we all know how that changes. I would like to end up with King 2.5x14" coilovers in the front followed by a 2.5x14" bypass and then with either 3.0x14-16" in the rear. But we will see how it goes - like the title said, this is a budget build! So let's get started!

Information about the truck:
1994 Ford Bronco XLT
5.8L V8
E4OD Transmission
179k Miles
5 x BFGoodrich Mud Terrains 35x12.5R15
Previously had 6" Rough Country Lift kit (coils and blocks for the rear)

Performance:
Cold Air Intake
MSD Race Ignition coil, plugs, wires, etc.
Tranny stage 3 race chip (Previous owner - don't know the details on it).

Front:
Deaver 5.5" F64C Coil Springs
Camburg Coil Buckets
10" Bilstein 7100 valved at 255/70
Extended Radius Arms
Custom Drop Bracket (done by previous owner)
Axle Pivot points converted to Heim Joints (PO)
D44 Front Differential
4x4 Manual locking hubs
4.88 Yukon Gear and Axle LSD

Rear:
Ford 8.8 Rear Axle
4.88 open differential
Deaver J40 Leafs
Camburg Extended Shackles
14" Bilstein 5100's valved at 255/70
Custom Rear Upper shock mount

Misc:
20" LED Lightbar
2 KC Off-Road Lights
2 LED light pods
Front Bumper brush gaurd
Custom Roof Rack
Nerf Siren
2 x 10" Magnum subwoofers w/ 800w monoblock amp
4 x 100w Power Jensen amp
2 x 6x9 Pioneer 3-way speakers (rear)
2 x 6.5" Pioneer 2-way speakers (front)

Future Mods:
King 2.5x14" C/O's w/ Solomotorsports custom engine cage
King 2.5x14" bypasses
King 3.0x14-16" bypasses
Front 3" Wide glass
Rear 3" wide glass
Remove drop bracket and switch to C&T beams possibly
Rear TrueTrac locker
Front and rear custom bumpers
Full cage
Race Seats (Mastercraft, PRP, or Corbeau) - in the market for some btw.

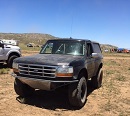
When I first got the truck:
When I first got the truck
IMG_0413.JPG (218.91 KiB) Viewed 4284 times
First wheeling trip in the Rio Puerco:
Rio Puerco, NM
Rio Puerco, NM
FullSizeRender.jpg (128.28 KiB) Viewed 4284 times
Some Muddy Fun:
Mudding
Mudding
IMG_1129.JPG (215.2 KiB) Viewed 4284 times
Baby flex with sway bar removed:
baby flex front sway bar removal
IMG_1188.JPG (204.31 KiB) Viewed 4284 times
Rear axle C-clip broke and destroyed the entire rear end:
c-clip destruction
c-clip destruction
IMG_1394.JPG (236.56 KiB) Viewed 4284 times
New rear axle:
new 8.8
new 8.8
IMG_1427.JPG (154.99 KiB) Viewed 4284 times
JonMac31
Posts: 108
Joined: Mon Sep 09, 2013 9:41 pm
Bronco Info: 1994, 351w, 2.5x12" Sway-Away (500/600#), Deaver J40 w/ Camburg ext. Shackle/Bilstein 5100 14"
Location: Albuquerque, NM

Re: 94 Bronco - Budget Build

Post by JonMac31 »

Few months later, front axle heim joint pivot broke:
heim joint pivot point
IMG_1577.JPG (210.96 KiB) Viewed 4283 times
Front Suspension redone (driver):
driver front
driver front
Driver_Front.jpg (90.71 KiB) Viewed 4283 times
Front Suspension redone (passenger):
passenger front
passenger front
Passenger_Front.jpg (57.28 KiB) Viewed 4283 times
Flex test:
flex test1
flex test1
IMG_2700.JPG (177.52 KiB) Viewed 4283 times
flex test2
flex test2
IMG_2701.JPG (194.51 KiB) Viewed 4283 times
Shenanigans:
shenanigans
shenanigans
IMG_2890.JPG (217.29 KiB) Viewed 4283 times
JonMac31
Posts: 108
Joined: Mon Sep 09, 2013 9:41 pm
Bronco Info: 1994, 351w, 2.5x12" Sway-Away (500/600#), Deaver J40 w/ Camburg ext. Shackle/Bilstein 5100 14"
Location: Albuquerque, NM

Re: 94 Bronco - Budget Build

Post by JonMac31 »

Rear suspension started - removal of leafs, hangers, shackles, axle perches, everything:
rear torn down
rear torn down
Rear_Removed.jpg (94.4 KiB) Viewed 4282 times
Customer upper shock mount:
upper mount
upper mount
Rear_Upper_Mount.jpg (78.73 KiB) Viewed 4282 times
Upper shock mount in place with Bilsteins attached:
shocks attached
shocks attached
Rear_Upper_Shock_Mount.jpg (68.41 KiB) Viewed 4282 times
Pinion angle needed to be fixed, so we were re-welding the new axle perches on. A little bit of a droop pic:
more work...
more work...
Finished_New_Perches_Droop.jpg (68.61 KiB) Viewed 4282 times
New rear Suspension done - let's do a jeep thing... tire flex!:
jeep flex
jeep flex
Jeep_Tire_Flex.jpg (72.96 KiB) Viewed 4282 times
I will upload more pics of the leafs, shackles, and hangers when I get home - most of this was what was on my phone.
Kx125str99
Posts: 2
Joined: Fri Aug 19, 2016 6:19 am
Bronco Info: 1990 ford bronco 5.8l 6"lift on 35's

Re: 94 Bronco - Budget Build

Post by Kx125str99 »

Nice build. Looks great. Where did you get the rear upper shock mount bracket
User avatar
Tchajagos
Posts: 2124
Joined: Sat Dec 17, 2011 11:07 am
Bronco Info: 1993 xlt stock on 33' BFGs
Location: Murrieta

94 Bronco - Budget Build

Post by Tchajagos »

If you can I would put some more tabs on that rear shock mount for double shear. Why not just put another tab on each side and not have to worry about the single shear breaking off.
JonMac31
Posts: 108
Joined: Mon Sep 09, 2013 9:41 pm
Bronco Info: 1994, 351w, 2.5x12" Sway-Away (500/600#), Deaver J40 w/ Camburg ext. Shackle/Bilstein 5100 14"
Location: Albuquerque, NM

Re: 94 Bronco - Budget Build

Post by JonMac31 »

Kx125str99 wrote:Nice build. Looks great. Where did you get the rear upper shock mount bracket
Thanks man. I got the shock mount from a buddy who had it on his bronco - I believe it was custom made either by himself or some local shop.
JonMac31
Posts: 108
Joined: Mon Sep 09, 2013 9:41 pm
Bronco Info: 1994, 351w, 2.5x12" Sway-Away (500/600#), Deaver J40 w/ Camburg ext. Shackle/Bilstein 5100 14"
Location: Albuquerque, NM

Re: 94 Bronco - Budget Build

Post by JonMac31 »

Tchajagos wrote:If you can I would put some more tabs on that rear shock mount for double shear. Why not just put another tab on each side and not have to worry about the single shear breaking off.
The reason for it being single shear at the moment was because it was kind of "throw it all together to see where everything ends up" in order to figure out where I need to tune.
I need to set bumps and limit straps - so when I have everything disassembled and set properly then I will convert to double shear.

I totally agree - wouldn't want that single shear breaking in the middle of nowhere on a wheeling trip! I don't do very hard wheeling, yet, but who's to say it can't happen ;)
JonMac31
Posts: 108
Joined: Mon Sep 09, 2013 9:41 pm
Bronco Info: 1994, 351w, 2.5x12" Sway-Away (500/600#), Deaver J40 w/ Camburg ext. Shackle/Bilstein 5100 14"
Location: Albuquerque, NM

Re: 94 Bronco - Budget Build

Post by JonMac31 »

So much for keeping this thing a budget build... I managed to get my hands on a setup of 2.5x12" Sway away coil overs for a steal. Originally I was going to run as just a shock in the rear, but after talking with Dave over at Threat Motorsports, we were able to work out a deal on some coil over engine cage mounts.

I will be picking the C/O's up on Wednesday, and I should hopefully have the mounts shipped out next week!
JonMac31
Posts: 108
Joined: Mon Sep 09, 2013 9:41 pm
Bronco Info: 1994, 351w, 2.5x12" Sway-Away (500/600#), Deaver J40 w/ Camburg ext. Shackle/Bilstein 5100 14"
Location: Albuquerque, NM

Re: 94 Bronco - Budget Build

Post by JonMac31 »

Well I picked these up a little earlier then expected! 2.5x12" Sway-Away coil overs running a 500/600 spring rate. I have no idea what the valving is, but it was valved for a V8 so it should work out great.
coil overs
coil overs
coilovers.jpg (693.4 KiB) Viewed 4032 times
I have my mounts being made by Dave @ Threat Motorsports, which should be here in a few weeks. And, I managed to score some King 2.5x12" smoothies for the rear of the truck as well.

Hoping to have this all put together by end of November!
User avatar
funinthesun95
Posts: 1701
Joined: Thu May 13, 2010 2:06 pm
Bronco Info: 1992 Bronco MAF UsShift
Location: San Diego
Contact:

Re: 94 Bronco - Budget Build

Post by funinthesun95 »

nice
Good people + Great info = GFB
@csracingteam
@Cockstarmotorsports
JonMac31
Posts: 108
Joined: Mon Sep 09, 2013 9:41 pm
Bronco Info: 1994, 351w, 2.5x12" Sway-Away (500/600#), Deaver J40 w/ Camburg ext. Shackle/Bilstein 5100 14"
Location: Albuquerque, NM

Re: 94 Bronco - Budget Build

Post by JonMac31 »

so Friday my coil over mounts came in from Dave @ Threat - love the way they turned out. Very clean and timely. I wanted to get started on Saturday but things came up which delayed my start until Sunday morning. They bolted straight up for the most part - although I had to ream a few holes. They were only off by maybe 1/8" or so.
Bucket mounted
Bucket mounted
IMG_3517.JPG (620.12 KiB) Viewed 3876 times
The mounts also cleared everything on the passenger side as well - there are a few hoses that need to be re-routed, but other then that it was solid.
top of bucket
top of bucket
IMG_3518.JPG (771.2 KiB) Viewed 3876 times
I'm still amazed by the welds, probably because I am a horrible welder myself.
close up of bucket
close up of bucket
IMG_3519.JPG (580.83 KiB) Viewed 3876 times
After getting the old stuff off and the new stuff on, it was time to remove the bracketry for the dual shock setup so that I could get a solid place to mount the lower shock tabs on top of the radius arm. This meant removing those stud bolts... let me tell you, those were a pain in the #$%! I cut off the top thread of the upper stud enough to where I could get a deep socket on it, then with the help of a 2ft cheater bar and a 1/2" breaker bar, it began coming out.
upper radius arm stud
IMG_3520.JPG (456.33 KiB) Viewed 3876 times
The bottom one on the other hand... was a hole different story. I had soaked it prior to starting with some penetrating oil and it still was not budging. I ended up having to use an 8ft pole as my cheater bar in order to get enough leverage so that it would finally break. Once I got it spinning, I could get it out with the impact no problem.
lower radius arm stud
IMG_3521.JPG (120.08 KiB) Viewed 3876 times
I had removed the upper bolt to grind off some clean surfaces in order for clean contact with the welds. Upon putting that bolt in somehow the threads got nerfed at the beginning. So off to the hardware store so that I could get a tap and die set... best $70 bucks I have ever spent. It worked like a champ and the upper bolt began sliding back through no problem.
JonMac31
Posts: 108
Joined: Mon Sep 09, 2013 9:41 pm
Bronco Info: 1994, 351w, 2.5x12" Sway-Away (500/600#), Deaver J40 w/ Camburg ext. Shackle/Bilstein 5100 14"
Location: Albuquerque, NM

Re: 94 Bronco - Budget Build

Post by JonMac31 »

After fixing the nerfed stud bolt, I began prepping my shears for welding. I am not a welder by any means (although I have always wanted to learn - it's a MUST for this hobby). I broke out my dads little welder and began doing tacks so that I could get everything aligned and centered. I thought it was good, so I attempted to wiggle it and the whole shear just came off... oops! Did I mention I am not a welder?
I have my dad assist me, as he does not have much more experience than I do. We ground off my welds, and tried again. His tacks looked good, they didn't break with us moving it around, solid? Hmm...

We bolted the C/O up, and began cycling. 3 pumps in with the jack and the tab broke off... man we are batting a million here. So we decided to take a break, and pause, and think about this. I began texting some of my buddies for their thoughts and opinions - one of my friends gave us some good advice so we decided to attempt it again. My dad lined everything up and began heating that sucker up. After about 3-4 tacks, we stopped and attempted to wiggle it. They did not move. We bolted up the C/O and began cycling, and they held. Whoohoo! So we got the other shear lined up and tacked, bolted the C/O and cycled again - everything was holding and the C/O was going very smooth.

I started this project at 9AM, and didn't finish until 5:30PM. I had everything unbolted and the new stuff bolted on by 11AM - but because of those setbacks and our horrible welding skills, it pushed us further and further. But, needless to say, I have my passenger side done now:
mounted
mounted
IMG_3522.JPG (650.02 KiB) Viewed 3875 times
top mount
top mount
IMG_3523.JPG (677.25 KiB) Viewed 3875 times
I am having my buddy do a final burn in on my bottom shears so that they actually stay on the truck and so that we are not relying on our welds... scary! Hopefully I can get the driver side done sometime this week and have it ready to test this weekend!

Learned some good lessons as well. Take frequent breaks, patience is key AND use the right tool for the job!
dtbback
Posts: 1677
Joined: Mon Mar 03, 2014 8:45 am
Bronco Info: 1996 EB 351W!! First Bronco!! Plan: Prerunner/ Trail Rig/ SHTF All around Rig

Re: 94 Bronco - Budget Build

Post by dtbback »

Looking good! Love those towers!
JonMac31
Posts: 108
Joined: Mon Sep 09, 2013 9:41 pm
Bronco Info: 1994, 351w, 2.5x12" Sway-Away (500/600#), Deaver J40 w/ Camburg ext. Shackle/Bilstein 5100 14"
Location: Albuquerque, NM

Re: 94 Bronco - Budget Build

Post by JonMac31 »

dtbback wrote:Looking good! Love those towers!
Thanks man! Yeah those towers are pretty freaking cool!
squirelmurphy
Posts: 199
Joined: Wed Aug 10, 2011 2:05 pm
Bronco Info: No broncos, but I have a 73 f100 with a big block. Does that count?

Re: 94 Bronco - Budget Build

Post by squirelmurphy »

I'm interested in your old coil buckets if you're looking to sell.
JonMac31
Posts: 108
Joined: Mon Sep 09, 2013 9:41 pm
Bronco Info: 1994, 351w, 2.5x12" Sway-Away (500/600#), Deaver J40 w/ Camburg ext. Shackle/Bilstein 5100 14"
Location: Albuquerque, NM

Re: 94 Bronco - Budget Build

Post by JonMac31 »

squirelmurphy wrote:I'm interested in your old coil buckets if you're looking to sell.
I am thinking of selling the entire front setup as a kit (buckets, springs, and maybe the shocks). I haven't decided yet, and won't know until I get the C/Os on.
I have another person who already expressed interest and will be my first contact if I decide to sell.

But keep in contact so that if something doesn't work out, you have second choice.
squirelmurphy
Posts: 199
Joined: Wed Aug 10, 2011 2:05 pm
Bronco Info: No broncos, but I have a 73 f100 with a big block. Does that count?

Re: 94 Bronco - Budget Build

Post by squirelmurphy »

Cool, thanks!
JonMac31
Posts: 108
Joined: Mon Sep 09, 2013 9:41 pm
Bronco Info: 1994, 351w, 2.5x12" Sway-Away (500/600#), Deaver J40 w/ Camburg ext. Shackle/Bilstein 5100 14"
Location: Albuquerque, NM

Re: 94 Bronco - Budget Build

Post by JonMac31 »

Well Sunday we had a local GoFast get together with some of the other prerunners in town - so it prompted me to get my butt moving on my driver side. Wednesday I started tearing down the driver side to get it prepped for the new bucket what not. Had everything off and bolted up in under an hour or so. Thursday I was able to finish up with the installation and clean up some things here and there. Friday evening I was ready to cycle the suspension and find my lower tab mounting locations - this is when I also came to the conclusion that my little welder does not like thick stuff. Luckily, my buddy brought his 220v and was able to help me out. Took about 45 minutes and the bronco finally had coil overs on it.

I buttoned everything up and began cutting the inner fender liner so I could retain a somewhat stock look. Driver side was complete.

On the passenger side there is a hose that runs to the top of the water pump and up into the firewall - it also has a little cap that you can turn (not sure what it is), but it was being crushed by the bucket so I tried to bend it up and out of the way. I ended up putting a hole in the tube and anti-freeze began dripping out, wonderful! After cutting the old section off and sliding the hose back on, I got it seated on there. Sunday was a good shake down, the truck felt good. That same coolant hose broke again, no idea why. I had to drive it to O'Reillys with coolant pouring out of the truck in order to get a replacement hose. After about 45 minutes I was able to get it to stop and finally hold. Back to the trail!

Had some good tests and shakedown runs, I am very pleased with how the truck handled. One concern though is I have a huge camber problem. If you read my posts in some of the other boards, camber and my truck just do not get along and I have no idea why.

I set my preload initially at 3/4" on both sides. The driver side had about a -2* camber angle roughly and the passenger side sat at about -5*. I had an alignment done on the truck before the coilovers and I was sitting at -2 & -3*. I tightened up my preload a little bit more pushing it to roughly 1"-1-1/8" and I am sitting still at around -1 on the driver side, and about -2 on the passenger.

Any ideas on what I need to adjust or how much more preload I need? The spring rates are 500/600.

Oh, and I will upload pics sometime tomorrow!
JonMac31
Posts: 108
Joined: Mon Sep 09, 2013 9:41 pm
Bronco Info: 1994, 351w, 2.5x12" Sway-Away (500/600#), Deaver J40 w/ Camburg ext. Shackle/Bilstein 5100 14"
Location: Albuquerque, NM

Re: 94 Bronco - Budget Build

Post by JonMac31 »

Well I wasn't able to get a whole lot of pictures, but I did manage to snap one of the driver side completely done. I really liked the way the inner fender liner structure came out - almost gives it that stock look.
IMG_3539.JPG
IMG_3539.JPG (835.87 KiB) Viewed 3702 times
VintageIronFab
Posts: 2328
Joined: Mon May 27, 2013 12:25 am
Bronco Info: Bronco List:
Location: Phoenix, AZ

Re: 94 Bronco - Budget Build

Post by VintageIronFab »

What do those coil buckets run? Those are pretty slick compared to others out there- I'd like to hear or see how they cleared the the master cylinder if you have anymore pics.
http://www.vintageironfabworks.com

77- "Victoria"
71- "Annie" Halfcab
73- "Heloise"
96- "Cheryl"
95- Marilyn (F150)
Post Reply