Jim & Paige's Bronco

User avatar
1Hondalover
Posts: 819
Joined: Mon May 14, 2012 2:30 pm
Bronco Info: Having so much fun with friends in Baja, we're not sure if we want to race NORRA.....
Location: Santa Clarita

Jim & Paige's Bronco

Post by 1Hondalover »

After buying the Bronco and having some fun with it, we've fixed a few things and learned a ton. In part due to GFB, I've been able carve out a bit of a plan to get this rig right where I want, it so Paige and I can go play in it both long and short range. NORRA is still very much on our radar, though delayed a bit as we get the Bronco reliable to run an event complete on its own wheels not on trailer wheels. I'm not sure if I should thank you folks for attracting us to this ride or hate you for making me want to spend money on it. The truth is, we've met some great people here and I'm enjoying this project even if I can't personally partake in the major parts of renovating it. Of course none of this would be possible without the love and support of my wife Paige, who likes to go as fast as I do!

Thank you Paige.

We're fortunate to have the services of a great fabricator right here in Santa Clarita. Greg at least surfs and lurks in this GFB board, and I'll leave him otherwise nameless unless he sees fit to jump in and expose himself. A great guy really, with real world skills far above his ability to bend tube and weld. Greg knows the difference between fantasy racecar and reality prerunner. He knows how to make things suitable for ease of service in the future, and at the same time live to tell a story about Baja and back. For the moment we have the assistance of my son Blake, who's committed to helping Greg with this current round of renovation. This will be a great combination and Blake will learn a ton.

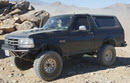
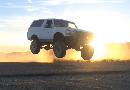
Many of you have read previously about this 1992 Bronco that I unfortunately have little history on. What I do know and/or have figured out, is that the heavy fabrication is pretty nice and ready to play. Unfortunately the wiring and lighter fabrication leaves something to be desired......and that's where we're going first. To get this happening, we're now the proud??? owners of THREE Broncos, necessary to get the OE and other parts to make one viable Bronco. Some of you know that I'm no longer a young man, but still have plenty of horsepower for a long time to come. That said, my goals may seem silly to some as we chase a combination of OE Ford cupholder comfort and reliability mixed with big shocks and tires so the bumps don't spill our sodas at speed.

Here we go. Round One is the R&R of the engine, transmission, transfer case, dashboard, computer, complete wiring harness......gut the existing pieces and replace with all from the complete and fully operational green 1996 Bronco we bought for "parts". You've seen me talk about it before and yes I require OBDII with the ability to legally smog, an OD transmission, push button 4x4, and of course those all-important cupholders. This round will include joint service and upgrade of the TTB to 1981 bolt-on third member components as soon as Greg is done with it.


June 24 - Blake's birthday with Bronco strip & prep:
IMG_4659 (Medium).JPG
IMG_4659 (Medium).JPG (204.35 KiB) Viewed 6162 times
IMG_4654 (Medium).JPG
IMG_4654 (Medium).JPG (183.94 KiB) Viewed 6162 times
IMG_4662 (Medium).JPG
IMG_4662 (Medium).JPG (194.91 KiB) Viewed 6162 times
IMG_4665 (Medium).JPG
IMG_4665 (Medium).JPG (186.3 KiB) Viewed 6162 times
IMG_4679 (Medium).JPG
IMG_4679 (Medium).JPG (219.56 KiB) Viewed 6162 times
IMG_4672 (Medium).JPG
IMG_4672 (Medium).JPG (238.35 KiB) Viewed 6162 times
User avatar
1Hondalover
Posts: 819
Joined: Mon May 14, 2012 2:30 pm
Bronco Info: Having so much fun with friends in Baja, we're not sure if we want to race NORRA.....
Location: Santa Clarita

Re: Jim & Paige's Bronco

Post by 1Hondalover »

June 25 - More Bronco strip and prep wash for fab start:
IMG_4725 (Medium).JPG
IMG_4725 (Medium).JPG (214.22 KiB) Viewed 6156 times
IMG_4722 (Medium).JPG
IMG_4722 (Medium).JPG (196.11 KiB) Viewed 6156 times
IMG_4723 (Medium).JPG
IMG_4723 (Medium).JPG (267.72 KiB) Viewed 6156 times
IMG_4721 (Medium).JPG
IMG_4721 (Medium).JPG (191.96 KiB) Viewed 6156 times
IMG_4718 (Medium).JPG
IMG_4718 (Medium).JPG (198.42 KiB) Viewed 6156 times
IMG_4727 (Medium).JPG
IMG_4727 (Medium).JPG (159.97 KiB) Viewed 6156 times
User avatar
robertcrav
Let me google that for you
Posts: 4313
Joined: Thu Jan 13, 2011 8:06 am
Bronco Info: Lana - Stock width c/t coil-overs/bypasses -- Sylvia - Stock width 4" Rancho kit on Billies
Location: South O.C.
Contact:

Re: Jim & Paige's Bronco

Post by robertcrav »

Nice!!!
User avatar
keenanduran1
Posts: 559
Joined: Fri May 09, 2014 10:29 am
Bronco Info: 1993 Bronco. 1992 F150
Location: Dana Point, CA

Re: Jim & Paige's Bronco

Post by keenanduran1 »

super clean!
User avatar
1Hondalover
Posts: 819
Joined: Mon May 14, 2012 2:30 pm
Bronco Info: Having so much fun with friends in Baja, we're not sure if we want to race NORRA.....
Location: Santa Clarita

Re: Jim & Paige's Bronco

Post by 1Hondalover »

June 27 - Firewall refab, trim and smooth......prep for HVAC installation and electrical relocation. Autofab big boy motor mounts sized up and primered for paint. All floor holes welded up and steering column support fabrication prep. Wiring harness layout and prep for mounting on custom left side tabs so all clears the tire at full compression. Layout and prep for battery relocation to the rear and battery switch relocation to the shock tub behind the passenger seat. Planning for temporary relocated fuel filler to deal with the raised fuel tank.
IMG_4730 (Medium).JPG
IMG_4730 (Medium).JPG (218.16 KiB) Viewed 6012 times
IMG_4731 (Medium).JPG
IMG_4731 (Medium).JPG (198.61 KiB) Viewed 6012 times
IMG_4733 (Medium).JPG
IMG_4733 (Medium).JPG (147.16 KiB) Viewed 6012 times
IMG_4735 (Medium).JPG
IMG_4735 (Medium).JPG (221.01 KiB) Viewed 6012 times
IMG_4743 (Medium).JPG
IMG_4743 (Medium).JPG (177.94 KiB) Viewed 6012 times
IMG_4750 (Medium).JPG
IMG_4750 (Medium).JPG (178.83 KiB) Viewed 6012 times
User avatar
1Hondalover
Posts: 819
Joined: Mon May 14, 2012 2:30 pm
Bronco Info: Having so much fun with friends in Baja, we're not sure if we want to race NORRA.....
Location: Santa Clarita

Re: Jim & Paige's Bronco

Post by 1Hondalover »

A few more:
IMG_4747 (Medium).JPG
IMG_4747 (Medium).JPG (152.56 KiB) Viewed 6008 times
IMG_4748 (Medium).JPG
IMG_4748 (Medium).JPG (225.11 KiB) Viewed 6008 times
IMG_4736 (Medium).JPG
IMG_4736 (Medium).JPG (250.48 KiB) Viewed 6008 times


C6 race box out......cupholder E4OD in.
IMG_4737 (Medium).JPG
IMG_4737 (Medium).JPG (257.3 KiB) Viewed 6008 times
IMG_4739 (Medium).JPG
IMG_4739 (Medium).JPG (236.01 KiB) Viewed 6008 times
IMG_4740 (Medium).JPG
IMG_4740 (Medium).JPG (219.09 KiB) Viewed 6008 times

Paul Delpo paid this morning for a custom Punisher valve body on the way, and I'm picking up and aluminum PML trans pan on Monday morning. Greg will do a quick transmission service once the big 'ol E4OD is in it's final resting place.
User avatar
1Hondalover
Posts: 819
Joined: Mon May 14, 2012 2:30 pm
Bronco Info: Having so much fun with friends in Baja, we're not sure if we want to race NORRA.....
Location: Santa Clarita

Re: Jim & Paige's Bronco

Post by 1Hondalover »

End of the day June 27 - left side firewall smooth and tire clearance. The protruding body seams and joints that hang into the wheelwell are now mostly gone and no more tire rub. The shoulder will creat a nice mounting point for the fender liners.

Greg is relocating all of the electric firewall penetrations as necessary to clear the 37's. He had a pretty smart idea when he asked if he could take some pieces from the 96 shell.....Greg removed the OE electric cutouts and grafted them into the 92 firewall so the fit and finish of the wiring and plugs is OE. Thank you Greg - this means if we ever have to service or replace anything it will be just like a stock Bronco!
IMG_4751 (Medium).JPG
IMG_4751 (Medium).JPG (227.91 KiB) Viewed 5956 times
IMG_4752 (Medium).JPG
IMG_4752 (Medium).JPG (179.83 KiB) Viewed 5956 times
IMG_4754 (Medium).JPG
IMG_4754 (Medium).JPG (200.29 KiB) Viewed 5956 times
User avatar
ChaseTruck754
Spy/Ninja
Posts: 9194
Joined: Thu Jan 28, 2010 9:46 am
Bronco Info: Don't have one - just old Ford trucks
Location: Huntington Beach, CA

Re: Jim & Paige's Bronco

Post by ChaseTruck754 »

looks like you're making so quick progress. Can't wait to see more.
User avatar
Wrightracing.net
Posts: 2209
Joined: Thu Oct 28, 2010 9:58 pm
Bronco Info: 1972 Bronco with an 86 chassis, full cage and Long travel coil-over suspension.
Location: San Diego
Contact:

Re: Jim & Paige's Bronco

Post by Wrightracing.net »

Looking good.

I saw that you had a Kenwood 110 race radio mount under the passenger side seat. You might want to move it or make sure to put a double or triple layer of Dynomat heat shielding. That placement gets hot from the Cat and exhaust. Also it makes is susceptible to water if the cab gets water in it. It is best to use isolation rubber bolts as a pedestal so if you get water in it flows under the radio and not in it.

The Kenwoods are sealed well on the front, but the back power and Molex connectors are not. On the radios I have been refurbishing, I have been converting the power over to a Weather Pak waterproof connection and the when needed change the Molex to the mobile 5 pin like PCI uses on the race mod for a intercom. The dust boots work as a splash guard but any prolonged water, but needs to be sealed better.
User avatar
keenanduran1
Posts: 559
Joined: Fri May 09, 2014 10:29 am
Bronco Info: 1993 Bronco. 1992 F150
Location: Dana Point, CA

Re: Jim & Paige's Bronco

Post by keenanduran1 »

Love your build. I really like your roof rack set up. Let me know if you want to get rid of it :)
User avatar
1Hondalover
Posts: 819
Joined: Mon May 14, 2012 2:30 pm
Bronco Info: Having so much fun with friends in Baja, we're not sure if we want to race NORRA.....
Location: Santa Clarita

Re: Jim & Paige's Bronco

Post by 1Hondalover »

June 30 - 96 engine & transmission in: Greg was on a mission Friday to prep for engine and trans installation on Monday. He finished the firewall electrical mounting provisions at custom angles to clear obstructions on both sides, including the brake booster, dashboard and of course the 37" tire. Greg painted over the weekend, fabricated a super cool removable engine cage top piece, and it was on!

Greg and Blake went at it first thing Monday, and with a few hiccups got the bulk of everything in so they could start the next round of fabrication. The Autofab motor mounts made the install tight because the complete engine didn't have too much room to wiggle through the cage, but they got it. I have to talk to John about the bolts supplied with the mounts......no washers, too short and nylon locking nuts are not what I prefer for use near the block and exhaust manifold. No problem, some 1/2" longer bolts, all-metal locknuts and SAE washers will be replacing them today.

Blake got charged with wiring harness mods and installation, while Greg took to HVAC prep including patterened and fabbed aluminum covers for the trimmed fan/duct box under the hood. It appears we'll have the luxury of factory air and 37's at full bump with no beam forward push.
IMG_4784 (Medium).JPG
IMG_4784 (Medium).JPG (232.05 KiB) Viewed 5794 times
IMG_4787 (Medium).JPG
IMG_4787 (Medium).JPG (231.01 KiB) Viewed 5794 times
IMG_4789 (Medium).JPG
IMG_4789 (Medium).JPG (151.83 KiB) Viewed 5794 times
IMG_4794 (Medium).JPG
IMG_4794 (Medium).JPG (148.5 KiB) Viewed 5794 times
IMG_4812 (Medium).JPG
IMG_4812 (Medium).JPG (225.62 KiB) Viewed 5794 times
IMG_4813 (Medium).JPG
IMG_4813 (Medium).JPG (222.79 KiB) Viewed 5794 times
User avatar
1Hondalover
Posts: 819
Joined: Mon May 14, 2012 2:30 pm
Bronco Info: Having so much fun with friends in Baja, we're not sure if we want to race NORRA.....
Location: Santa Clarita

Re: Jim & Paige's Bronco

Post by 1Hondalover »

IMG_4829 (Medium).JPG
IMG_4829 (Medium).JPG (178.02 KiB) Viewed 5791 times
IMG_4797 (Medium).JPG
IMG_4797 (Medium).JPG (203.15 KiB) Viewed 5791 times
IMG_4796 (Medium).JPG
IMG_4796 (Medium).JPG (183.13 KiB) Viewed 5791 times
IMG_4782 (Medium).JPG
IMG_4782 (Medium).JPG (226.51 KiB) Viewed 5791 times
IMG_4814 (Medium).JPG
IMG_4814 (Medium).JPG (216.95 KiB) Viewed 5791 times
IMG_4783 (Medium).JPG
IMG_4783 (Medium).JPG (197.91 KiB) Viewed 5791 times
User avatar
1Hondalover
Posts: 819
Joined: Mon May 14, 2012 2:30 pm
Bronco Info: Having so much fun with friends in Baja, we're not sure if we want to race NORRA.....
Location: Santa Clarita

Re: Jim & Paige's Bronco

Post by 1Hondalover »

Battery relocation prep - PO spent a bunch on money on this Bronco just before we got it from him.......strange to spend the dough for laser cut Optima brackets and never paint them. Greg cut them off the engine cage for reuse in the back, and this time they'll get some paint. This will be a temporary install until Round 2 when the tubs get cut back to make some more room for the spare and tools.
IMG_4821 (Medium).JPG
IMG_4821 (Medium).JPG (157.87 KiB) Viewed 5789 times
IMG_4822 (Medium).JPG
IMG_4822 (Medium).JPG (192.81 KiB) Viewed 5789 times


A new house for the Punisher:
IMG_4798 (Medium).JPG
IMG_4798 (Medium).JPG (148.94 KiB) Viewed 5789 times
IMG_4800 (Medium).JPG
IMG_4800 (Medium).JPG (124.83 KiB) Viewed 5789 times
IMG_4802 (Medium).JPG
IMG_4802 (Medium).JPG (103.48 KiB) Viewed 5789 times
User avatar
1Hondalover
Posts: 819
Joined: Mon May 14, 2012 2:30 pm
Bronco Info: Having so much fun with friends in Baja, we're not sure if we want to race NORRA.....
Location: Santa Clarita

Re: Jim & Paige's Bronco

Post by 1Hondalover »

351, C6, transfer case and wiring harness out. This ran good and made lots of power but unfortunately didn't meet my OBDII requirements. Think I'll put the combo up for sale but have to figure out what year the engine is......can anyone tell me how to figure it out?
IMG_4774 (Medium).JPG
IMG_4774 (Medium).JPG (249.88 KiB) Viewed 5787 times
IMG_4777 (Medium).JPG
IMG_4777 (Medium).JPG (234.88 KiB) Viewed 5787 times
IMG_4779 (Medium).JPG
IMG_4779 (Medium).JPG (235.66 KiB) Viewed 5787 times
IMG_4668 (Medium).JPG
IMG_4668 (Medium).JPG (156.63 KiB) Viewed 5787 times
User avatar
1Hondalover
Posts: 819
Joined: Mon May 14, 2012 2:30 pm
Bronco Info: Having so much fun with friends in Baja, we're not sure if we want to race NORRA.....
Location: Santa Clarita

Re: Jim & Paige's Bronco

Post by 1Hondalover »

Wrightracing.net wrote:Looking good.

I saw that you had a Kenwood 110 race radio mount under the passenger side seat. You might want to move it or make sure to put a double or triple layer of Dynomat heat shielding. That placement gets hot from the Cat and exhaust. Also it makes is susceptible to water if the cab gets water in it. It is best to use isolation rubber bolts as a pedestal so if you get water in it flows under the radio and not in it.

The Kenwoods are sealed well on the front, but the back power and Molex connectors are not. On the radios I have been refurbishing, I have been converting the power over to a Weather Pak waterproof connection and the when needed change the Molex to the mobile 5 pin like PCI uses on the race mod for a intercom. The dust boots work as a splash guard but any prolonged water, but needs to be sealed better.
Thank you for the caution and info.....I'll make sure this is looked after.
User avatar
SteveG
Admin
Posts: 6100
Joined: Sat Dec 05, 2009 10:25 am
Bronco Info: Wilson: 96, Stretched 17.5", coil-overs / Bypasses, 4-link, a fridge and all the amenities :)
Location: Arroyo Grande, CA

Re: Jim & Paige's Bronco

Post by SteveG »

On fire, Jim! Looking good!
User avatar
tcm glx
Peanut Butter
Posts: 7303
Joined: Tue Dec 08, 2009 11:19 am
Bronco Info: 93 Ford Bronco 5.8
Location: Riverside Ca
Contact:

Re: Jim & Paige's Bronco

Post by tcm glx »

Looking sweet!!
BajaBronco13
Bronco Broker
Posts: 2434
Joined: Tue Dec 08, 2009 11:00 am
Bronco Info: Bronco AKA The Silver Bullet
Location: Orange County, California

Re: Jim & Paige's Bronco

Post by BajaBronco13 »

Loving the red bronco! What's the plan for the green bronco? Body looks clean.

Chris
User avatar
1Hondalover
Posts: 819
Joined: Mon May 14, 2012 2:30 pm
Bronco Info: Having so much fun with friends in Baja, we're not sure if we want to race NORRA.....
Location: Santa Clarita

Re: Jim & Paige's Bronco

Post by 1Hondalover »

BajaBronco13 wrote:What's the plan for the green bronco? Body looks clean.

Chris
The sheet metal roller will be for sale Chris.....the top will be staying with me though.
User avatar
1Hondalover
Posts: 819
Joined: Mon May 14, 2012 2:30 pm
Bronco Info: Having so much fun with friends in Baja, we're not sure if we want to race NORRA.....
Location: Santa Clarita

Re: Jim & Paige's Bronco

Post by 1Hondalover »

July 1 - Wiring, HVAC, firewall and under the hood:

Lots of smaller details happening now.....little to takes pictures of but lots of time invested! Greg and Blake have the complete wiring harness in and secure underneath, terminated from the firewall back. Blake worked the wiring while Greg was the HVAC tech. The trimmed A/C box/fan/evaporator got installed in the engine bay, as well as a bunch of other engine pieces including the compressor, alternator and a start on the emissions components.

Blake prepped the firewall and installed Russian StP Silver, a Dynamat alternative with better workability and a better price: http://stp-atlantic.com/products/Vibrat ... 300629621/.
Be careful looking at this product online because we used the professional Silver at 80 mils thick. Amazon and others have iSilver for less in a "bulk package", however it's less square footage and only 70 mils. The rest of the firewall was put back together including the OE insulation to get ready for the dash to go back in.

Greg blew lots of crap out of the evaporator as he was reassembling, and found some of the foam surround gasketing way out of place just as it came from the factory. I don't have the pictures of this yet, but like many of you I've read the stories about low air flow in the Bronco so everything was closely inspected prior to going back together. The down tubes on the rollcage run right through the far left and right ductwork behind the dash. The original builder just cut off the ducts, foamed them closed and blanked the dash vents. Like several other "smaller things" that were done on my Bronco, this was unacceptable and Greg came up with a cool solution. He trimmed the factory ductwork back and used some rubber to reconnect it to the vent, making the connection flexible enough to conform to the rollcage tube but still flow air. Great idea!

Everything coming together nicely and more detail work/dashboard installation before the next round of fabrication needed for crossmembers, driveshafts, exhaust and tabs under the hood for all the accessories.
IMG_4836 (Medium).JPG
IMG_4836 (Medium).JPG (196.96 KiB) Viewed 5679 times
IMG_4838 (Medium).JPG
IMG_4838 (Medium).JPG (165.43 KiB) Viewed 5679 times
IMG_4831 (Medium).JPG
IMG_4831 (Medium).JPG (198.05 KiB) Viewed 5679 times
IMG_4830 (Medium).JPG
IMG_4830 (Medium).JPG (198.58 KiB) Viewed 5679 times
IMG_4832 (Medium).JPG
IMG_4832 (Medium).JPG (209.61 KiB) Viewed 5679 times
IMG_4833 (Medium).JPG
IMG_4833 (Medium).JPG (217.05 KiB) Viewed 5679 times
Post Reply