96 Bronco - Project "Cheryl"
-
RyanDS650X
- Posts: 1867
- Joined: Sun Dec 13, 2009 11:13 am
- Bronco Info: Autofab '96 XLT 5.8
- Location: Mesa, AZ
- Contact:
Re: 96 Bronco - Project "Cheryl"
The shop i go too and have been for years with the same guy alignining my vehicles. He even puts it in neutral to roll it forward before he starts as to not use the brakes. Finding a shop worth a shit is hard in most cases.
-
ChaseTruck754

- Spy/Ninja
- Posts: 9194
- Joined: Thu Jan 28, 2010 9:46 am
- Bronco Info: Don't have one - just old Ford trucks
- Location: Huntington Beach, CA
Re: 96 Bronco - Project "Cheryl"
yup.
There is a shop in the Hesperia area that is the same thing & I trust them. It's just I'm not usually up there and won't do the 2 hr. drive just to get work done.
There is a shop in the Hesperia area that is the same thing & I trust them. It's just I'm not usually up there and won't do the 2 hr. drive just to get work done.
-
VintageIronFab
- Posts: 2328
- Joined: Mon May 27, 2013 12:25 am
- Bronco Info: Bronco List:
- Location: Phoenix, AZ
Re: 96 Bronco - Project "Cheryl"
Well I found out today that you MUST set the toe before you do anything. I didn't at first and for some reason the front end just set up high- like the springs wouldn't relax or something. I drove it for probably 5 miles and it still sat up high. Set the toe pretty close and wala-- the front end relaxed is all I can call it. The front end is probably good enough now if I was just using the truck in the dirt but I gotta be able to run this on the highway.
SO here is my question.. I have an appointment to get this aligned tomorrow -- what specs castor/camber and toe do you all think is just the best happy medium?
SO here is my question.. I have an appointment to get this aligned tomorrow -- what specs castor/camber and toe do you all think is just the best happy medium?
-
Rmc
- El Jefe
- Posts: 6026
- Joined: Tue Oct 09, 2012 10:22 pm
- Bronco Info: 94 bronco xlt prerunner
- Location: IE SoCal
- Contact:
Re: 96 Bronco - Project "Cheryl"
Proper toe and go with as close to what they recommend for caster. That's IF it's in the ballpark of what they say it should be. I say throw a bunch of caster at it, camber as close to zero as you can get and correct toe and your good to go.
Most of that crap is purely to save tires. If you built your front set up right you already have decent caster/camber, but I know you were still dealing with the camber due to the spring height. Keep in mind your camber/caster/toe are purely based on ride height with your current steering set up. Just my thoughts.... Anyone?
Most of that crap is purely to save tires. If you built your front set up right you already have decent caster/camber, but I know you were still dealing with the camber due to the spring height. Keep in mind your camber/caster/toe are purely based on ride height with your current steering set up. Just my thoughts.... Anyone?
-
VintageIronFab
- Posts: 2328
- Joined: Mon May 27, 2013 12:25 am
- Bronco Info: Bronco List:
- Location: Phoenix, AZ
Re: 96 Bronco - Project "Cheryl"
I am running a drop pitman arm if that matters btw...
-
VintageIronFab
- Posts: 2328
- Joined: Mon May 27, 2013 12:25 am
- Bronco Info: Bronco List:
- Location: Phoenix, AZ
Lower spring mount-- "Bagel-Cut Mod"
Here is what I ended up doing with my lower factory spring mount. I honestly did this prior to the toe getting fixed causing the springs to not relax and sit high. With that said I have heard of at least a couple guys talking about lowering their front end an inch or so. I am gonna call this the lower spring mount "bagel-cut mod" I dont have a mill which would be the best way to accomplish this but I do have a killer bandsaw and it worked out to get the factory piece cut down. With the 7/8" cut down she is sitting dead level,
- Attachments
-
- BagelMod1.JPG (150.4 KiB) Viewed 1722 times
-
- BagelMod2.JPG (145.43 KiB) Viewed 1722 times
-
- BagelMod3.JPG (140.96 KiB) Viewed 1722 times
-
- BagelMod4.JPG (164.2 KiB) Viewed 1722 times
-
- BagelMod5.JPG (125.4 KiB) Viewed 1722 times
-
VintageIronFab
- Posts: 2328
- Joined: Mon May 27, 2013 12:25 am
- Bronco Info: Bronco List:
- Location: Phoenix, AZ
J 40's!!!
My J40's came today!! Aren't they pretty .... Pretty sweet!!! 
- Attachments
-
- image.jpg (74.49 KiB) Viewed 1647 times
-
Rmc
- El Jefe
- Posts: 6026
- Joined: Tue Oct 09, 2012 10:22 pm
- Bronco Info: 94 bronco xlt prerunner
- Location: IE SoCal
- Contact:
Re: 96 Bronco - Project "Cheryl"
Those look nice!
-
VintageIronFab
- Posts: 2328
- Joined: Mon May 27, 2013 12:25 am
- Bronco Info: Bronco List:
- Location: Phoenix, AZ
Re: 96 Bronco - Project "Cheryl"
Got some cleaning up done to the front headlight support pieces. Two big boxes with my Baja XD's came in as well-- had to go hunt down the UPS guy is why they are in the back of the truck
- Attachments
-
- Core Support Cleaning.JPG (133.58 KiB) Viewed 1550 times
-
- Mastercraft Coming Home.JPG (109.14 KiB) Viewed 1550 times
-
VintageIronFab
- Posts: 2328
- Joined: Mon May 27, 2013 12:25 am
- Bronco Info: Bronco List:
- Location: Phoenix, AZ
Re: 96 Bronco - Project "Cheryl"
Some rear end truss pics. The webbing in the center section was tapped as close to the tube as possible, then plate pieces to the tubes, the bolts go thru the plate and welded to the plate. On the cast I put a big tack weld on the bolts to just further keep it all together. Added a couple weld washers to the lower shock mounts. I'm a fan of -3an stuff-- I call brass the "devils metal ".... Lol!!
- Attachments
-
- image.jpg (79.89 KiB) Viewed 1488 times
-
- image.jpg (79.89 KiB) Viewed 1488 times
-
- image.jpg (76.89 KiB) Viewed 1488 times
-
- image.jpg (75.1 KiB) Viewed 1488 times
-
- image.jpg (110.55 KiB) Viewed 1488 times
-
VintageIronFab
- Posts: 2328
- Joined: Mon May 27, 2013 12:25 am
- Bronco Info: Bronco List:
- Location: Phoenix, AZ
-
otter
- Posts: 534
- Joined: Sun Sep 04, 2011 8:57 pm
- Bronco Info: Currently in a holding pattern
- Location: Hawaii
Re: 96 Bronco - Project "Cheryl"
Nice. Looked like it handle that pretty good.
-
1Hondalover

- Posts: 819
- Joined: Mon May 14, 2012 2:30 pm
- Bronco Info: Having so much fun with friends in Baja, we're not sure if we want to race NORRA.....
- Location: Santa Clarita
Re: 96 Bronco - Project "Cheryl"
Yeah.....good hit and it settled right down. Looks like you're getting it dialed.
-
VintageIronFab
- Posts: 2328
- Joined: Mon May 27, 2013 12:25 am
- Bronco Info: Bronco List:
- Location: Phoenix, AZ
Re: 96 Bronco - Project "Cheryl"
Yea it was pretty nice -- now I know that coilovers are in the future at some point. The front shocks didn't come close to bottoming out- funny thing though my back is fu@king killing me right now! I'm not sure if that drop off did it or just getting up from the computer I tweaked something. I've got good seats now so who knows!
-
Mojo
- Posts: 444
- Joined: Wed Sep 14, 2011 9:55 pm
- Bronco Info: 96eb 5.8, custom SS exh, C&T/uniball, Heim R-arms, 35"bajas 4.88s F53 w/SOLO shackle PRPs
- Location: Prescott, AZ
- Contact:
Re: 96 Bronco - Project "Cheryl"
I'm liking the truss!!! Good work.
-
VintageIronFab
- Posts: 2328
- Joined: Mon May 27, 2013 12:25 am
- Bronco Info: Bronco List:
- Location: Phoenix, AZ
Re: 96 Bronco - Project "Cheryl"
Thanks-- not sure if this truss actually does anything but it can't hurt-- without doing all the heating/preheating nickel rod-- this is about as good as it gets short of something really major. Its mainly because I thought it looked cool ..LOL!!
-
VintageIronFab
- Posts: 2328
- Joined: Mon May 27, 2013 12:25 am
- Bronco Info: Bronco List:
- Location: Phoenix, AZ
Re: 96 Bronco - Project "Cheryl"
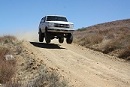
Well today I noticed something on the body of my truck-- the drivers side rear inner fender was pretty scuffed up, and the body was tweaked a tad too. The passenger side rear was scuffed too. I am guessing that is the norm on the FSB with 35" tires and stock alcoas?? I went back and looked at the video - that driver side rear hit really hard I am still waiting on u-bolts so I can mount up the J40's. Hopefully the J40's will help control the rear axle and slow the upward speed the hits happen. Also at this point I think there needs to b "more" shock. Currently the shocks are just a little light and need to be just a bit stiffer. Went back today-- that drop off is 42" and not 30"!!! Another question-- anyone think that drop off would have fully collapsed the front coil spring on impact? I almost think the spring was fully collapsed because I doesn't appear I used all the shock up all the way to the stock bumpstop. Love to hear some thoughts from the TTB guys in the know.....
- Attachments
-
- photo 3(7).JPG (82.65 KiB) Viewed 1343 times
-
- photo 2(13).JPG (90.68 KiB) Viewed 1343 times
-
- photo 1(5).JPG (92.94 KiB) Viewed 1343 times
-
Wrightracing.net

- Posts: 2209
- Joined: Thu Oct 28, 2010 9:58 pm
- Bronco Info: 1972 Bronco with an 86 chassis, full cage and Long travel coil-over suspension.
- Location: San Diego
- Contact:
Re: 96 Bronco - Project "Cheryl"
The truss looks good. It looks like it will help the axle tubs from pulling out and better support than stock to keep the housing from bending. Maybe a back truss that bolts to the diff cover would be a good idea to help horizontal pressure on axle tubes.
-
tcm glx

- Peanut Butter
- Posts: 7303
- Joined: Tue Dec 08, 2009 11:19 am
- Bronco Info: 93 Ford Bronco 5.8
- Location: Riverside Ca
- Contact:
Re: 96 Bronco - Project "Cheryl"
Rub on the inner fenders is common.
-
Rmc
- El Jefe
- Posts: 6026
- Joined: Tue Oct 09, 2012 10:22 pm
- Bronco Info: 94 bronco xlt prerunner
- Location: IE SoCal
- Contact:
Re: 96 Bronco - Project "Cheryl"
Bump stops coming soon to a bronco named Cheryl near you!!! 
Pretty much par for the course bro, the j40's will allow you to push it harder and the same thing will happen. Get some air bumps and you'll be good to go. Urethane bumps set before tire rub has the same result but depends on buget.
Pretty much par for the course bro, the j40's will allow you to push it harder and the same thing will happen. Get some air bumps and you'll be good to go. Urethane bumps set before tire rub has the same result but depends on buget.