Page 5 of 8
Re: Utah BroncoSpeed
Posted: Sun Mar 28, 2010 9:10 am
by tcm glx
Hey Brad,
So how about an update.... was the wedge the issue for the rear driveshaft? Hoping it was......
thanks for the cage to frame pics by the way
Re: Utah BroncoSpeed
Posted: Wed Mar 31, 2010 5:13 pm
by denhabr
tcm glx wrote:Hey Brad,
So how about an update.... was the wedge the issue for the rear drive shaft? Hoping it was......
thanks for the cage to frame pics by the way
You are welcome.
So...not sure if it was the missing wedge, but the additional lift really brought out the gremlins in the rear drive shaft. There were a LOT of drive-line noise issues, and the vibration and shuddering from the entire rear drive-line was driving me nuts.
So...as I mentioned above, I took the Bronco it to the local custom drive shaft shop here in south Salt lake City (Lehi, UT actually) that caters to Jeepers, Moab crawlers, and 4x4's in general. I had them upgrade the entire rear drive shaft to fully rebuilt and rebalanced condition...with new greasable Spicer 1350 u-joints in the double cardan, and a greasable Spicer 1410 u-joint just in front of the diff.
They also installed a Zerk fitting to allow me to grease the telescoping section of the drive shaft, and sealed the telescoping portion with a new seal.
They also said I did not need a spring wedge...unless I experienced further vibration issues. Which I currently do not. If I do, he said to bring it back and he will install a ~ 3-degree wedge. The shop also said that the drive shaft is equivalent to what a Powerstroke diesel has...not sure really about that...but regardless, it's pretty stout for a Bronco.
See pics...

- Rear Driveshaft 3-27-2010 (1).JPG (146.44 KiB) Viewed 1810 times
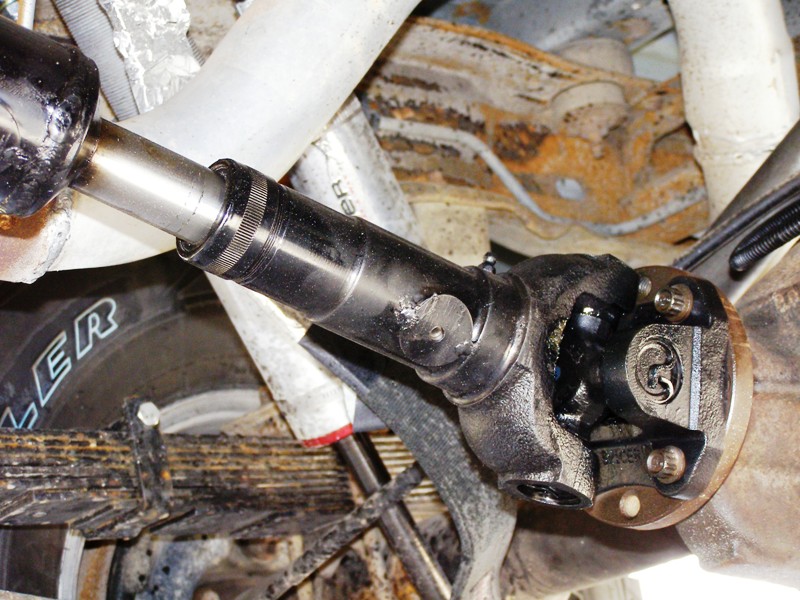
- Rear Driveshaft 3-27-2010 (2).JPG (146.18 KiB) Viewed 1810 times

- Rear Driveshaft 3-27-2010 (3).JPG (127.44 KiB) Viewed 1810 times
Re: Utah BroncoSpeed
Posted: Sat Jun 12, 2010 12:37 am
by Brad12
Very nice bronco, I have enjoyed watching this thread. Any updates? Did the new driveshaft fix your problems?
July 2010 Update 1
Posted: Mon Jul 12, 2010 3:45 pm
by denhabr
All,
It's been awhile since my last update as my work various travels have kept me busy...so my time has been limited in getting my project updates into GoFastBroncos.com (and back over at Broncospeed.com.) However, this reply and the next will show you what I've been up to over the last few months:
- Major: Powder coating the bumpers, spare tire carrier, and receiver hitch
- Minor: Fixing a vacuum leak on the intake tube
- Minor: Cleaning the radiator fins and repairing a headlight bezel/surround
----------------------------------------------------------------------------------------------------------------------------------
Brad12 wrote:Very nice bronco, I have enjoyed watching this thread. Any updates? Did the new drive shaft fix your problems?
Brad12...thanks for the comments. Actually, the new drive shaft did a LOT to address the vibration and noise from the rear end. I still sense a small amount of minor vibration (especially on the highway,) but I will deal with it.
Powder coating update is in next posting...
July 2010 Update 2 - Powdercoating Complete!
Posted: Mon Jul 12, 2010 3:57 pm
by denhabr
Got the rusty F&R custom fab'd bumpers, OEM spare tire carrier, and aftermarket receiver hitch all removed, sand-blasted and powder coated at the end of June. Got them all back on
(a lot harder to bolt back on than it was to take them off!) back on July 2...just before a week of family vacation in Florida.
The powder coat was performed my a local SLC shop that I've patronized before, and I selected "Silver Vein" as the color. It is a textured 'hammertone' silver and black finish that also has a second clear coat applied.
All 7 pieces sandblasted and coated (silver vein and clear gloss) cost me $373.97.
Pics attached...
The monster F prerunner bumper after a little wax application:

- Bumper Powdercoating Results July 2010 (0).jpg (273.71 KiB) Viewed 1713 times
All 7 pieces laid out after a little Meguiar's Carnauba wax treatment...
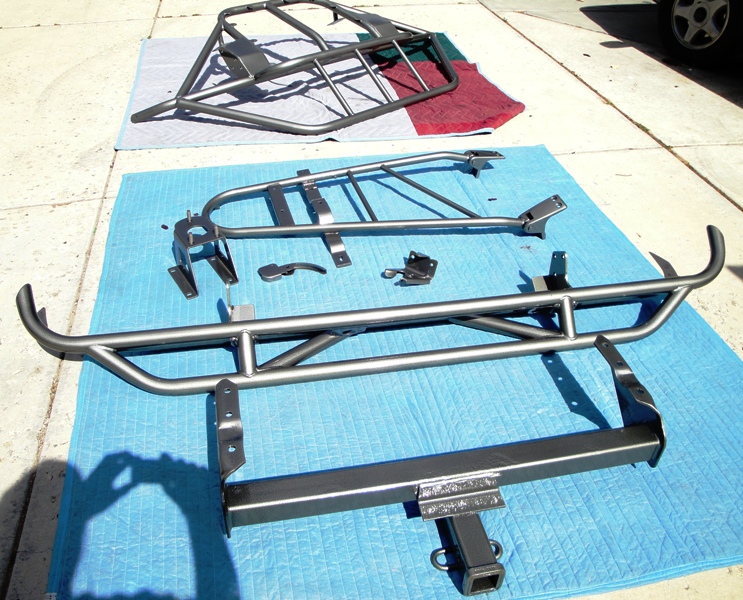
- Bumper Powdercoating Results July 2010 (4).JPG (255.39 KiB) Viewed 1713 times
Close-up of the F bumper showing the detail of the hammertone finish

- Bumper Powdercoating Results July 2010 (9).JPG (218.72 KiB) Viewed 1713 times
R bumper close-up...

- Bumper Powdercoating Results July 2010 (12).JPG (210.24 KiB) Viewed 1713 times
July 2010 Update 2 - Powdercoating Complete! (II)
Posted: Mon Jul 12, 2010 4:17 pm
by denhabr
Re: Utah BroncoSpeed
Posted: Mon Jul 12, 2010 11:10 pm
by Brad12
That looks great. Very good choice on the "silver vein" in my opinion. The only thing we need now is some video of that beauty in action!
Re: Utah BroncoSpeed
Posted: Tue Jul 13, 2010 3:29 am
by whatdyisit
Very nice choice on the color. Those pieces look awesome.
Re: Utah BroncoSpeed
Posted: Thu Jul 15, 2010 3:32 pm
by denhabr
Brad12 wrote:That looks great. Very good choice on the "silver vein" in my opinion. The only thing we need now is some video of that beauty in action!
Brad12...I just have to find the band to get my ass out in the desert with this beast and go have some more fun with it. Jeez!

These days, my time is not my own.
Bleh!
whatdyisit wrote:Very nice choice on the color. Those pieces look awesome.
Thanks
whatdyisit!
Re: Utah BroncoSpeed
Posted: Thu Jul 15, 2010 3:51 pm
by hobbyturnedobsession
I'll second that opinion, great color, makes it all tie up clean! You'll have to show some pics of that thing in action. I'd like to see it.
Re: Utah BroncoSpeed
Posted: Fri Jul 16, 2010 10:02 am
by Broncodawg
Nice looking powdercoating. Thought I might give you a friendly heads up to be very careful with your spare tire mount. Mounting to bed corner and tailgate is not the strngest when flogging it in the dirt especially with larger tire/wheel. Have seen latches tear out of tailgates, so might want to make sure there's a good steel mounting plate inside tailgate. Many abandon that mount setup and build them into a custom bumper, but understand that can cost a bunch and typical prerun rear bumper can't handle the load. Keep an eye on it in any case and nice rig! Sorry for the hijack, but hope it helps.
Re: Utah BroncoSpeed
Posted: Fri Jul 16, 2010 1:45 pm
by denhabr
Broncodawg wrote:Nice looking powdercoating. Thought I might give you a friendly heads up to be very careful with your spare tire mount. Mounting to bed corner and tailgate is not the strngest when flogging it in the dirt especially with larger tire/wheel. Have seen latches tear out of tailgates, so might want to make sure there's a good steel mounting plate inside tailgate. Many abandon that mount setup and build them into a custom bumper, but understand that can cost a bunch and typical prerun rear bumper can't handle the load. Keep an eye on it in any case and nice rig! Sorry for the hijack, but hope it helps.
Broncodawg...appreciate the comment and suggestion! My fabricators said virtually the same thing when I told them to bolt it all back together. When I made that decision to keep the stock set-up, they immediately began planning some future mods that would:
- Support the locking mechanism (where it connects to the tailgate,) with an internal plate (as you suggested,)
- Cross-brace the existing swing arms to hold the weight, and...
- Add an additional vertical brace that would transfer the load bearing duties (from the locking mechanism area) down to the lower tubular bumper
I can' imagine the damage that could occur with a 35x12.50-15 mounted on a stock carrier! Ouch.
So, in the mean time, I'll pray that what I have doesn't break (heck, I don't even have a 35" spare tire yet!,) and budget your suggestion for a Fall 2010 mini-project.
Thanks!!!
Re: Utah BroncoSpeed
Posted: Fri Jul 16, 2010 1:59 pm
by Phoenix0783
denhabr wrote:Broncodawg wrote:Nice looking powdercoating. Thought I might give you a friendly heads up to be very careful with your spare tire mount. Mounting to bed corner and tailgate is not the strngest when flogging it in the dirt especially with larger tire/wheel. Have seen latches tear out of tailgates, so might want to make sure there's a good steel mounting plate inside tailgate. Many abandon that mount setup and build them into a custom bumper, but understand that can cost a bunch and typical prerun rear bumper can't handle the load. Keep an eye on it in any case and nice rig! Sorry for the hijack, but hope it helps.
Broncodawg...appreciate the comment and suggestion! My fabricators said virtually the same thing when I told them to bolt it all back together. When I made that decision to keep the stock set-up, they immediately began planning some future mods that would:
- Support the locking mechanism (where it connects to the tailgate,) with an internal plate (as you suggested,)
- Cross-brace the existing swing arms to hold the weight, and...
- Add an additional vertical brace that would transfer the load bearing duties (from the locking mechanism area) down to the lower tubular bumper
I can' imagine the damage that could occur with a 35x12.50-15 mounted on a stock carrier! Ouch.
So, in the mean time, I'll pray that what I have doesn't break (heck, I don't even have a 35" spare tire yet!,) and budget your suggestion for a Fall 2010 mini-project.
Thanks!!!
I've been running around in the desert with my stock tire carrier and 35s. It bounces around a little bit, but I haven't had any problems. Granted, the previous over backed into something with the spare tire and did a number on the tailgate so I'm not really worried about it, but still. I can't build something to support the tire from the bumper or else the tailgate would hit it when opened.
Re: Utah BroncoSpeed
Posted: Fri Jul 16, 2010 2:44 pm
by Nick
Phoenix0783 wrote:denhabr wrote:Broncodawg wrote:Nice looking powdercoating. Thought I might give you a friendly heads up to be very careful with your spare tire mount. Mounting to bed corner and tailgate is not the strngest when flogging it in the dirt especially with larger tire/wheel. Have seen latches tear out of tailgates, so might want to make sure there's a good steel mounting plate inside tailgate. Many abandon that mount setup and build them into a custom bumper, but understand that can cost a bunch and typical prerun rear bumper can't handle the load. Keep an eye on it in any case and nice rig! Sorry for the hijack, but hope it helps.
Broncodawg...appreciate the comment and suggestion! My fabricators said virtually the same thing when I told them to bolt it all back together. When I made that decision to keep the stock set-up, they immediately began planning some future mods that would:
- Support the locking mechanism (where it connects to the tailgate,) with an internal plate (as you suggested,)
- Cross-brace the existing swing arms to hold the weight, and...
- Add an additional vertical brace that would transfer the load bearing duties (from the locking mechanism area) down to the lower tubular bumper
I can' imagine the damage that could occur with a 35x12.50-15 mounted on a stock carrier! Ouch.
So, in the mean time, I'll pray that what I have doesn't break (heck, I don't even have a 35" spare tire yet!,) and budget your suggestion for a Fall 2010 mini-project.
Thanks!!!
I've been running around in the desert with my stock tire carrier and 35s. It bounces around a little bit, but I haven't had any problems. Granted, the previous over backed into something with the spare tire and did a number on the tailgate so I'm not really worried about it, but still. I can't build something to support the tire from the bumper or else the tailgate would hit it when opened.
X2. I had many baja miles, and several hucks on the stock carrier, with a 35, and never had a problem. That's not to say it will never happen.
Utah BroncoSpeed Tune-Up
Posted: Sun Oct 10, 2010 7:28 pm
by denhabr
Yes...I got the Bronco 23 months ago, bought the tune-up parts from Summit a few weeks later (after reading the entire FSB "Sixlitre Tune-Up" thread in November of 2008...see link below,) but just got to the tune up this past weekend! Here are the tune-up procedures from FSB's "Technical Write-Ups" sub-forum:
http://fullsizebronco.com/forum/showthread.php?t=63592
My parts list:
- Accel #140012 coil (yellow)
- Ford Racing Performance Parts #M-12259-M301 9mm wires (grey/black)
- Autolite #25 plugs, gapped @ .055"
- Accel #8234 brass cap and rotor (grey)
- BWD #C241 distributor cap base (grey)
Starts perfect, idles great, no CEL, and around-town performance is a bit more gutsy, even with the stock timing! Next step is to get it off road and see how things perform. No MPG figures from before...as I really don't care all that much. Just wanted the performance pickup to compensate for the added weight of the cage, 35" tires, and Autofab suspension.
I did everything this time except check the timing. I sold my cherished 'chrome' Craftsman timing light (and dwell meter) at a garage sale ~ 4 years ago...never thinking I would use it again...HA!
The Autofab cross tube (and the reservoirs mounted to it) both hindered (limited access to the distributor and wires) and helped (I could rest on the cross tube while leaning over into the compartment to get at the #4 and #8 plugs!)
So, I'll pick up a timing light this next weekend, time it to 13 degrees BTDC, and see where that takes me. Since I'm at 4500' ASL, I should be OK with my local 85 octane gasoline. Also want to purchase some plastic 9mm looms and lay the wires out a bit better than they already are (and follow the under-hood wiring diagram.) The FRPP wires are much longer than stock, and just need a little organization. Also need to remount the right front S-A-W 2.5" shock res as I knocked it off the upper shock hoop and lost one of the small red urethane mounting pads.
Publish or Perish!
Posted: Sun Oct 10, 2010 7:31 pm
by denhabr
Been conversing with Jerrod Jones at Off-Road Magazine since I kicked off my Utah Broncospeed project in 2008. He was interested in what I was doing on my project about the same time as they initiated their "Project Juice."
He said, "hey, send me some pics when you get done..."
So I did.
Made Page 19 of the December 2010 issue of ORM - Reader's Rides...

- ORM Dec 2010 Cover 600x800.jpg (171.18 KiB) Viewed 1539 times

- 's Bronco in ORM Dec 2010 Pg 19 600x800.jpg (150.8 KiB) Viewed 1539 times

Re: Utah BroncoSpeed
Posted: Sun Oct 10, 2010 7:33 pm
by tcm glx
That's awesome! Congrats!!
Re: Utah BroncoSpeed
Posted: Wed Oct 13, 2010 8:43 pm
by shockseals.com
Id love to see the mdr "what really happened" article. Care to scan it?
Re: Utah BroncoSpeed
Posted: Wed Oct 13, 2010 11:00 pm
by BDKW1
AR23's....... Should have been at the off road swap meet earlier this year, I had a pile of 10 of those I ended up offing for 10$ a wheel so I wouldn't have to haul them home.
Re: Utah BroncoSpeed
Posted: Thu Oct 14, 2010 6:59 pm
by denhabr
shockseals.com wrote:Id love to see the mdr "what really happened" article. Care to scan it?
Done...
http://www.gofastbroncos.com/forum/view ... 2&start=19