PELLEY's 1990
Re: PELLEY's 1990
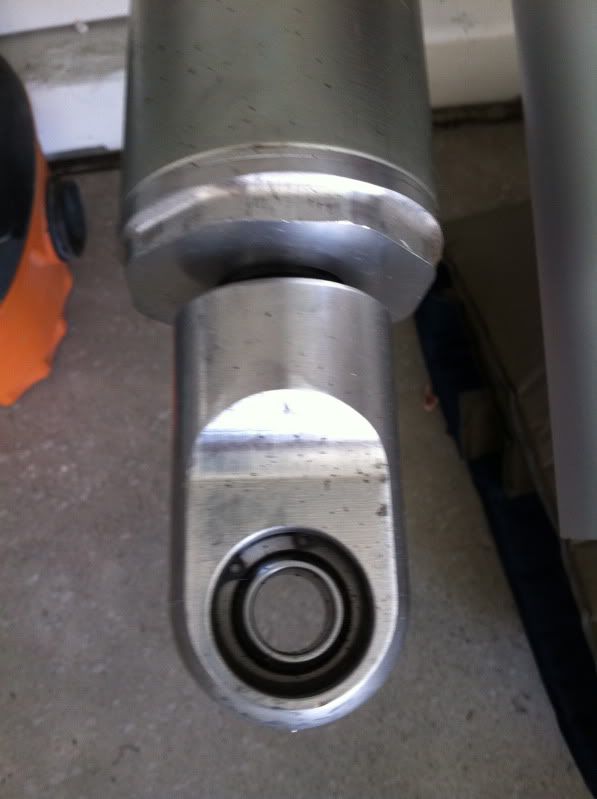
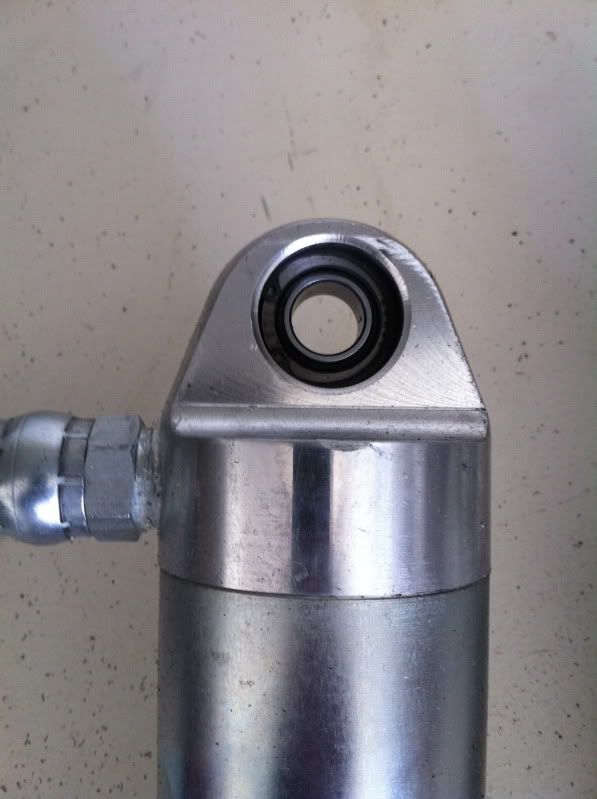
are the nuts about the piston metal locking? If not might be a good idea to convert to one.
-
PELLEY
- Posts: 137
- Joined: Sun Oct 31, 2010 8:30 am
- Bronco Info: 1990 5.8L, auto, roll-a-long.
- Location: Edwards AFB, CA
Re: PELLEY's 1990
Thanks for the heads up RyanB. They are not locking, and there doesn't look to be room to put a lock nut on there either, not even the metal ones. I got me some red lock tight, I think that should do the trick.
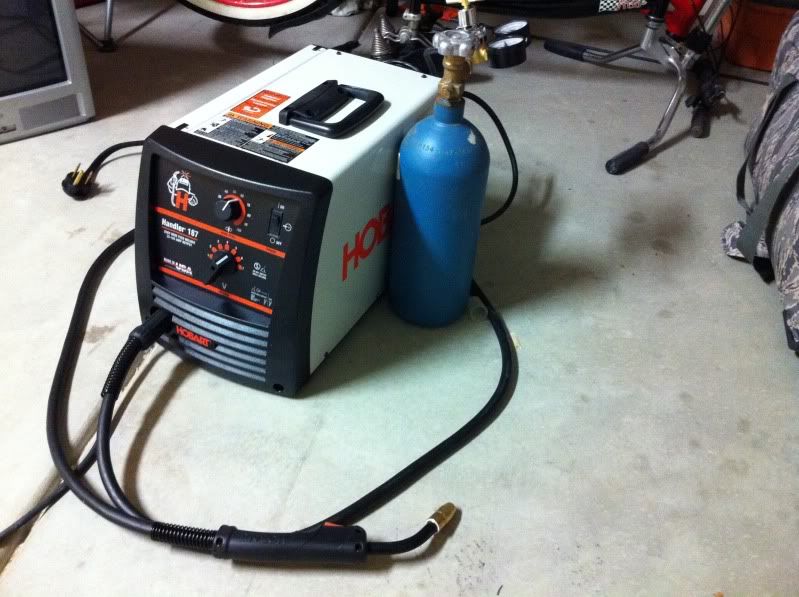
Also today was a great day in deliveries!!! Got my welder and a set of rotary drill bits in today!!!!!
Hobart 187 with the "mini me" of mixed gas bottles. It is all they had at the local spot, will step up to at least a number 2 for the next exchange...
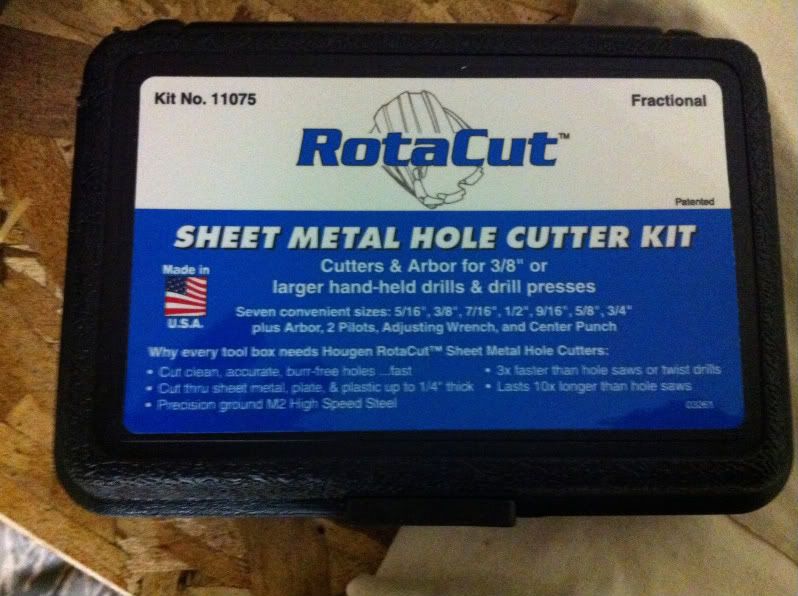
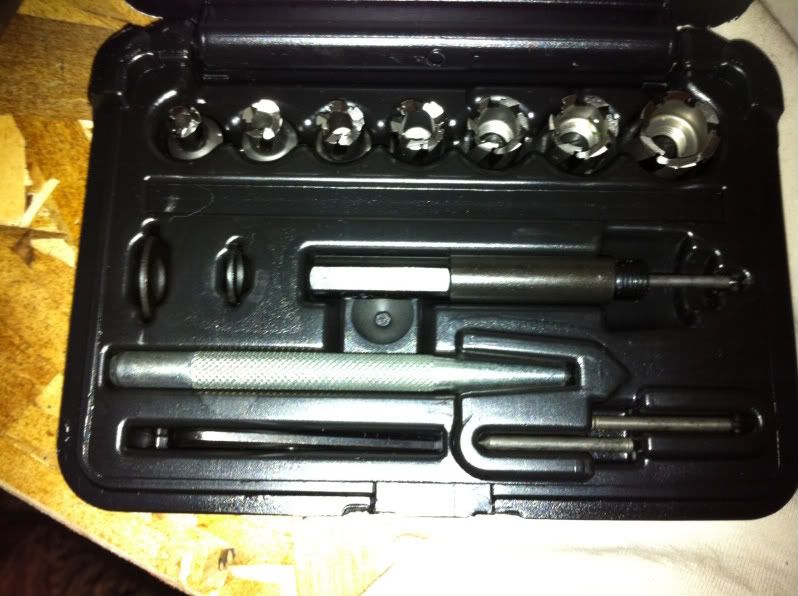
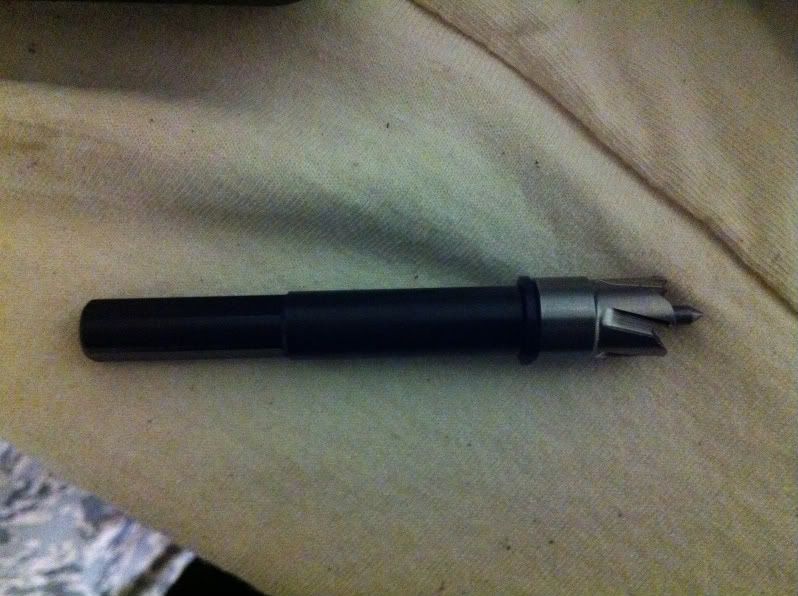
Here are the rotary bits. If you haven't used these things, I highly recommend them. $95 for the set from etools.com, or $250 if you love your snap-on guy. They make drilling a 3/4" hole in chromoly like drilling a hole in wood. Not only that but they don't wobble or anything at all so you get perfect holes every time. The only disadvantage, and it is a small one, is that they are a little harder to use without a drill press, but still much easier than standard bits.
Also cut my spacers for my bumps and collected the rest of my odds and ends over the weekend. Now I just need to go get a sheet of 3/16" plate and need my gallon of shock oil to show up. Then the only hold up will be me!!!
Also today was a great day in deliveries!!! Got my welder and a set of rotary drill bits in today!!!!!
Hobart 187 with the "mini me" of mixed gas bottles. It is all they had at the local spot, will step up to at least a number 2 for the next exchange...
Here are the rotary bits. If you haven't used these things, I highly recommend them. $95 for the set from etools.com, or $250 if you love your snap-on guy. They make drilling a 3/4" hole in chromoly like drilling a hole in wood. Not only that but they don't wobble or anything at all so you get perfect holes every time. The only disadvantage, and it is a small one, is that they are a little harder to use without a drill press, but still much easier than standard bits.
Also cut my spacers for my bumps and collected the rest of my odds and ends over the weekend. Now I just need to go get a sheet of 3/16" plate and need my gallon of shock oil to show up. Then the only hold up will be me!!!
-
ChaseTruck754

- Spy/Ninja
- Posts: 9194
- Joined: Thu Jan 28, 2010 9:46 am
- Bronco Info: Don't have one - just old Ford trucks
- Location: Huntington Beach, CA
Re: PELLEY's 1990
Funny - I finally picked up a set of rotobroaches - well it was a b-day present I just got actually, but I can't wait to try them out. I've heard nothing but good things.
This is the one I put on my wish list and got. It'll save people a little $$ if they are looking at these.
http://www.amazon.com/Blair-Equipment-1 ... 836&sr=8-2
This is the one I put on my wish list and got. It'll save people a little $$ if they are looking at these.
http://www.amazon.com/Blair-Equipment-1 ... 836&sr=8-2
Owner of only dead and forgotten projects
-
PELLEY
- Posts: 137
- Joined: Sun Oct 31, 2010 8:30 am
- Bronco Info: 1990 5.8L, auto, roll-a-long.
- Location: Edwards AFB, CA
Re: PELLEY's 1990
Oh wow thats a way better price, and from what I have been told they are all made by the same company, just put in different boxes... I did however, see a few on amazon that looked almost the same, but when you look closely at the bits, they are a little different. Not sue how those work... maybe they are good too, who knows. But ya the ones like you and I have are the best. Just make sure to use lube, especially with the 3/4" and don't go too fast or push to hard, they will break if you don't take it easy. I plan on ordering up a few extra cutters for the common holes I drill the most.
-
PELLEY
- Posts: 137
- Joined: Sun Oct 31, 2010 8:30 am
- Bronco Info: 1990 5.8L, auto, roll-a-long.
- Location: Edwards AFB, CA
Re: PELLEY's 1990
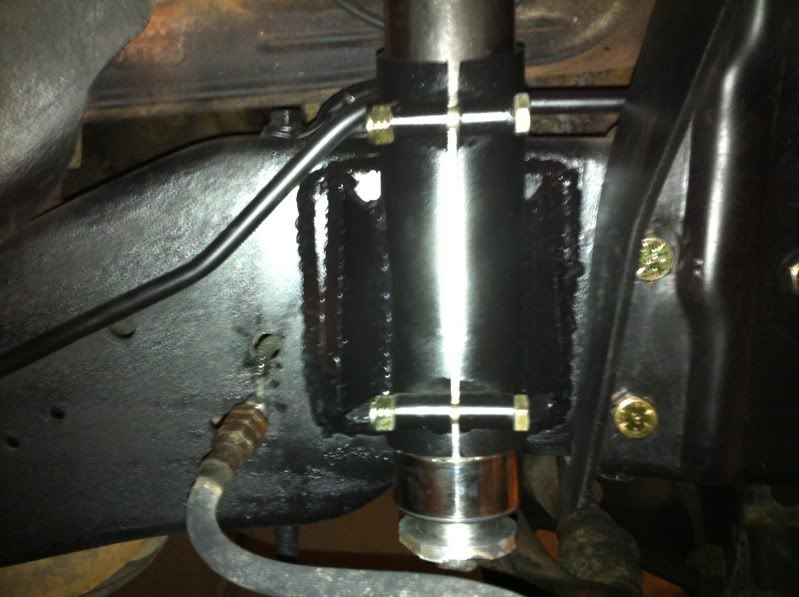
Finally got started on some of the fun stuff yesterday and today. Went and picked up a sheet of 3/16" plate and got to work on my radius arm pivots. Cut out the sides, and some fancy weld washers/laminates yesterday, then drilled holes and welded the washers on today. Not I just need to cut out the top and bottom plates and weld them all up. My Hobart runs very good, welded this 3/16" with power to spare. This thing is a great garage welder for sure! As far as my welding goes, I am still a little rusty, it has been around 4 years since I have welded but all in all they looked ok, I'll get better once I start welding more. Pivots are going to be weld-on. I know most go with bolt-on, but I didn't want to mess with all the extra hole drilling and hardware. Pics...
Plates with washers welded on. 3/16 laminates are a little overkill but it's mild so I figure better safe then sorry. Should hold up no problem though, not a race truck by any means. If I ever have a problem I will build chromoly ones...

Here is a closer shot at one of the welds, looks good enough, haha.
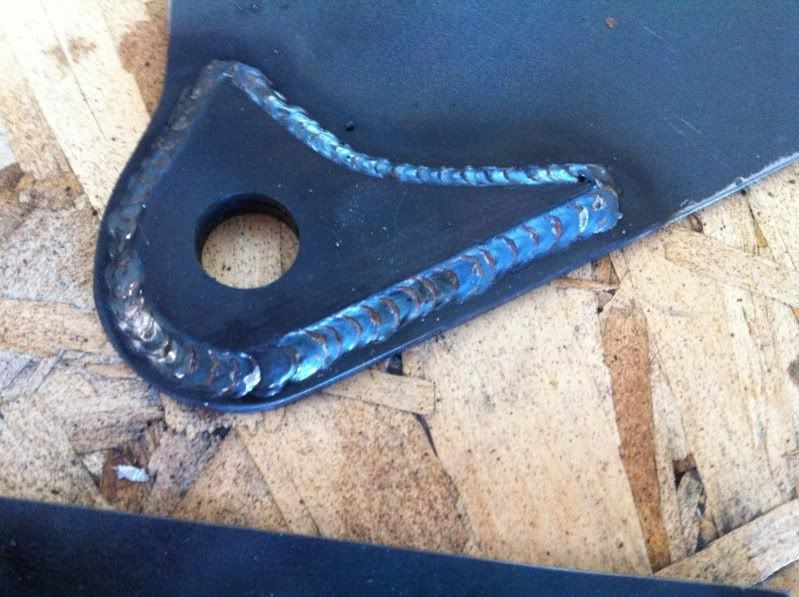
Couple more plates and these will be all done!
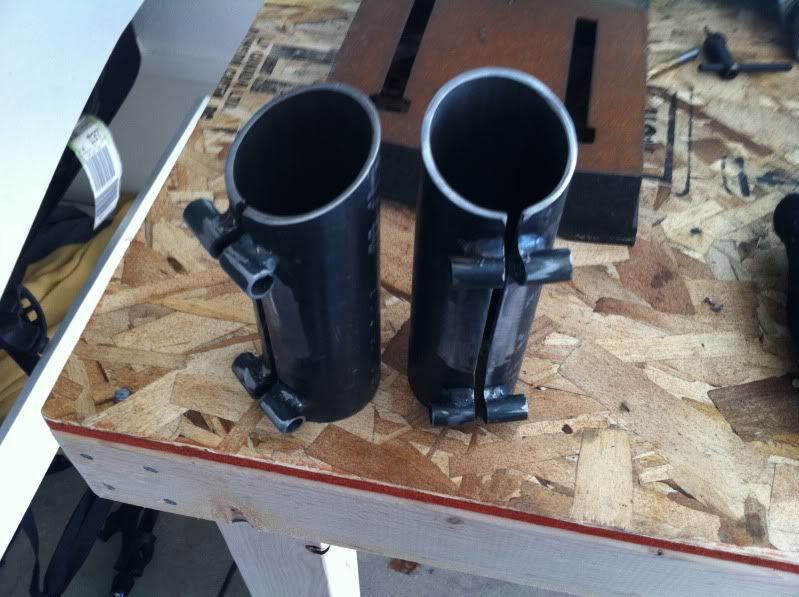
Next I need to build my bump cans. Used to be California Metals back in the day, now Competitive Metals (if I remember right) in San Diego actually cut me a 12" peace of 2 1/4" chromoly for the cans. I was surprised they actually were willing to cut me a 12" peace off of a 20' stick of tube, but they were more than happy to do it, I was just hoping they had a small scrap peace laying around. So props to them big time, most places won't do that. I wish I lived in San Diego so I could buy from them all the time, but I will definitely go there again whenever I am down there. Once I get the cans done I can start tearing down the front to put my parts on.
My Bronco has the duel shock mounts so the plan is to cut the bucket as to get ride of the rear of the two mounts, plate the side up nice and then mount the bump can on the frame. This way when I go coilover the cans are already mounted where they need to be. Will only have a single 2" Bilstein on the front for the time being. I might even get a little old school Autofab, cut the front shock mount of the bucket and get 2 more Bilsteins and run duel 2" shocks in front of the beam until I get coilovers. Still not sure yet, trying to brain storm on how to do a decent front end that will do the job for a bit. The wife is still asking for a roll cage so that is more important than a huge front end right now. This kit I put together should work good while I do the cage and then do a good rear suspension set-up.
Plates with washers welded on. 3/16 laminates are a little overkill but it's mild so I figure better safe then sorry. Should hold up no problem though, not a race truck by any means. If I ever have a problem I will build chromoly ones...
Here is a closer shot at one of the welds, looks good enough, haha.
Couple more plates and these will be all done!
Next I need to build my bump cans. Used to be California Metals back in the day, now Competitive Metals (if I remember right) in San Diego actually cut me a 12" peace of 2 1/4" chromoly for the cans. I was surprised they actually were willing to cut me a 12" peace off of a 20' stick of tube, but they were more than happy to do it, I was just hoping they had a small scrap peace laying around. So props to them big time, most places won't do that. I wish I lived in San Diego so I could buy from them all the time, but I will definitely go there again whenever I am down there. Once I get the cans done I can start tearing down the front to put my parts on.
My Bronco has the duel shock mounts so the plan is to cut the bucket as to get ride of the rear of the two mounts, plate the side up nice and then mount the bump can on the frame. This way when I go coilover the cans are already mounted where they need to be. Will only have a single 2" Bilstein on the front for the time being. I might even get a little old school Autofab, cut the front shock mount of the bucket and get 2 more Bilsteins and run duel 2" shocks in front of the beam until I get coilovers. Still not sure yet, trying to brain storm on how to do a decent front end that will do the job for a bit. The wife is still asking for a roll cage so that is more important than a huge front end right now. This kit I put together should work good while I do the cage and then do a good rear suspension set-up.
-
PELLEY
- Posts: 137
- Joined: Sun Oct 31, 2010 8:30 am
- Bronco Info: 1990 5.8L, auto, roll-a-long.
- Location: Edwards AFB, CA
Re: PELLEY's 1990
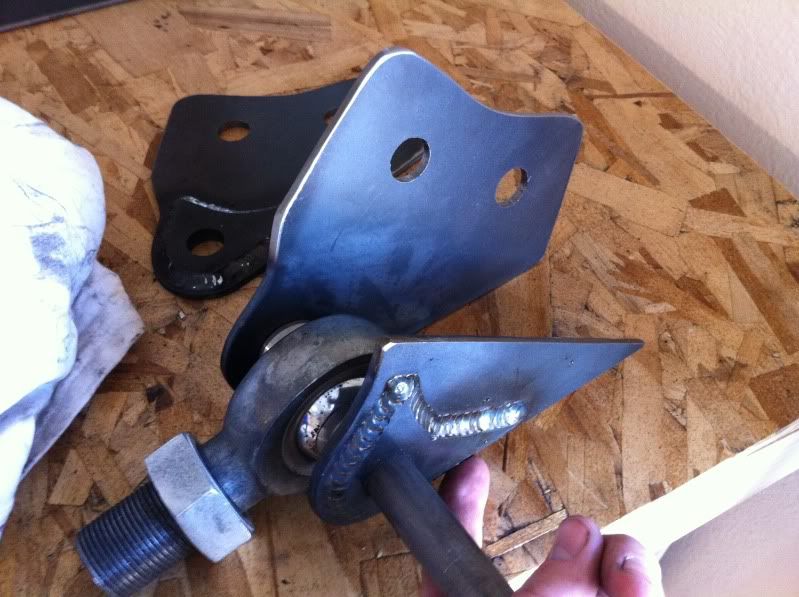
Well I finished my pivots today. I think they turned out pretty good. Also have a change in plans. I decided to go ahead and order up a set of FOA 2.5X14" smooth bodies with reservoirs. After doing some thinking I decided the doing 2 2" shocks would end up costing just as much, and would just mean I would have to mount more stuff. I want to do C/O's in the long run, but for now I think this will work great while I get a lot of the other work done. I am still a little skeptical about how the FOA's will work out, but they are half the price, and from what I have seen on the FOA thread on DR it looks like they have great customer service. We will see how they work out, but I can't wait to get them and mount um up. I am getting ready to go to the Mojave Road at the end of March and am hoping to get everything do for the trip, we will see though, from what I hear FOA is swamped with orders and they take a month plus to get shocks sent out. Either way I will have the radius arms, 2" coils, hydro bumps, and my 2" Bilsteins on and ready to go, install starts on Wednesday!!!!
Pictures of the pivots:

Pictures of the pivots:
-
Silverslk
- Posts: 1932
- Joined: Tue Dec 08, 2009 12:13 pm
- Bronco Info: 1995 Eddie Baur Bronco......GONE to a better home
- Location: Garden Grove, CA
- Contact:
Re: PELLEY's 1990
Let us know how the shocks work out. The problem with good customer service is that you only know its good when you have to use it. Seems like everyone with FOA has to use it.......I'm sticking with Bilstein.
SteveG wrote:The point? It's amazing these front ends go down the road straight in any form! The TTB is brute. A broad sword and not a scalpel. That's why I love it!
-
randomthoughtsracing
- Posts: 57
- Joined: Wed Dec 16, 2009 3:46 pm
- Location: so cal.
Re: PELLEY's 1990
If you dont want to wait I have a pair of Bilstein 60mm 2.65" x 14" coilovers (22.5" col, 35.9" ext) that were mounted but never used that I cant sell as "new" sitting on the shelf ready to ship for a sweetheart price... send me an email if interested joel.ward@bilsteinUS.comPELLEY wrote:Well I finished my pivots today. I think they turned out pretty good. Also have a change in plans. I decided to go ahead and order up a set of FOA 2.5X14" smooth bodies with reservoirs. After doing some thinking I decided the doing 2 2" shocks would end up costing just as much, and would just mean I would have to mount more stuff. I want to do C/O's in the long run, but for now I think this will work great while I get a lot of the other work done. I am still a little skeptical about how the FOA's will work out, but they are half the price, and from what I have seen on the FOA thread on DR it looks like they have great customer service. We will see how they work out, but I can't wait to get them and mount um up. I am getting ready to go to the Mojave Road at the end of March and am hoping to get everything do for the trip, we will see though, from what I hear FOA is swamped with orders and they take a month plus to get shocks sent out. ...
-
PELLEY
- Posts: 137
- Joined: Sun Oct 31, 2010 8:30 am
- Bronco Info: 1990 5.8L, auto, roll-a-long.
- Location: Edwards AFB, CA
Re: PELLEY's 1990
Ya I agree the Bilsteins are the way to go, but those will put a bigger dent in the wallet than I can handle right now with everything else I am trying to do to the Bronco and of course this this life thing... haha. When I go C/O down the road I plan on running Bilsteins.
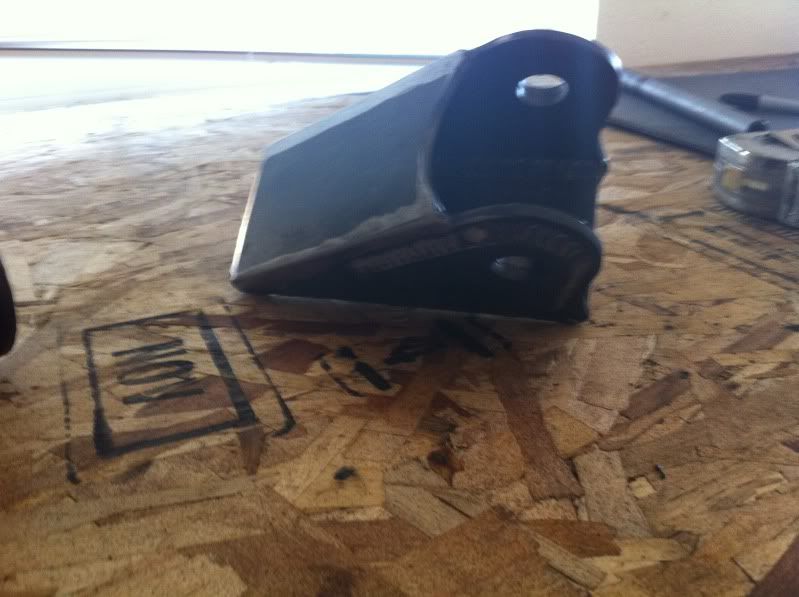
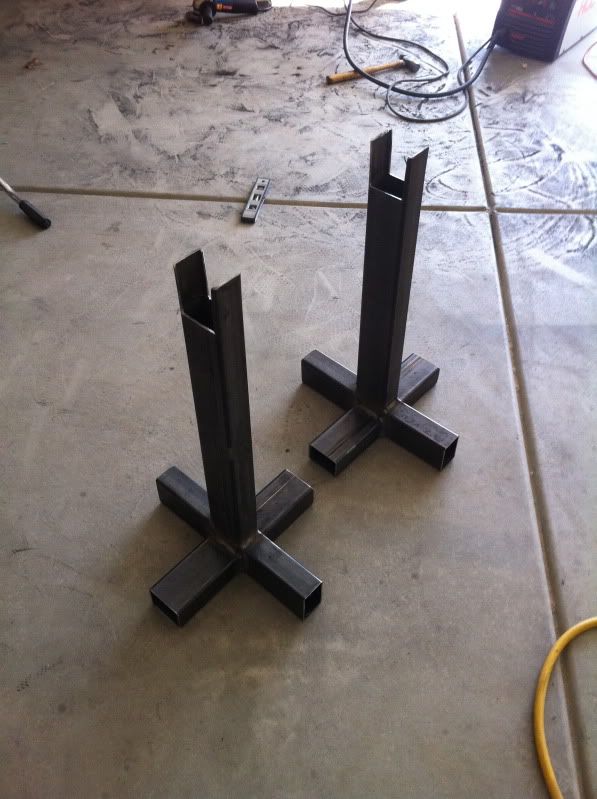
So today I started with the build-up, FINALLY. Started out by making some custom jack stands for the job, and building my bump cans.
Then pulled the wheels and started to disassemble...
I must say you gotta love and hate the factory lock tight... The top and bottom bolts for the radius arm/beam were killer, breaker bar/cheater bar the whole way out. Happy to have that behind me.
Started to put the new radius arms on and found a weird problem, there is a 3/8" gap between plates where it meets the beam.
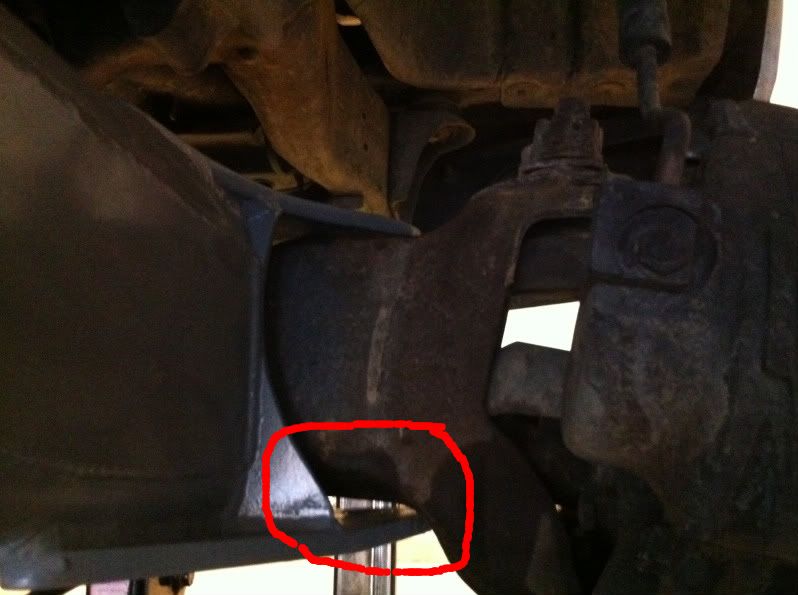
I bought these used from a guy on RDZ who said he bought them used from someone who said they were for a 2WD f-150, they didn't work for him so he sold them to me saying they were actually for a Bronco/4x4 F-150. Now I beginning to guess they are not for this thing either. They are supposed to be Camburg, but when I got them they were bare metal and other than looking like Camburg beams I really can't figure out how to tell for sure. But as I said there is a 3/8" gap between plates, plus the top plate goes towards the end of the beam too far and when the holes are lined up it starts to go up the curve of the beam.
I am already too far to go back, and luckily for me I have a sheet of 3/16" plate. I am going to go ahead and weld spacers on both sides so that they are on the top and bottom of the beam. This will take up the 3/8" gap. Then I am going to grind the top plate back a bit so that it does not hit on the beam any more. This will let me get them bolted on. If everything works out I will either run um, or jig them up and build some new ones with the right spacing and everything. Right now I just need to get this thing done. Here is a pic of where it is hitting, and the radius arm partially installed.
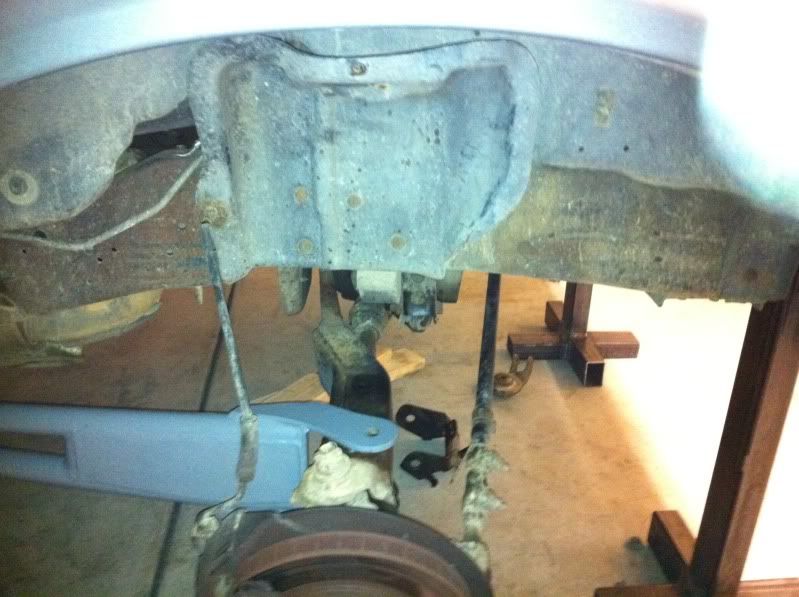
So that's the dilemma, I am going to hit it again tomorrow and see where I can get. I still need to cut these buckets off so I can modify them, then get everything back on. So much for having it all done by Sunday, but hey we all know these things never go as planned!!!
So today I started with the build-up, FINALLY. Started out by making some custom jack stands for the job, and building my bump cans.
Then pulled the wheels and started to disassemble...
I must say you gotta love and hate the factory lock tight... The top and bottom bolts for the radius arm/beam were killer, breaker bar/cheater bar the whole way out. Happy to have that behind me.
Started to put the new radius arms on and found a weird problem, there is a 3/8" gap between plates where it meets the beam.
I bought these used from a guy on RDZ who said he bought them used from someone who said they were for a 2WD f-150, they didn't work for him so he sold them to me saying they were actually for a Bronco/4x4 F-150. Now I beginning to guess they are not for this thing either. They are supposed to be Camburg, but when I got them they were bare metal and other than looking like Camburg beams I really can't figure out how to tell for sure. But as I said there is a 3/8" gap between plates, plus the top plate goes towards the end of the beam too far and when the holes are lined up it starts to go up the curve of the beam.
I am already too far to go back, and luckily for me I have a sheet of 3/16" plate. I am going to go ahead and weld spacers on both sides so that they are on the top and bottom of the beam. This will take up the 3/8" gap. Then I am going to grind the top plate back a bit so that it does not hit on the beam any more. This will let me get them bolted on. If everything works out I will either run um, or jig them up and build some new ones with the right spacing and everything. Right now I just need to get this thing done. Here is a pic of where it is hitting, and the radius arm partially installed.
So that's the dilemma, I am going to hit it again tomorrow and see where I can get. I still need to cut these buckets off so I can modify them, then get everything back on. So much for having it all done by Sunday, but hey we all know these things never go as planned!!!
-
Silverslk
- Posts: 1932
- Joined: Tue Dec 08, 2009 12:13 pm
- Bronco Info: 1995 Eddie Baur Bronco......GONE to a better home
- Location: Garden Grove, CA
- Contact:
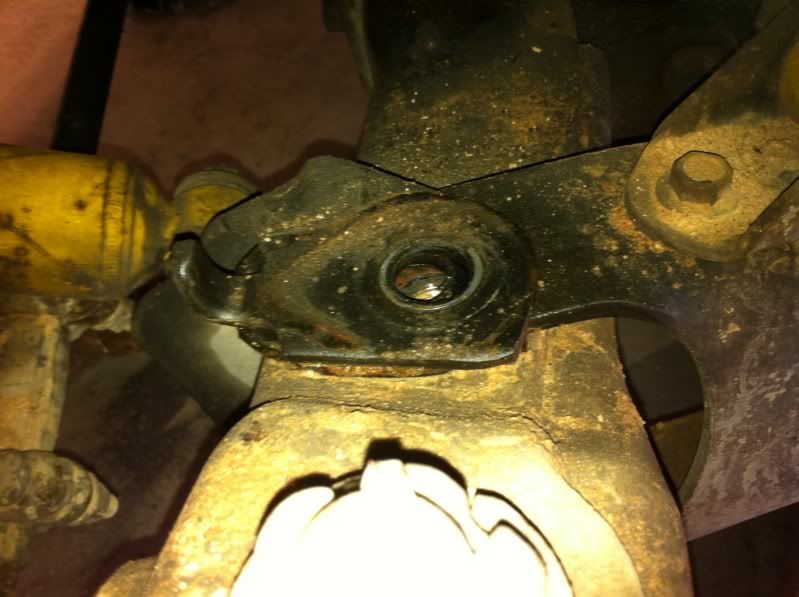
Re: PELLEY's 1990
That bracket (for front shock?) sits inbetween the beam the the radius arm. I see in the pic you are not using them.....is that causing the gap maybe?
SteveG wrote:The point? It's amazing these front ends go down the road straight in any form! The TTB is brute. A broad sword and not a scalpel. That's why I love it!
-
lifeinthesouth
- Posts: 24
- Joined: Fri Dec 11, 2009 10:56 pm
- Bronco Info: 95 5.0L/E4OD
- Location: Kodiak, AK
Re: PELLEY's 1990
Same issue with the solo RA's... if you're leaving out that shock bracket you'll need to make a spacer. Spacing it up a bit on the top will also probably eliminate it hitting the curve on the beam.
Lookin good, have fun with those rivets!!!
Lookin good, have fun with those rivets!!!
-
Dezertbronco
- Posts: 652
- Joined: Fri Jan 22, 2010 12:29 am
- Bronco Info: 1990 Bronco EB
- Location: Highland, CA.
Re: PELLEY's 1990
I recently ran into that exact issue. it was missing the shock bracket.Silverslk wrote:That bracket (for front shock?) sits inbetween the beam the the radius arm. I see in the pic you are not using them.....is that causing the gap maybe?
There is no substititute for Horsepower.
-
PELLEY
- Posts: 137
- Joined: Sun Oct 31, 2010 8:30 am
- Bronco Info: 1990 5.8L, auto, roll-a-long.
- Location: Edwards AFB, CA
Re: PELLEY's 1990
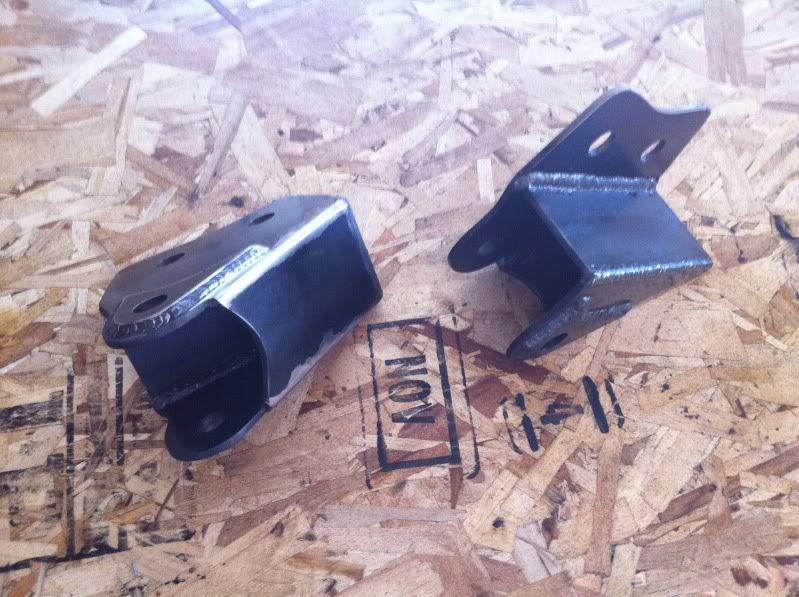
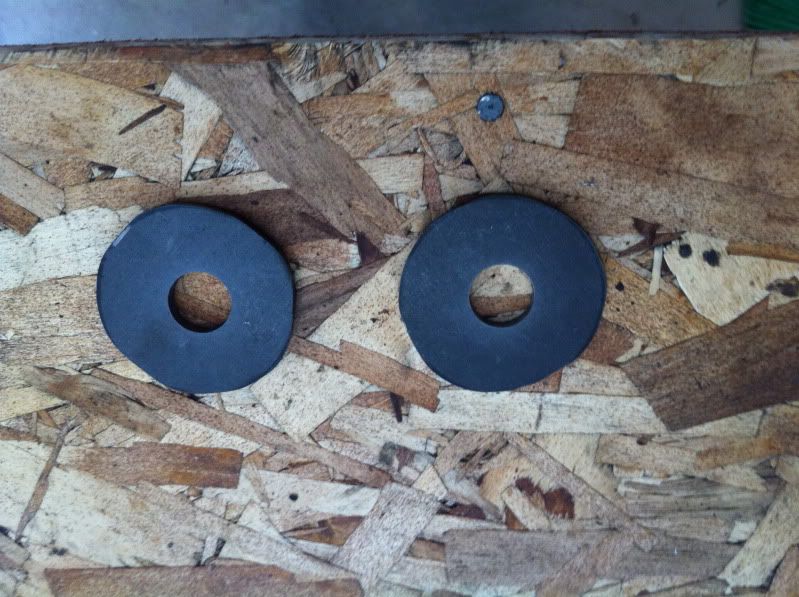
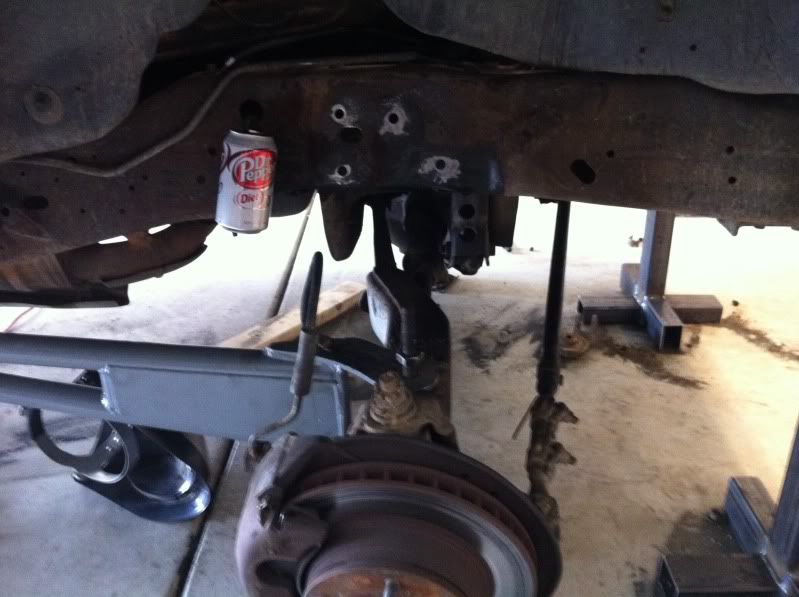
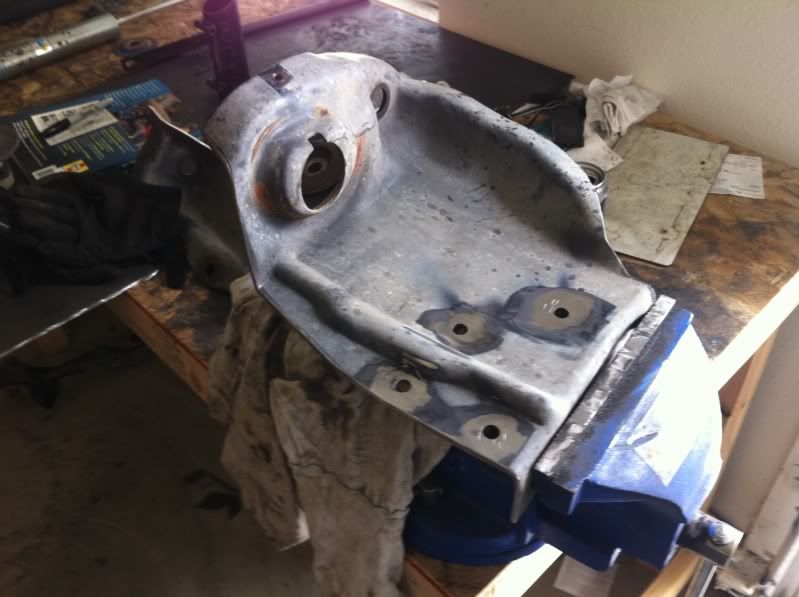
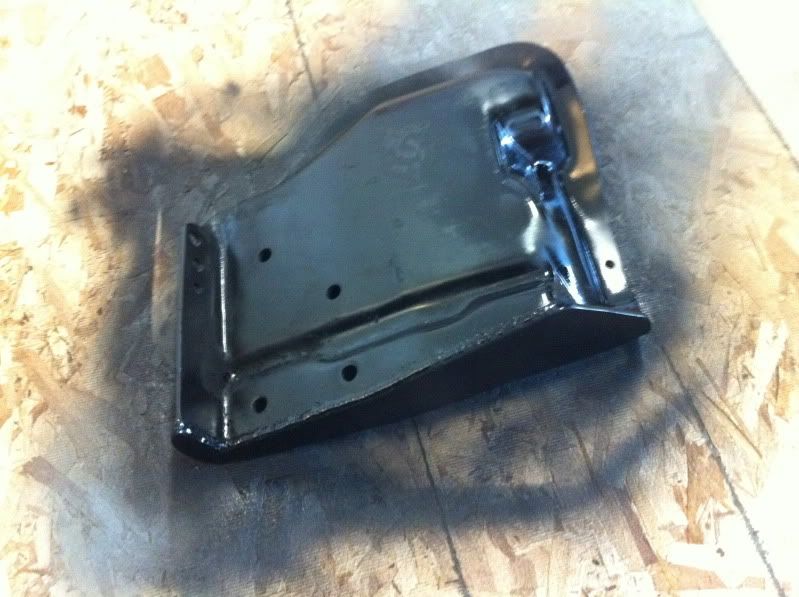
Started day two of the build. I went and looked at the front shock mount and that is not the culprit. If you look at the picture it doesn't go between the radius arm and the beam, but instead on top of the radius arm. I even tried seeing if it would fit inside the Camburg ones and it was too wide for that as well. With no answer to why it is this way I just moved on and made some 3/16" washers... hard to cut perfect circles with an angle grinder (torches are out of gas). They came out all right though, I didn't put too much into them as they will never be seen.
After getting those cut and tacked to the radius arms, I got them installed and everything seems to fit. Then I went ahead and started with the fun task of taking off the buckets. Used the trusty angle grinder and a new grinding wheel and got everything off without too much extra effort. It did take a little while, but to be expected.
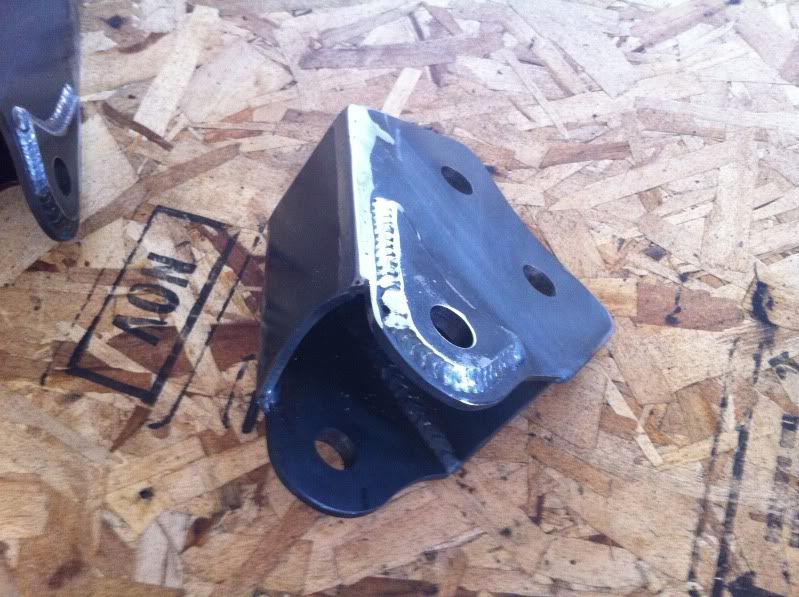
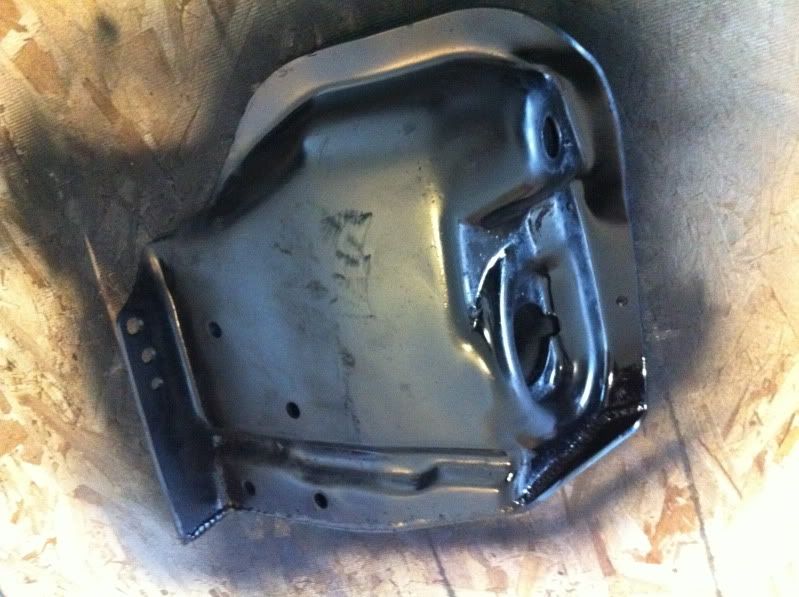
Then I went onto modifying the buckets. Started by cutting off the rear shock mount.
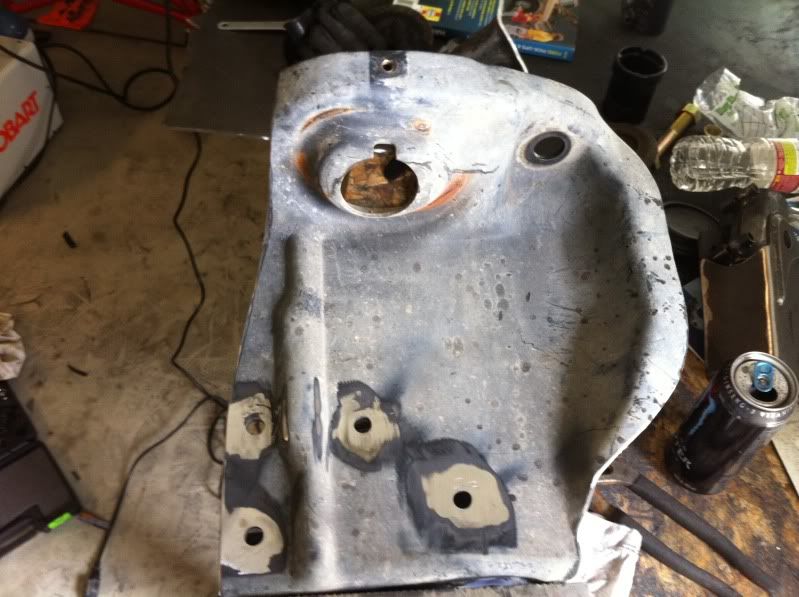
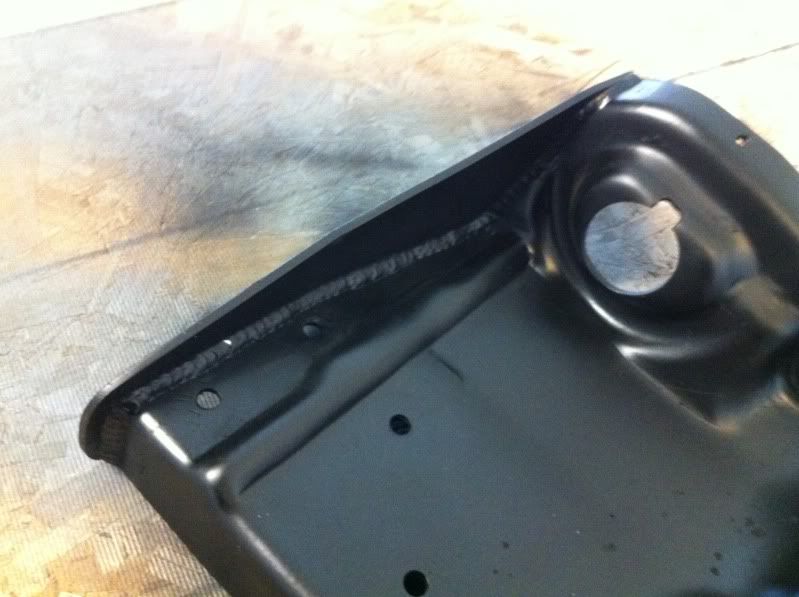
Then made the gusset and welded it on. Wanted to take a picture of it raw, but I didn't remember until after I painted it. I think it turned out really nice. I am going to go ahead and install it this way for now with the 2" Bilstein in the front. I am going on a Mojave Road run last weekend of March so I need to get this thing together. If the shocks get here before the trip then I will be pulling these guys off and modifying the front side as well for the 2.5" shock. But hey, by then all the hard work of cutting rivets and everything will already be done so that won't be too much of a job!
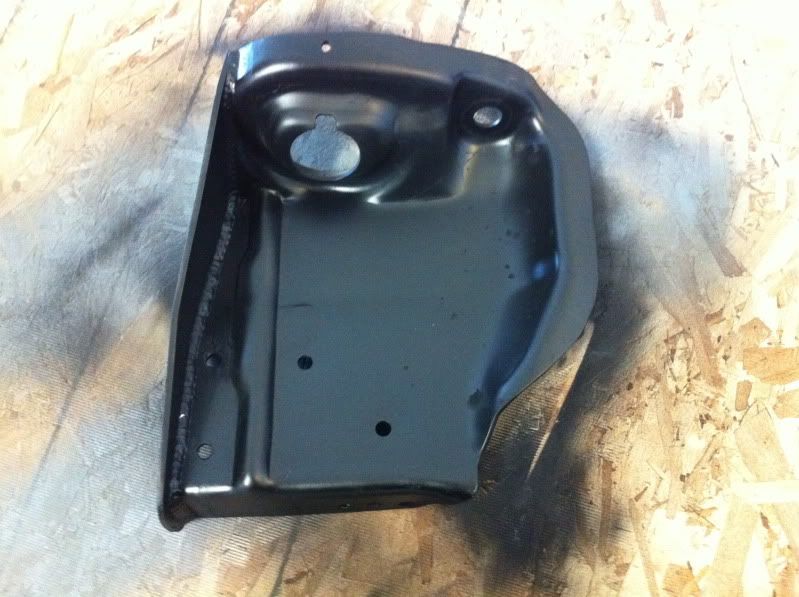
Also painted up the frame and wheel well... that should last about two weeks before it looks all messed up again, haha. And yes I moved the can out of the way when I painted...
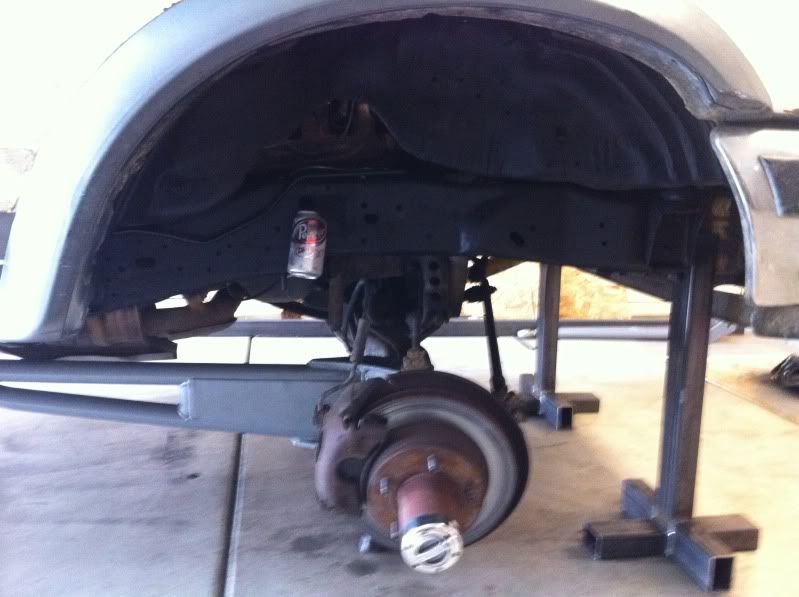
Not sure if I will get time to work on it tomorrow, have things to do around the house but Tuesday I am hoping I will get at least the passenger side (I have been on this side primarily) all finished up. Then I have the fun task of the driver side bucket and everything to do after that. We will see when I get this all done, I am really hoping before Friday... we will see
After getting those cut and tacked to the radius arms, I got them installed and everything seems to fit. Then I went ahead and started with the fun task of taking off the buckets. Used the trusty angle grinder and a new grinding wheel and got everything off without too much extra effort. It did take a little while, but to be expected.
Then I went onto modifying the buckets. Started by cutting off the rear shock mount.
Then made the gusset and welded it on. Wanted to take a picture of it raw, but I didn't remember until after I painted it. I think it turned out really nice. I am going to go ahead and install it this way for now with the 2" Bilstein in the front. I am going on a Mojave Road run last weekend of March so I need to get this thing together. If the shocks get here before the trip then I will be pulling these guys off and modifying the front side as well for the 2.5" shock. But hey, by then all the hard work of cutting rivets and everything will already be done so that won't be too much of a job!
Also painted up the frame and wheel well... that should last about two weeks before it looks all messed up again, haha. And yes I moved the can out of the way when I painted...
Not sure if I will get time to work on it tomorrow, have things to do around the house but Tuesday I am hoping I will get at least the passenger side (I have been on this side primarily) all finished up. Then I have the fun task of the driver side bucket and everything to do after that. We will see when I get this all done, I am really hoping before Friday... we will see
-
lifeinthesouth
- Posts: 24
- Joined: Fri Dec 11, 2009 10:56 pm
- Bronco Info: 95 5.0L/E4OD
- Location: Kodiak, AK
Re: PELLEY's 1990
Coming along nicely. Lookin forward to see it all come together
-
PELLEY
- Posts: 137
- Joined: Sun Oct 31, 2010 8:30 am
- Bronco Info: 1990 5.8L, auto, roll-a-long.
- Location: Edwards AFB, CA
Re: PELLEY's 1990
Thanks for the props!
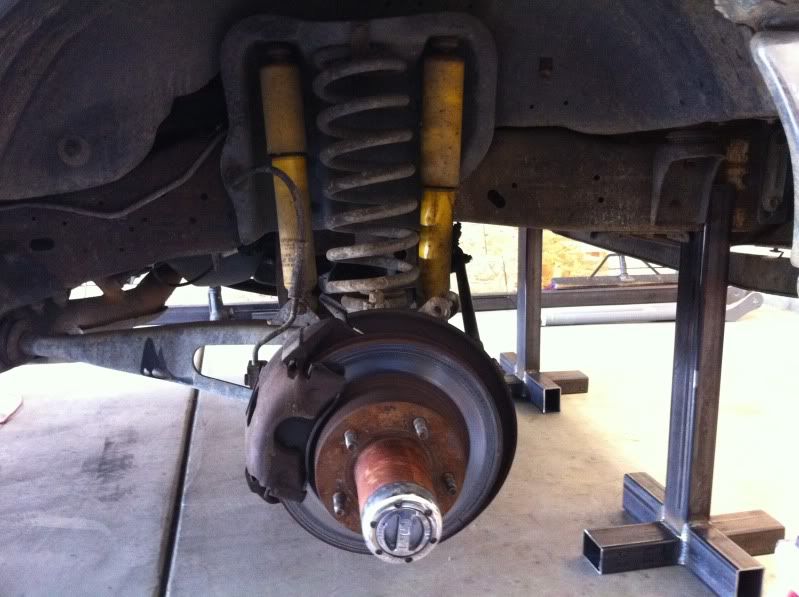
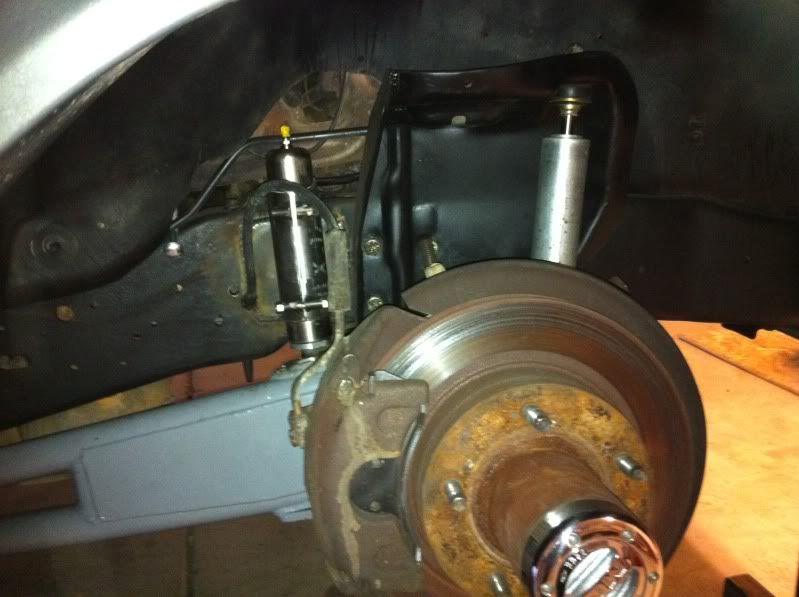
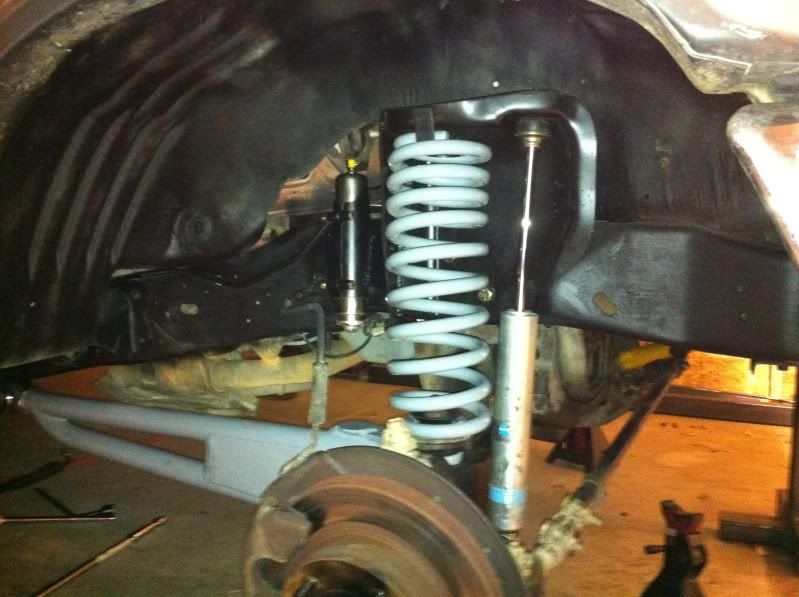
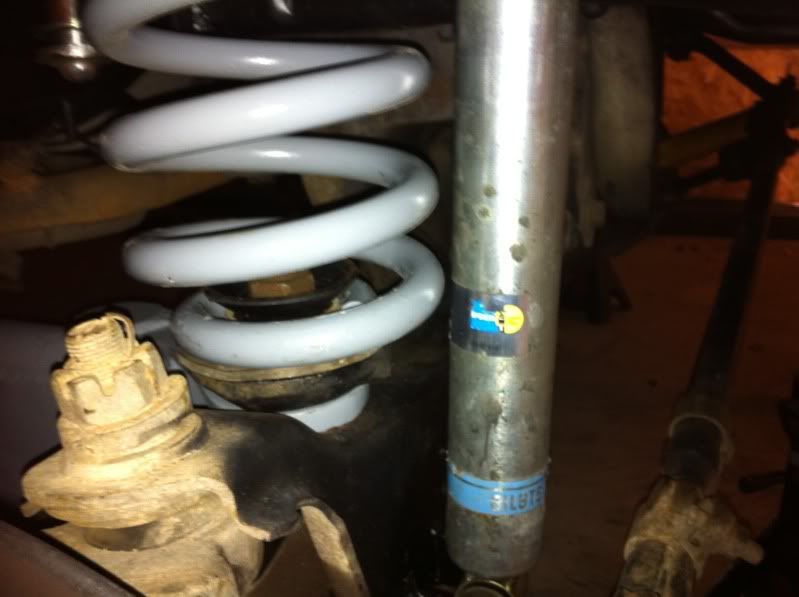
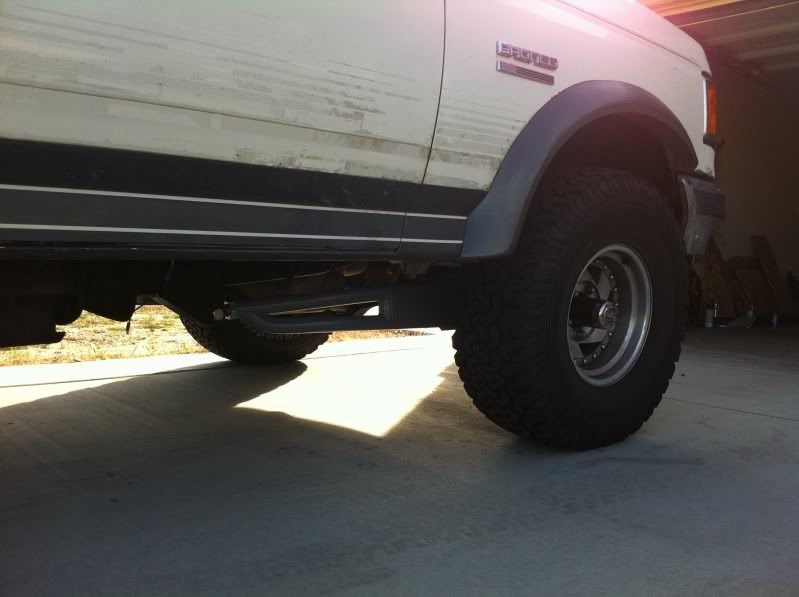
Ok so got a little done yesterday and today. Got the passenger side all wrapped up. Got the suspension compressed, located my front lower shock mounts and mounted my bumps yesterday. Then today I finished the tabbing for the bumps, painted everything and bolted it all up. With the Bilstein shock it cycles 10" of travel, with the shock removed it has a clean 14" so once I get my FOA's I should be able to get close to that. Only dilemma I am seeing is the front shock. It is rather close to the coil at droop. It looks like it gets better as the suspension cycles towards bump. I will see how it looks once I get it on the ground. If it is still close at ride height then I will look at making new tabs to fix this problem. I am hoping it will work out so I can do my Mojave Road run at the end of the month, then I will make it perfect when I mount the real shocks. Here are some shots:
At Bump
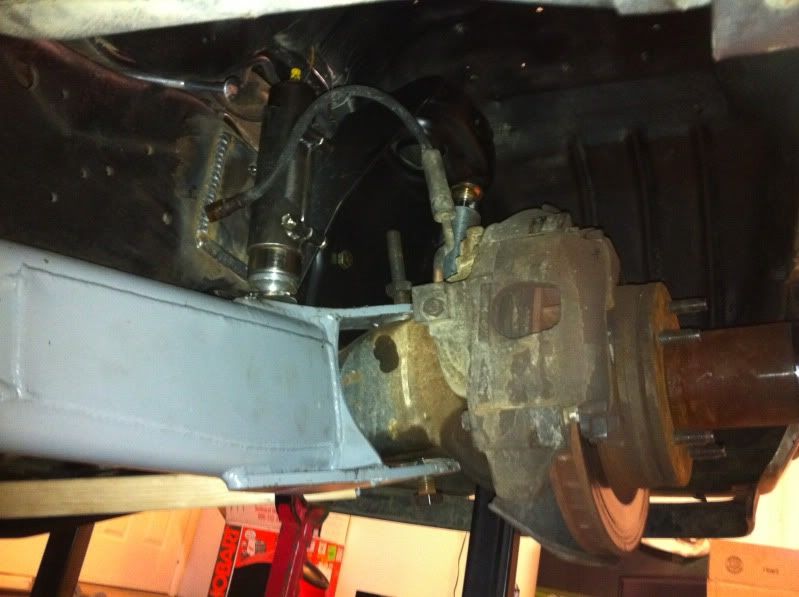
All done
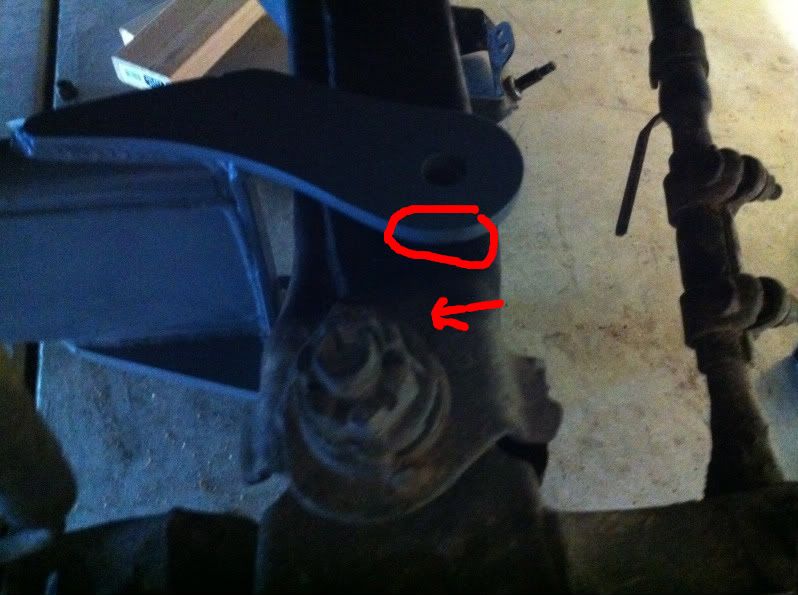
Pivots turned out ok, they look better in person for some reason...
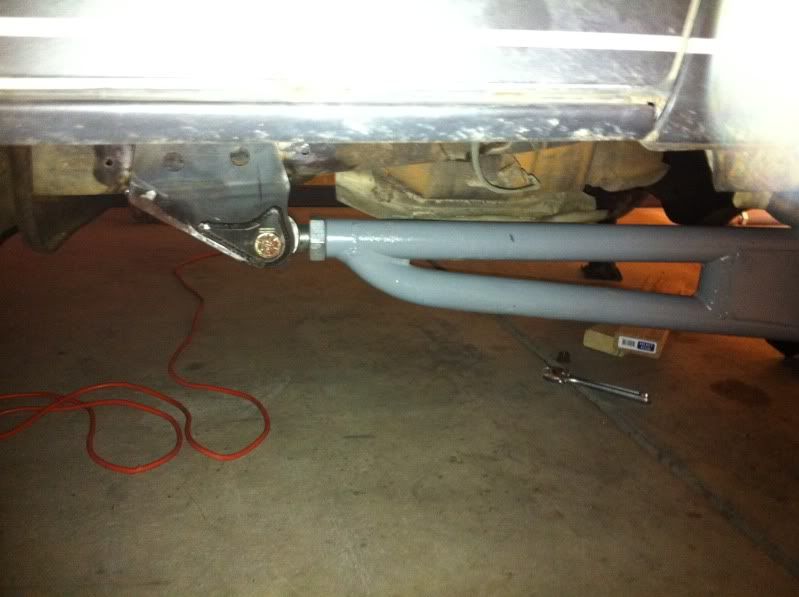
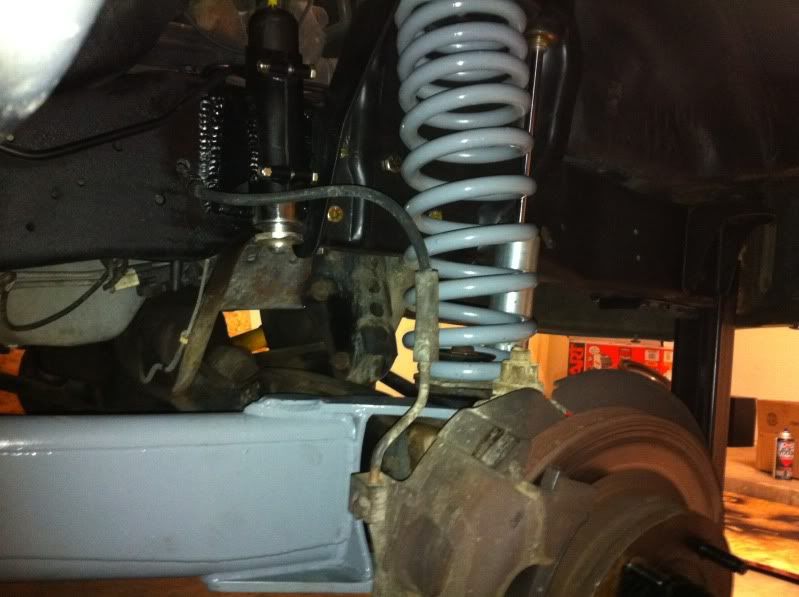
Bump mount. Put a piece of 3/16" over the frame holes, has a big roset weld under the bump. Should work well. I plan on replacing the brake lines after my trip, but need to figure out a good may to keep them in place. Just pushed them through a different hole in the frame for now, no spot for a clip or a tab. I zip tie may be the fix for the trip...
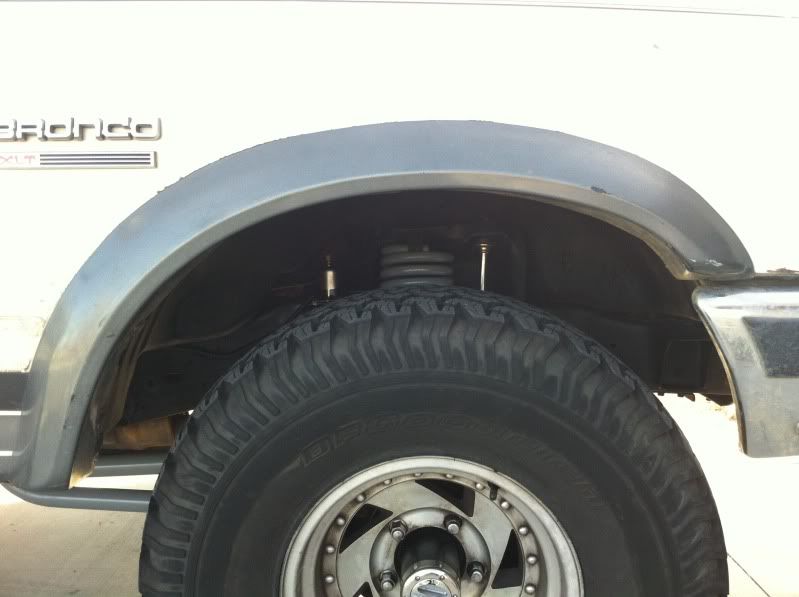
Here is the clearance on the shock... We will see what happens. Should be better on the other side. The way the springs are made there is not driver/passenger. When bolted in the bottom is offset a little bit towards the front of the Bronco, should do the opposite on the Driver side.
Now I just need to get the driver side done. Still have to remove and modify the buckets, mount the radius arm pivots, and mount the bumps... hoping to get this done by Sunday if my wife doesn't have too much for me to do... we will see though, we all know how that works out, haha. As always any criticism or input is always appreciated!
Ok so got a little done yesterday and today. Got the passenger side all wrapped up. Got the suspension compressed, located my front lower shock mounts and mounted my bumps yesterday. Then today I finished the tabbing for the bumps, painted everything and bolted it all up. With the Bilstein shock it cycles 10" of travel, with the shock removed it has a clean 14" so once I get my FOA's I should be able to get close to that. Only dilemma I am seeing is the front shock. It is rather close to the coil at droop. It looks like it gets better as the suspension cycles towards bump. I will see how it looks once I get it on the ground. If it is still close at ride height then I will look at making new tabs to fix this problem. I am hoping it will work out so I can do my Mojave Road run at the end of the month, then I will make it perfect when I mount the real shocks. Here are some shots:
At Bump
All done
Pivots turned out ok, they look better in person for some reason...
Bump mount. Put a piece of 3/16" over the frame holes, has a big roset weld under the bump. Should work well. I plan on replacing the brake lines after my trip, but need to figure out a good may to keep them in place. Just pushed them through a different hole in the frame for now, no spot for a clip or a tab. I zip tie may be the fix for the trip...
Here is the clearance on the shock... We will see what happens. Should be better on the other side. The way the springs are made there is not driver/passenger. When bolted in the bottom is offset a little bit towards the front of the Bronco, should do the opposite on the Driver side.
Now I just need to get the driver side done. Still have to remove and modify the buckets, mount the radius arm pivots, and mount the bumps... hoping to get this done by Sunday if my wife doesn't have too much for me to do... we will see though, we all know how that works out, haha. As always any criticism or input is always appreciated!
-
Dezertbronco
- Posts: 652
- Joined: Fri Jan 22, 2010 12:29 am
- Bronco Info: 1990 Bronco EB
- Location: Highland, CA.
Re: PELLEY's 1990
Straighten out the Bends in those Brake lines ASAP. Be sure to Check Them At Full Droop and turn the wheels both ways.
Ask me how I found this one out
Ask me how I found this one out
There is no substititute for Horsepower.
-
PELLEY
- Posts: 137
- Joined: Sun Oct 31, 2010 8:30 am
- Bronco Info: 1990 5.8L, auto, roll-a-long.
- Location: Edwards AFB, CA
Re: PELLEY's 1990
Haha that's funny! Ya right now at 10" the brake lines have plenty of slack. I checked at droop and full turn left and right. When I put the big shocks on and this thing can drop out more I can see that being a problem. They also seemed to gain a bunch of slack when I moved them from their original frame hole (where the bumps are now) to their new location. Thanks for the heads up though, I don't wanna know how much fun that is learning the hard way, haha!!!
-
PELLEY
- Posts: 137
- Joined: Sun Oct 31, 2010 8:30 am
- Bronco Info: 1990 5.8L, auto, roll-a-long.
- Location: Edwards AFB, CA
Re: PELLEY's 1990
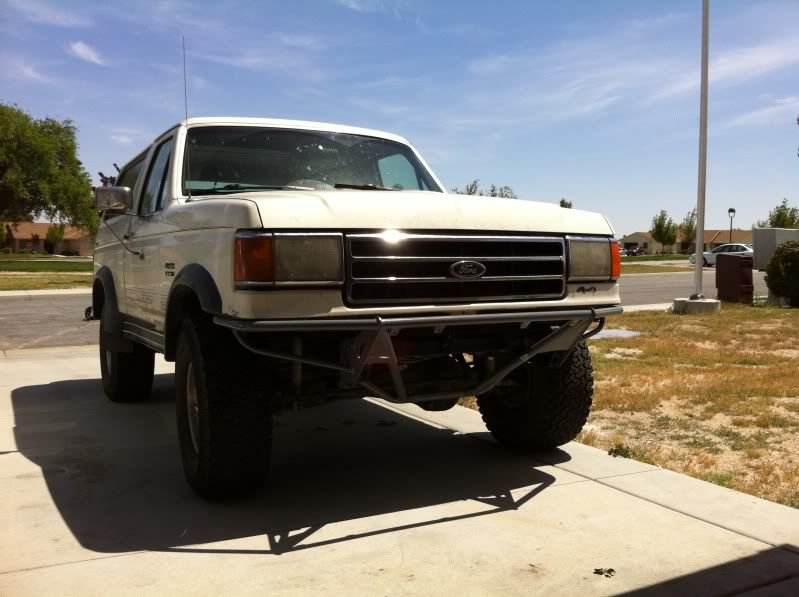
Well I got the ol' Bronco all wrapped up this week. Here are some shots of it all wrapped up. Sits perfect, everything looks great, hopefully I can take it out on a test run tomorrow. As far as the alignment goes, what a bear... It took me calling over five shops around here to find one that would change the alignment cams out with my adjustable ones, and do the alignment. Finally found one who would do it, and when I picked it up they said they didn't like the adjustable ones so they just flipped mine to do the best they can... Drove the thing home, tires are still a little positive (I think thats right, top further out than bottom). Think I am going to go ahead and change them out myself and then see if I can find another shop to get it dialed in. I wish I was back in San Diego, I would just take it to TrueLine and it would get handled. Ok enough complaining, here are the shots!!!
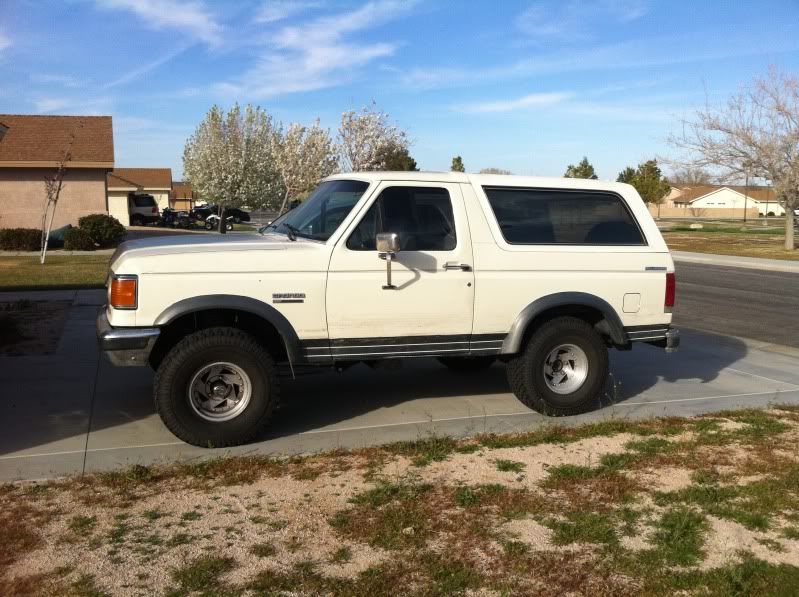
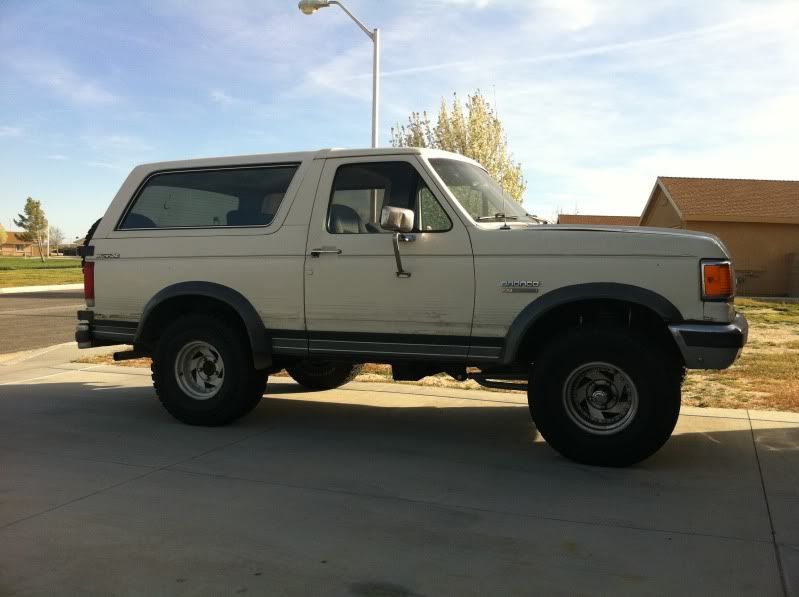
These pictures were taken before I got it aligned, so it's not this bad, but still needs to be fixed. Doing my Mojave Road run next week so after that I will get it dialed in. Next is mounting the 2.5's once they get here!! Can't wait to get that all set up!!!!
These pictures were taken before I got it aligned, so it's not this bad, but still needs to be fixed. Doing my Mojave Road run next week so after that I will get it dialed in. Next is mounting the 2.5's once they get here!! Can't wait to get that all set up!!!!
-
PELLEY
- Posts: 137
- Joined: Sun Oct 31, 2010 8:30 am
- Bronco Info: 1990 5.8L, auto, roll-a-long.
- Location: Edwards AFB, CA
Re: PELLEY's 1990
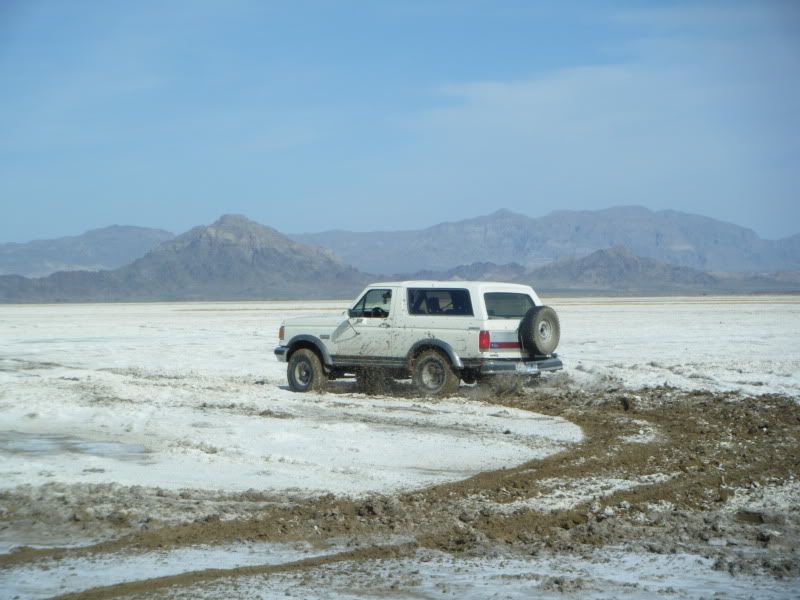
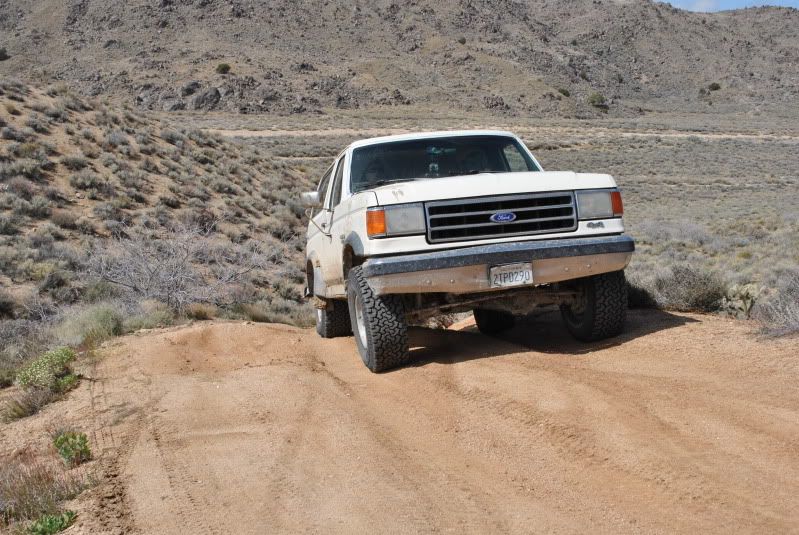
Well I got to take the Bronco out for a real good three day test session, haha. Myself and a group of family and friends (guys trip!) did the Mojave Road. We started in Barstow, then took our time over the next three days making out to Laughlin. Bronco did good, other than seriously drinking gas!! The front did as expected. It worked good overall with the random changes in terrain and through the rutted out areas. It goes smooth over small to medium woops, but runs out of dampening real quick once I get moving real fast or over the bigger stuff. This trip was on the Bilsteins so it was to be expected. Once I get the 2.5's on there I expect it to do much better! Overall though I am very pleased and can't wait to get more done. Here are a few pictures:
Dry lake bed
Random stuff
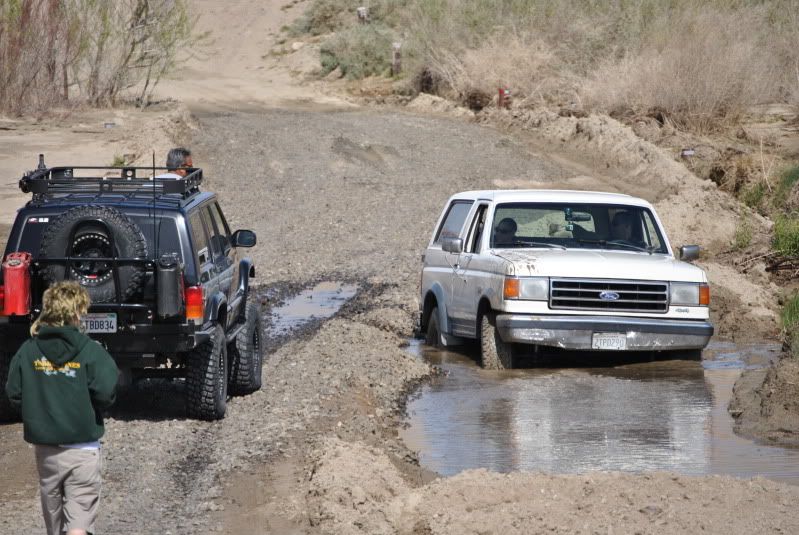
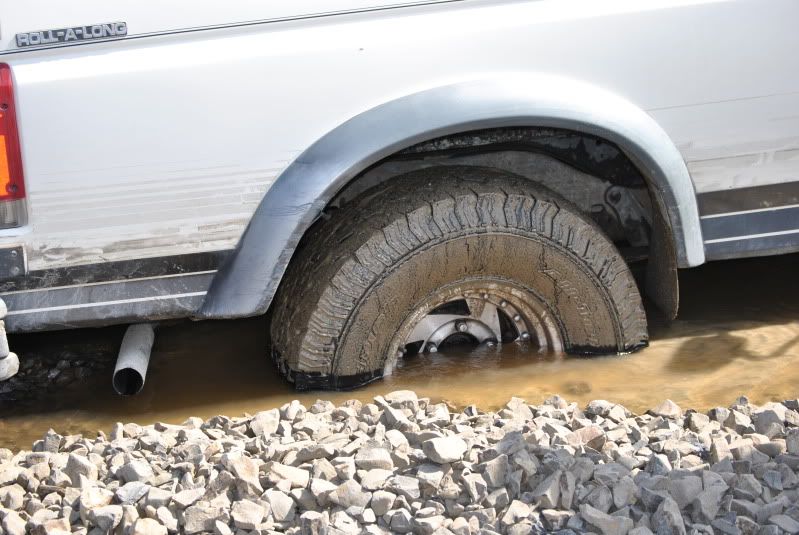
The usual water crossing was freaking paved over! I decided to step of the road and goof off. I wasn't going very fast and though 2" of water would be no big deal, come to find out it was straight mush...
Found a nice rock at speed too, haha
Since the trip I have finally got my hands on a tube bender! Decided to dust the cobwebs off the fab skills by building a new front bumper (now it's an official go-fast right!). There were a lot of different bumpers I have seen and liked so I thought I would pull inspiration from a few and come up with a simple twist on the traditional pre-runner bumper. I really like the way Mark does his at South West with the front of the horns. Also found a slightly different way of doing it by a company called N-Fab. Saw their Raptor bumper and though I would take some inspiration from that as well. Did it all with a little of my own style as well, just wanted to give credit on a few style Q's I picked up from others!
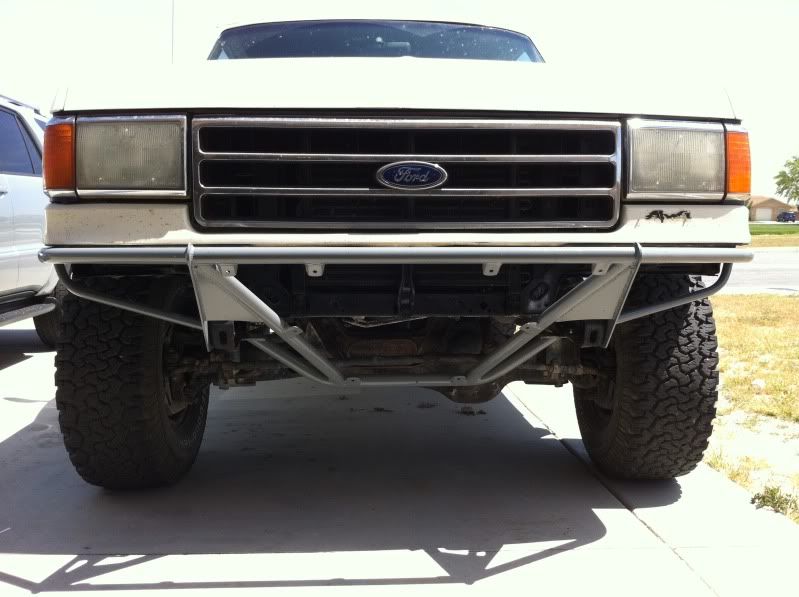
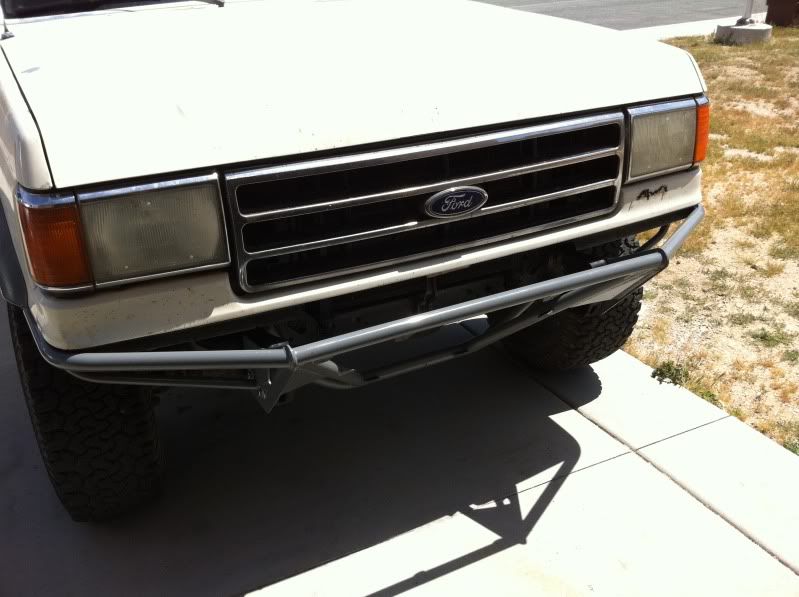
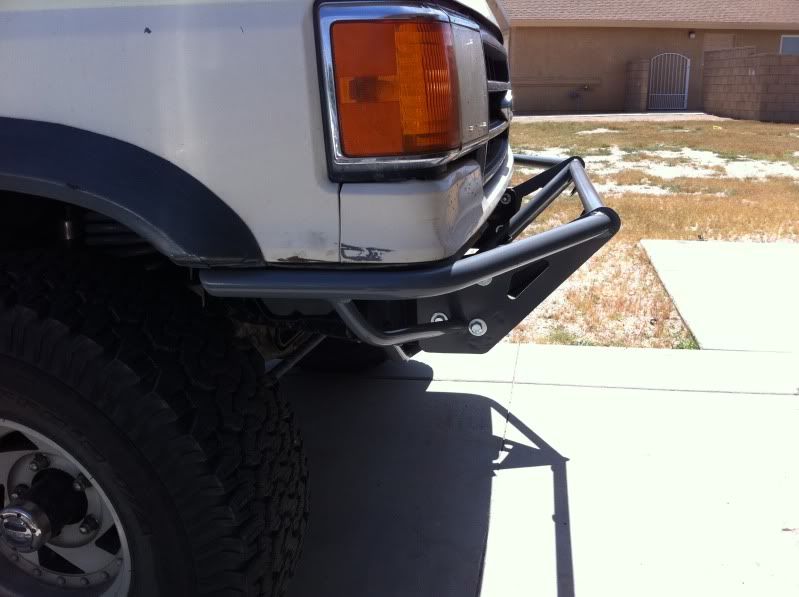
Just need to get a piece of Aluminum sheered up at the local metal supply and it will be close to finished. I plan on adding a detachable light bar to hold four 6" lights as well. I have an idea for a cool 2 bolt and key type setup for making the detachable part an easy and clean looking part. Once I get lights in hand I will make it. I haven't decided which lights yet. Thinking the smaller Kragen HID's or maybe just some Hella 700's that I can convert to HID later down the road...
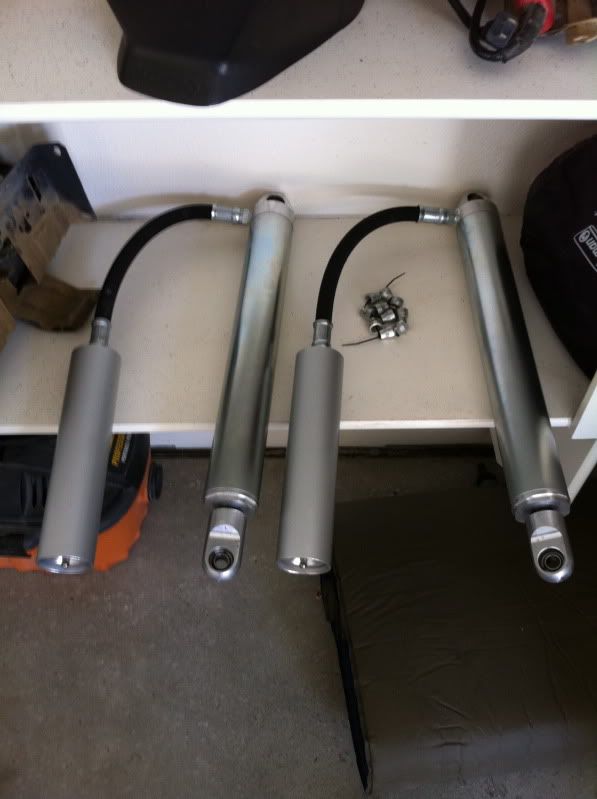
Also got my FOA's in a week ago. They look well made. Other than anodizing or chrome they look just as nice as any other brand. Still can't speak for performance as they are not mounted yet.
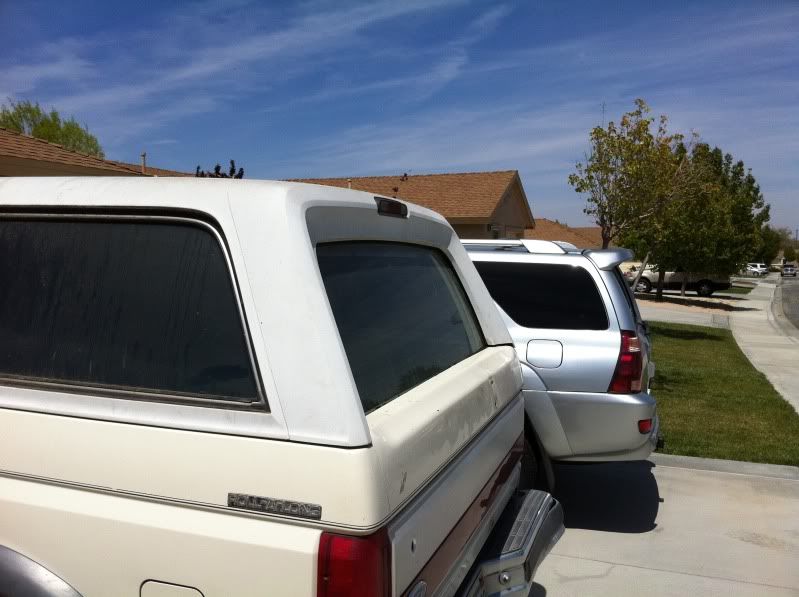
Also just picked me up a new shell for $40 from FSB!!!! It is for a 92-96, but fits my 90 pretty good! Other than the angled edges on the back I think it is a great fit. My stock one had about 6 holes on the top from the previous owners roof rack. It looked like the dang thing ripped off because they were ruff. Hell just to repair those would have cost me more than $40 in supplies. I am thinking of painting it a dark grey. does anyone have experience painting these? any pointers would be help full!!!

Next few steps for the ride are new fabbed back bumper. I need to get a Y-pipe from a MAF engine so I can make a new intake. Then I can mount the 2.5's. Also looking for new front fenders and a hood for this thing. I was going to update the front end, but have decided against it. I talked to a few people about how big the job was, and after looking at more pictures of some built Broncos that keep the 90's style front end I am happy with what I got. I just need to replace the two front fenders and hood because they are all dented up. I figure used good parts are cheaper than fixing dents... So if anyone has the Y-pipe I am looking for, or a cheap set of front end parts please let me know! haha
Dry lake bed
Random stuff
The usual water crossing was freaking paved over! I decided to step of the road and goof off. I wasn't going very fast and though 2" of water would be no big deal, come to find out it was straight mush...
Found a nice rock at speed too, haha
Since the trip I have finally got my hands on a tube bender! Decided to dust the cobwebs off the fab skills by building a new front bumper (now it's an official go-fast right!). There were a lot of different bumpers I have seen and liked so I thought I would pull inspiration from a few and come up with a simple twist on the traditional pre-runner bumper. I really like the way Mark does his at South West with the front of the horns. Also found a slightly different way of doing it by a company called N-Fab. Saw their Raptor bumper and though I would take some inspiration from that as well. Did it all with a little of my own style as well, just wanted to give credit on a few style Q's I picked up from others!
Just need to get a piece of Aluminum sheered up at the local metal supply and it will be close to finished. I plan on adding a detachable light bar to hold four 6" lights as well. I have an idea for a cool 2 bolt and key type setup for making the detachable part an easy and clean looking part. Once I get lights in hand I will make it. I haven't decided which lights yet. Thinking the smaller Kragen HID's or maybe just some Hella 700's that I can convert to HID later down the road...
Also got my FOA's in a week ago. They look well made. Other than anodizing or chrome they look just as nice as any other brand. Still can't speak for performance as they are not mounted yet.
Also just picked me up a new shell for $40 from FSB!!!! It is for a 92-96, but fits my 90 pretty good! Other than the angled edges on the back I think it is a great fit. My stock one had about 6 holes on the top from the previous owners roof rack. It looked like the dang thing ripped off because they were ruff. Hell just to repair those would have cost me more than $40 in supplies. I am thinking of painting it a dark grey. does anyone have experience painting these? any pointers would be help full!!!
Next few steps for the ride are new fabbed back bumper. I need to get a Y-pipe from a MAF engine so I can make a new intake. Then I can mount the 2.5's. Also looking for new front fenders and a hood for this thing. I was going to update the front end, but have decided against it. I talked to a few people about how big the job was, and after looking at more pictures of some built Broncos that keep the 90's style front end I am happy with what I got. I just need to replace the two front fenders and hood because they are all dented up. I figure used good parts are cheaper than fixing dents... So if anyone has the Y-pipe I am looking for, or a cheap set of front end parts please let me know! haha
-
CBDuner
- Posts: 148
- Joined: Sun Oct 24, 2010 8:45 pm
- Bronco Info: Wishing I had one!
- Location: Coos Bay, OR
- Contact:
Re: PELLEY's 1990
Looking good! I like the bumper. Almost posted last night for an update.