Another Bronco Build
-
Broncodawg
- Posts: 711
- Joined: Fri Dec 11, 2009 10:14 pm
- Bronco Info: Ole Yeller- 89 Bronco prerunner, 77 Bronco rock rig, 79 F100 prerunner barn find
- Location: Bishop, CA
Re: Another Bronco Build
Welcome to GFB and best of luck with the build. The beauty of these broncos is they'll work for you slow in the rocks or fast! Have fun!
-
ChiroMatt

- Posts: 191
- Joined: Thu Apr 05, 2012 6:02 pm
- Bronco Info: 96 Eddie Bauer 5.8l Clean Stock for now
- Location: Calaveras
Re: Another Bronco Build
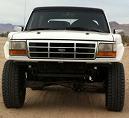
14" c/o
400/450 coils
2" bumps w cans
400/450 coils
2" bumps w cans
- Attachments
-
- image.jpg (22.67 KiB) Viewed 1073 times
-
ChiroMatt
- Posts: 191
- Joined: Thu Apr 05, 2012 6:02 pm
- Bronco Info: 96 Eddie Bauer 5.8l Clean Stock for now
- Location: Calaveras
Re: Another Bronco Build
Gears and lockers going in next.
Waiting on c/t and leafs to arrive.
Still lots of frame prep to do.
Waiting on c/t and leafs to arrive.
Still lots of frame prep to do.
- Attachments
-
- image.jpg (225.12 KiB) Viewed 1052 times
-
ChiroMatt
- Posts: 191
- Joined: Thu Apr 05, 2012 6:02 pm
- Bronco Info: 96 Eddie Bauer 5.8l Clean Stock for now
- Location: Calaveras
Re: Another Bronco Build
Does any have any tips in how to remove
The body mount bolts? 22mm wrench and
A hammer is tough going.
Cannot seem to fit an impact wrench on
There... Any help would be great.
The body mount bolts? 22mm wrench and
A hammer is tough going.
Cannot seem to fit an impact wrench on
There... Any help would be great.
- Attachments
-
- image.jpg (227.63 KiB) Viewed 963 times
-
- image.jpg (130.52 KiB) Viewed 963 times
Re: Another Bronco Build
What's your intention with taking them off? They are a major pain! Took a saw zaw to mine.
-
ChiroMatt
- Posts: 191
- Joined: Thu Apr 05, 2012 6:02 pm
- Bronco Info: 96 Eddie Bauer 5.8l Clean Stock for now
- Location: Calaveras
Re: Another Bronco Build
Intend to replace body mounts with new
Urethane ones. Looking to mount glass
All the way around, and was advised by
The autofab guru that body mounts should
Be done first in order to ensure a good glass
Fit. Wow they are super tough To get off.
Urethane ones. Looking to mount glass
All the way around, and was advised by
The autofab guru that body mounts should
Be done first in order to ensure a good glass
Fit. Wow they are super tough To get off.
-
Rmc
- El Jefe
- Posts: 6026
- Joined: Tue Oct 09, 2012 10:22 pm
- Bronco Info: 94 bronco xlt prerunner
- Location: IE SoCal
- Contact:
Re: Another Bronco Build
Sawsall then trash the remains. A little heat helps too if needed.
-
ChiroMatt
- Posts: 191
- Joined: Thu Apr 05, 2012 6:02 pm
- Bronco Info: 96 Eddie Bauer 5.8l Clean Stock for now
- Location: Calaveras
Re: Another Bronco Build
Dang
So no chance of re using the bolts...?
Was trying not to spend the $300 for the
JBG kit.
Is there anything special about these bolts?
Can't I just measure and pu at a hardware
Store?
So no chance of re using the bolts...?
Was trying not to spend the $300 for the
JBG kit.
Is there anything special about these bolts?
Can't I just measure and pu at a hardware
Store?
-
Rmc
- El Jefe
- Posts: 6026
- Joined: Tue Oct 09, 2012 10:22 pm
- Bronco Info: 94 bronco xlt prerunner
- Location: IE SoCal
- Contact:
Re: Another Bronco Build
Not special hardware, outside of shank lengths. Just figure out your lengths (remove nuts and punch out bottom up with a long skinny punch if needed) then go buy grade 8 bolts, the body isn't shifting all that much, I wouldn't worry about shank lengths. Factory are 9/16's if memory serves. There should only be 3 or 4 lengths. I'm pretty sure 4 in the bed are the same, 2 oddballs,then 2 up front at the core support. In the past I removed the bolts, and cut the sleeves and rubber using a combo saws all blade. The ones that have 2 tpi counts. The wood and nails demolition blades.then install the new mounts , start all bolts by hand and lower the body onto the replacements. FYI I have yet to do my bronco and I'm dreading the removal process too.
-
ChaseTruck754

- Spy/Ninja
- Posts: 9194
- Joined: Thu Jan 28, 2010 9:46 am
- Bronco Info: Don't have one - just old Ford trucks
- Location: Huntington Beach, CA
Re: Another Bronco Build
I get the bolts out - lots of kroil, liquid wrench, or other penetrating oil & a pnumatic socket from the TOP, as that nut on the bottom is part of the bottom plate of body mount. Then I drill out the body mounts themselves as they are a 2 part metal deal that snaps together & then rusts together over time. I re-use these metal inserts with the poly, but stick a grade 8 9/16" or 5/8" bolt through with a large fender washer on the bottom in place of that plate with the nut when done.
These pics are from a 70's truck body mount I did, but the body mounts work the same through the 90's
Here's one with the bottom rubber & metal insert removed after drilling.

& here's that bottom plate with attached nut after drilling

These pics are from a 70's truck body mount I did, but the body mounts work the same through the 90's
Here's one with the bottom rubber & metal insert removed after drilling.

& here's that bottom plate with attached nut after drilling

-
ChaseTruck754
- Spy/Ninja
- Posts: 9194
- Joined: Thu Jan 28, 2010 9:46 am
- Bronco Info: Don't have one - just old Ford trucks
- Location: Huntington Beach, CA
Re: Another Bronco Build
On the top pic there you can still see a portion of the bottom part of the matal mount stuck to the top piece. This is the part that snaps together & never seems to want to come off.
Also - as far as shank lengths on these bolts - it doesn't really matter as Robert said.
Oh and factory bolts are 7/16" I believe. As I said I bump these way up.
Also - as far as shank lengths on these bolts - it doesn't really matter as Robert said.
Oh and factory bolts are 7/16" I believe. As I said I bump these way up.
-
snowman429

- Posts: 201
- Joined: Sun Jun 10, 2012 2:07 pm
- Bronco Info: 93 Bronco alot of work
- Location: Rigby, Idaho
Re: Another Bronco Build
You're better off with the impact or wrench on the top of the bolt. Once you get them loose back the bolts out about half way and hit them with a sledgehammer to separate the sleeves. That's how I did mine. The 6 rear are easy to beat on, the front two under the dash are a little harder to hit but it can be done. Pull the inner fenders out to get to the two on the core support, makes it a lot easier. It also helps to take the bolts all the way out then spray some wd40 or pb blaster down the holes. I only had to cut the two bolts on the core support. I think if I had removed the inner fenders first I could have just beat them with a sledgehammer to separate them. And I believe the bolts are 7/16th. Hope this helps.
-
ChiroMatt
- Posts: 191
- Joined: Thu Apr 05, 2012 6:02 pm
- Bronco Info: 96 Eddie Bauer 5.8l Clean Stock for now
- Location: Calaveras
Re: Another Bronco Build
Great info thx guys.
-
ChiroMatt
- Posts: 191
- Joined: Thu Apr 05, 2012 6:02 pm
- Bronco Info: 96 Eddie Bauer 5.8l Clean Stock for now
- Location: Calaveras
Re: Another Bronco Build
Since body mounts have been slowing me
Down I switched to the junkyard 9" trussing.
Down I switched to the junkyard 9" trussing.
- Attachments
-
- image.jpg (262.24 KiB) Viewed 890 times
Re: Another Bronco Build
Take the bolt out from the top then cut a piece of pipe that will fit over the cab mount from the bottom then take a piece of angle iron and drill a hole then put the bolt thru the hole thru the pipe and thread it into the mount from the bottom and as you tighten the bolt it will pull the 2 halves apart......easy as can be
-
ChiroMatt
- Posts: 191
- Joined: Thu Apr 05, 2012 6:02 pm
- Bronco Info: 96 Eddie Bauer 5.8l Clean Stock for now
- Location: Calaveras
Re: Another Bronco Build
The rear end is in!!!
E350 9" off an 85 van
31 spline
ARB air locker
Disc brakes off a junkyard flat track 9"
Ruff stuff truss
Q80's
Threat shackles
Threat upper shock mount
FOA 12" triple bypass
Still need to run:
limit straps
Wheel spacers?
Paint it
Trim u bolts
E350 9" off an 85 van
31 spline
ARB air locker
Disc brakes off a junkyard flat track 9"
Ruff stuff truss
Q80's
Threat shackles
Threat upper shock mount
FOA 12" triple bypass
Still need to run:
limit straps
Wheel spacers?
Paint it
Trim u bolts
- Attachments
-
- image.jpg (43.08 KiB) Viewed 828 times
-
keenanduran1
- Posts: 559
- Joined: Fri May 09, 2014 10:29 am
- Bronco Info: 1993 Bronco. 1992 F150
- Location: Dana Point, CA
Re: Another Bronco Build
looks great man! what did you do for the front hanger when putting in the q80's?
-
ChiroMatt
- Posts: 191
- Joined: Thu Apr 05, 2012 6:02 pm
- Bronco Info: 96 Eddie Bauer 5.8l Clean Stock for now
- Location: Calaveras
Re: Another Bronco Build
For the front hanger we used 4 washers
Two per side of leaf spring. It's a tight fit
And a little tricky to get the last washer in
But it's possible with miny pry bar, awl, hammer
A lift and lots of cussing!!!!
I will post a photo of this next time I'm at
Shop.
Two per side of leaf spring. It's a tight fit
And a little tricky to get the last washer in
But it's possible with miny pry bar, awl, hammer
A lift and lots of cussing!!!!
I will post a photo of this next time I'm at
Shop.
-
cs_drums
- Posts: 2912
- Joined: Wed Dec 22, 2010 10:39 am
- Bronco Info: 94 5.8 Bronco w/dreams of being finished
Re: Another Bronco Build
How did you straighten it after the trussing on the rearend?
-
ChiroMatt
- Posts: 191
- Joined: Thu Apr 05, 2012 6:02 pm
- Bronco Info: 96 Eddie Bauer 5.8l Clean Stock for now
- Location: Calaveras
Re: Another Bronco Build
Slow welding, inch at a time and crossing sides lots....
and the truss is different than other trusses out there, its less on the back and more on the top and bottom, so it kinda keeps itself straight in the welding process. Read all this stuff on building a welding mount and or using a long straight bar, but did neither and it looks ok and measures ok, so far.
and the truss is different than other trusses out there, its less on the back and more on the top and bottom, so it kinda keeps itself straight in the welding process. Read all this stuff on building a welding mount and or using a long straight bar, but did neither and it looks ok and measures ok, so far.