Glen Strightiff/Chris Wilson C3 build
-
ChaseTruck754

- Spy/Ninja
- Posts: 9194
- Joined: Thu Jan 28, 2010 9:46 am
- Bronco Info: Don't have one - just old Ford trucks
- Location: Huntington Beach, CA
Re: Glen Strightiff/Chris Wilson C3 build
Love, love, LOVE this build! Those beams are stout as hell! Can't wait to see more!
Owner of only dead and forgotten projects
-
baja-chris

- Posts: 712
- Joined: Thu Dec 10, 2009 7:55 pm
Re: Glen Strightiff/Chris Wilson C3 build
The stock uprights were modified. The tapered hole for the tie rod was drilled out oversized and sleeved with a piece of 4130 and plate was added to put the new tie rod heim joint in double shear. A reinforcing plate/ring was added to the inside of the upright to add strength to the spindle bolts. The caliper mounting ears were cut off and a new caliper mounting plate was welded on, locating the large racing calipers to fit massive 14" rotors for the 17" wheels. After welding, the upright is covered with a metal bowl to keep it from cooling too fast and cracking.
- Attachments
-
- P4210578.JPG (47.03 KiB) Viewed 1418 times
-
- P4210586.JPG (54.6 KiB) Viewed 1418 times
-
- P4210587.JPG (45.47 KiB) Viewed 1418 times
-
- P4220592.JPG (56.01 KiB) Viewed 1418 times
-
baja-chris
- Posts: 712
- Joined: Thu Dec 10, 2009 7:55 pm
Re: Glen Strightiff/Chris Wilson C3 build
The stock hubs were painted. We had a buddy with a machine shop mill out these nice aluminum rotor hats to adapt the racing rotors to the stock hubs. It's assembled and the steering heim just clears the rotor by about 1/8". We had mocked it up before and wanted to push the brake package inboard as much as possible to clear the wheels. Once we had the rotor hats, then we were able to mock it up to locate where the caliper bracked needed to be welded to the upright. It came out nice.
- Attachments
-
- P4210577.JPG (44.88 KiB) Viewed 1417 times
-
- P4210585.JPG (54.42 KiB) Viewed 1417 times
-
- P4210589.JPG (45.48 KiB) Viewed 1417 times
-
- P5270618.JPG (59.07 KiB) Viewed 1417 times
-
baja-chris
- Posts: 712
- Joined: Thu Dec 10, 2009 7:55 pm
Re: Glen Strightiff/Chris Wilson C3 build
For the front drive, we are using a 1980 third member with the bolt-in style stub axle instead of the newer c-clip style. This allows you to replace the stub axle without removing the 3rd member. We are using a Dana 50 cross over u-joint assembly instead of the smaller Dana 44 parts. With the cut and turn beams, the cross over u-joint is running more angle at ride height than a stock truck and this cross over u-joint is under a lot of stress. The Dana 50 parts have the same length and spline count and fit right in place of the Dana 44. However the beam needs to be clearanced to clear the larger yoke. The yokes (both D44 and D50) will articualte much farther in one direction than the other due to one yoke having a deeper shape. We ground out the other one to match so we can get the same angle fro each phase of rotation. This allows for more suspension droop without binding the yoke. Because we widened each beam 1.5", we had to make longer axles. We made the axles 1.75" longer because we also moved the lower ball joint out to correct the camber and this spaced the centerline of the spindle out a bit also.
- Attachments
-
- P4220606.JPG (37.99 KiB) Viewed 1417 times
-
- P4220601.JPG (50.06 KiB) Viewed 1417 times
-
- P4220596.JPG (58.93 KiB) Viewed 1417 times
-
- P1020374.JPG (58.26 KiB) Viewed 1417 times
-
baja-chris
- Posts: 712
- Joined: Thu Dec 10, 2009 7:55 pm
Re: Glen Strightiff/Chris Wilson C3 build
The rear brakes and hubs were installed and now the project is a roller. A 4130 sleeve was custom machined for each rear hub to set the bearing preload. This is a spacer between the bearings so with this installed the spindle nut can then be torqued down with the impact and the preload is perfect.
- Attachments
-
- P5270626.JPG (64.54 KiB) Viewed 1416 times
-
- P1010368.JPG (32.26 KiB) Viewed 1416 times
-
- P1010367.JPG (48.21 KiB) Viewed 1416 times
-
- P1010365.JPG (60.41 KiB) Viewed 1416 times
-
baja-chris
- Posts: 712
- Joined: Thu Dec 10, 2009 7:55 pm
Re: Glen Strightiff/Chris Wilson C3 build
With the steering geometry where we wanted it, the steering box needed to be relocated. We started with a 4130 plate that picks up a couple of the stock mounting holes, and built up from there. Note that we are using a 4-bolt Saginaw box instead of the 3-bolt that came on these trucks.
- Attachments
-
- P3250499.JPG (48.62 KiB) Viewed 1415 times
-
- P3250495.JPG (44.24 KiB) Viewed 1415 times
-
- P2120451.JPG (47.88 KiB) Viewed 1415 times
-
- P2110444.JPG (55.6 KiB) Viewed 1415 times
-
baja-chris
- Posts: 712
- Joined: Thu Dec 10, 2009 7:55 pm
Re: Glen Strightiff/Chris Wilson C3 build
A couple more photos of the steering box mount.
- Attachments
-
- P3310532.JPG (49.83 KiB) Viewed 1415 times
-
- P3250511.JPG (47.49 KiB) Viewed 1415 times
-
- P3250502.JPG (46.16 KiB) Viewed 1415 times
-
- P3250503.JPG (40.17 KiB) Viewed 1415 times
-
baja-chris
- Posts: 712
- Joined: Thu Dec 10, 2009 7:55 pm
Re: Glen Strightiff/Chris Wilson C3 build
These photos show where we had to clearance the beam to allow the Dana 50 yoke to spin freely. We just cut away some metal on the upper lip of the beam. We did did not remove much and since we boxed it in there was no concern about loss of strength.
- Attachments
-
- P4150576.JPG (41.13 KiB) Viewed 1415 times
-
- P4010550.JPG (46.9 KiB) Viewed 1415 times
-
- P4010545.JPG (55.45 KiB) Viewed 1415 times
-
baja-chris
- Posts: 712
- Joined: Thu Dec 10, 2009 7:55 pm
Re: Glen Strightiff/Chris Wilson C3 build
With the front end all in place and the axles installed, we then cycled everything to make sure there were no issues and found that at full crab walk, one side fully up, the other side fully down, the axle was hitting the bottom of the passenger side beam. So we cut away material until it cleared then shaped a cup from 4130 plate to bridge the gap and put the strength back.
- Attachments
-
- P5270634.JPG (46.37 KiB) Viewed 1415 times
-
- P5270632.JPG (38.33 KiB) Viewed 1415 times
-
baja-chris
- Posts: 712
- Joined: Thu Dec 10, 2009 7:55 pm
Re: Glen Strightiff/Chris Wilson C3 build
We used a short pitman arm to reduce stress on the steering box sector shaft. The relay arm ratios make up the loss of stroke.
We started with a stock pitman arm, cut the end out of it on the band saw, trued it up in the lathe, then welded it inside a piece of tubing and then built out from there with plate.
We started with a stock pitman arm, cut the end out of it on the band saw, trued it up in the lathe, then welded it inside a piece of tubing and then built out from there with plate.
- Attachments
-
- P3030472.JPG (52.8 KiB) Viewed 1415 times
-
- P2120458.JPG (68.52 KiB) Viewed 1415 times
-
- P2120460.JPG (53.6 KiB) Viewed 1415 times
-
- P2120459.JPG (53.19 KiB) Viewed 1415 times
-
baja-chris
- Posts: 712
- Joined: Thu Dec 10, 2009 7:55 pm
Re: Glen Strightiff/Chris Wilson C3 build
The front shocks are mocked up to get some idea of where they will need to mount so we can route the cage where it needs to be to pick up the tops of the shocks and also to see how this relates to the body.
- Attachments
-
- P6030645.JPG (67.93 KiB) Viewed 1418 times
-
- P6030644.JPG (69.82 KiB) Viewed 1418 times
-
- P6020640.JPG (62.69 KiB) Viewed 1418 times
-
baja-chris
- Posts: 712
- Joined: Thu Dec 10, 2009 7:55 pm
Re: Glen Strightiff/Chris Wilson C3 build
Same deal on the rear, the shocks are mocked up to get an idea of where they need to go. We have 20" front travel and 24" rear travel.
- Attachments
-
- PB130169.JPG (60.39 KiB) Viewed 1418 times
-
ChaseTruck754
- Spy/Ninja
- Posts: 9194
- Joined: Thu Jan 28, 2010 9:46 am
- Bronco Info: Don't have one - just old Ford trucks
- Location: Huntington Beach, CA
Re: Glen Strightiff/Chris Wilson C3 build
Oh man this thing is SWEET! Can't wait to see more.
As for this:
As for this:
That is something I have never heard of and may have to steal & try!baja-chris wrote:After welding, the upright is covered with a metal bowl to keep it from cooling too fast and cracking.
Owner of only dead and forgotten projects
-
Copykat
- Posts: 242
- Joined: Thu Dec 10, 2009 7:37 am
- Bronco Info: 1987 BroncoII 4x4
- Location: Manitoba Canada
Re: Glen Strightiff/Chris Wilson C3 build
Can also do it in an oven. Since you have to preheat the cast knuckle some you can toss it back in the hot oven and every 5-10 min decrease the temp 100°FChaseTruck754 wrote:That is something I have never heard of and may have to steal & try!
1987 BroncoII 4x4
-
ChaseTruck754
- Spy/Ninja
- Posts: 9194
- Joined: Thu Jan 28, 2010 9:46 am
- Bronco Info: Don't have one - just old Ford trucks
- Location: Huntington Beach, CA
Re: Glen Strightiff/Chris Wilson C3 build
know about the oven and have a buddy that does it on a charcoal BBQ grill. Just let the coats cool down a bit & leave part on the grill to naturally cool with the grill.
Just had never heard of the metal bowl deal.
Just had never heard of the metal bowl deal.
Owner of only dead and forgotten projects
-
fordf100amc
- Posts: 35
- Joined: Sat Sep 04, 2010 11:43 am
- Bronco Info: 91 bronco
Re: Glen Strightiff/Chris Wilson C3 build
Awesome build its looking great. I'm building a race bronco right now as well and you have given me some great ideas.
Whats size tubing and wall thickness are you using for the radius arms?
Also what size and brand are the hiems your using for the radius arms?
Are you guys running 35" or 37" tires?
Whats size tubing and wall thickness are you using for the radius arms?
Also what size and brand are the hiems your using for the radius arms?
Are you guys running 35" or 37" tires?
-
baja-chris
- Posts: 712
- Joined: Thu Dec 10, 2009 7:55 pm
Re: Glen Strightiff/Chris Wilson C3 build
37" tires. We can not run wheels smaller than 17" because of the brake size. I think the radius arm tubes were 1.5" .120 wall with 1.25 heims but I'm not sure on that, they were built many months ago. Could be 1.75" tubes. The heims came from ORW, whatever brand they sell.fordf100amc wrote:Whats size tubing and wall thickness are you using for the radius arms?
Also what size and brand are the hiems your using for the radius arms?
Are you guys running 35" or 37" tires?
-
SteveG
- Admin
- Posts: 6100
- Joined: Sat Dec 05, 2009 10:25 am
- Bronco Info: Wilson: 96, Stretched 17.5", coil-overs / Bypasses, 4-link, a fridge and all the amenities :)
- Location: Arroyo Grande, CA
Re: Glen Strightiff/Chris Wilson C3 build
Beautiful, Chris!
Is the steering box a different ratio than stock?
Is the steering box a different ratio than stock?
Sho nuff,
SteveG
SteveG
-
baja-chris
- Posts: 712
- Joined: Thu Dec 10, 2009 7:55 pm
Re: Glen Strightiff/Chris Wilson C3 build
I looked at the radius arms today and we built them from 1.75" .120 wall 4130. Three tubes, plated on all three sides, with a .250 wall 4130 plate bulhead at the bend. Will definitely not bend or fail before the cast upright or wheel does. One of the ideas on this build was to build it over kill to reduce prep costs. Weak link in a crash is the cast uprights. Easily replaced.
As far as the steering box ratio, I'm not sure what stock is. The box i'm using is a spare full race box from my Class 4/8 truck. I believe it turns 3 turns lock to lock, or 1.5 turns from center to lock. With the relay arms and ram in place, the system now turns about 1.4 turns center to lock so the ram stops the travel before the steering box hits it's stops. This was intentional, we think having the ram provide the stop is stronger. We are using a 1.5:1 quickener on the steering column so we will end up about 1 turn from center to lock. That's about right for a short wheelbase racecar in the dirt, I think. If the wheelbase was long like a class 8, I'd want 3/4 turn center to lock. I'll also build up a straight shaft that can be installed by removing the quickener to setup for slower steering when we use the truck for other things like if we wanted to do a road trip to the easter jeep safari in it (it will be registered as a 1966 bronco). Heck I might even carry that extra shaft on board so after the race to la paz I can swap it in for the drive home with slower steering.
As far as the steering box ratio, I'm not sure what stock is. The box i'm using is a spare full race box from my Class 4/8 truck. I believe it turns 3 turns lock to lock, or 1.5 turns from center to lock. With the relay arms and ram in place, the system now turns about 1.4 turns center to lock so the ram stops the travel before the steering box hits it's stops. This was intentional, we think having the ram provide the stop is stronger. We are using a 1.5:1 quickener on the steering column so we will end up about 1 turn from center to lock. That's about right for a short wheelbase racecar in the dirt, I think. If the wheelbase was long like a class 8, I'd want 3/4 turn center to lock. I'll also build up a straight shaft that can be installed by removing the quickener to setup for slower steering when we use the truck for other things like if we wanted to do a road trip to the easter jeep safari in it (it will be registered as a 1966 bronco). Heck I might even carry that extra shaft on board so after the race to la paz I can swap it in for the drive home with slower steering.
-
baja-chris
- Posts: 712
- Joined: Thu Dec 10, 2009 7:55 pm
Re: Glen Strightiff/Chris Wilson C3 build
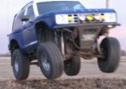
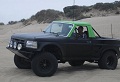
Back to the build sequence. At this point in the build we could slap some 1980-1996 skins on the truck, cage it and be all legal. The truck would be totally legal with no questions (running rear leafs instead of coils). But we do not want to build yet another ttb big bronco. I talked to Savage at SCORE and he said we could predate the body, but he did not say we could modify it in the process. So we took a chance and put our modified 66 body on the truck. To fit an EB body on a TTB chassis, we decided to at least attempt to be as legal as we could be by positioning the B-pillar where it would be for this chassis since one of the rules state that the distance from the front spindle to the B-pillar must remain stock, so we did that. But we also widened and lengthened the body. We took it to Savage, as shown in these photos. He decided no we cannot do this but would consider a rule change for next year to allow it. No follow up on that. He did say we could run class 8 with our modified body so that is now the plan, if we finish it in time for the 1000. I'd like to see a rule change to allow this vehicle in class 3, but it's not up to me, it's up to the class 3 regulars and Savage. Regardless it does not detract from our mission to build a unique racer. It's still legal in NORRA, and I think it can run Ultra-4 in BITD (or whatever they call the rock racer class). We will run some CODE races in it and they do not even have class 3 so we will run with the class 8 trucks there and run rear coilovers instead of the rear leafs.
To fit the body we widened the front through the headlights using some Peterbuilt headlamp bezels, and widening the hood on each side of the engine rise. We added tub length in the door and later reduced that gap and added a 2" gap in the front fender. The rear skins will also have some gaps added. We will just fill the gaps with new metal.
To fit the body we widened the front through the headlights using some Peterbuilt headlamp bezels, and widening the hood on each side of the engine rise. We added tub length in the door and later reduced that gap and added a 2" gap in the front fender. The rear skins will also have some gaps added. We will just fill the gaps with new metal.
- Attachments
-
- P6030657.JPG (58.44 KiB) Viewed 1347 times
-
- P6030661.JPG (65 KiB) Viewed 1347 times
-
- P6100673.JPG (45.93 KiB) Viewed 1347 times
-
- P6100680.JPG (72.46 KiB) Viewed 1347 times