CrazyJim's 1994 F1 Build - "Penny"
-
economig

- Posts: 1101
- Joined: Sun Jan 09, 2011 5:15 am
- Bronco Info: 1994 Eddie Bauer 5.8L
- Location: SW Riverside County
CrazyJim's 1994 F1 Build - "The Black Pearl"
Oh yeah, about the seats, might not be the same thing but I've had that happen before too. One time I found out the hinge for the seat back was off one notch on one side from the other (if that makes sense?) not sure how the hinges are in yours. But basically, one side would seat at a notch and the other side would always be right in between the two closest spots, leaning back, just enough to annoy. I was able to lean them all the way forward and back a couple times and get them back to the same spot. The other one had to be taken out and cycled all the way to get them lined up. Might be a different thing
T H R E A T Motorsports
Re: CrazyJim's 1994 F1 Build - "The Black Pearl"
Thanks Fellas! The dust light is temporary until I get a bumper fabbed and a light wing on top of the cab.
As for the seats, I'll have to check that out, because it sounds exactly like what you're describing. There isn't really much movement, just more of a lean. I assumed the mechanism for the recline is stronger on one side than the other, since they both lean away on the OPPOSITE side of the latch. However it could have skipped a tooth or may not be engaging completely. Not sure I want to tear them apart, but if I have to I can give it a shot.
As for the seats, I'll have to check that out, because it sounds exactly like what you're describing. There isn't really much movement, just more of a lean. I assumed the mechanism for the recline is stronger on one side than the other, since they both lean away on the OPPOSITE side of the latch. However it could have skipped a tooth or may not be engaging completely. Not sure I want to tear them apart, but if I have to I can give it a shot.
-
ChaseTruck754

- Spy/Ninja
- Posts: 9194
- Joined: Thu Jan 28, 2010 9:46 am
- Bronco Info: Don't have one - just old Ford trucks
- Location: Huntington Beach, CA
Re: CrazyJim's 1994 F1 Build - "The Black Pearl"
1st off - looking good. I LOVE this body style and will be watching this build intently!
2nd deals with this:
Oh - and those beards in the pic are on angle iron on the stock sliders - so yes, it does work well - haha
2nd deals with this:
Not sure about the F-150's but on the rangers of this era the "wood" was a paint or coating over aluminum! So the "wood" trim piece around the dash, etc. was aluminum & stronger than the plastic type ones off the lower trim levels. A bit of time with a wire wheel and my ranger looked a bit ricier (ok - not a ricer, but still) but better than wood. I'll see if I can find a pic.crazyjim wrote:I'm slowly getting rid of the funky ass fake wood grain all over the interior of this truck, one piece at a time.
Oh - and those beards in the pic are on angle iron on the stock sliders - so yes, it does work well - haha
- Attachments
-
- CB holder.jpg (61.82 KiB) Viewed 1002 times
-
- CB holder2.jpg (64.16 KiB) Viewed 1002 times
Owner of only dead and forgotten projects
Re: CrazyJim's 1994 F1 Build - "The Black Pearl"
Yea Steve mine are just shitty fake wood overlays. Looks like an eBay kit or similar. When I try to remove them they crack up and leave residue. My gauge surround is jacked anyway, just going to replace it.
Also, Will you were right about the seats! I've got them sitting nice and straight now. The lean forward trick worked! Thanks!
Also, Will you were right about the seats! I've got them sitting nice and straight now. The lean forward trick worked! Thanks!
-
economig
- Posts: 1101
- Joined: Sun Jan 09, 2011 5:15 am
- Bronco Info: 1994 Eddie Bauer 5.8L
- Location: SW Riverside County
CrazyJim's 1994 F1 Build - "The Black Pearl"
Ha ha glad that worked Jim! Weird, right? I remember thinking I couldn't believe my seats were doing that. Thought they were busted. It was driving me nuts too. I'm not even a big dude but i kind of lean back heavy when i drive so it was killing me. Then I figured out the reset and align and they were good to go! I think one of them did it again like a year later and it was an easier fix. You're stoked, I'm lovin the interior with those seatscrazyjim wrote:Yea Steve mine are just shitty fake wood overlays. Looks like an eBay kit or similar. When I try to remove them they crack up and leave residue. My gauge surround is jacked anyway, just going to replace it.
Also, Will you were right about the seats! I've got them sitting nice and straight now. The lean forward trick worked! Thanks!
T H R E A T Motorsports
Re: CrazyJim's 1994 F1 Build
Small update here, yanked the front end off my truck in preparation for some new beams!
Out with the old!

In with the new! Camburg 4.5" over kit, with extended radius arms and brackets. Picked it up with steering etc for a G.

Out with the old!
In with the new! Camburg 4.5" over kit, with extended radius arms and brackets. Picked it up with steering etc for a G.
-
economig
- Posts: 1101
- Joined: Sun Jan 09, 2011 5:15 am
- Bronco Info: 1994 Eddie Bauer 5.8L
- Location: SW Riverside County
Re: CrazyJim's 1994 F1 Build
Nice dude! That's a killer deal! Can't wait to see it. This was actually the same kind of truck I was originally gonna build but the seats won ha ha. This should look really good
T H R E A T Motorsports
Re: CrazyJim's 1994 F1 Build
Thanks Will, I'm stoked on it. It's funny about the seating, that's one bummer for me too, but I couldn't do the short wheelbase of the bronco, and I'm not baller enough to afford an extended bronco. So F1 it is!
Re: CrazyJim's 1994 F1 Build
I should also add, the F53's are in the rear now as well, just no pictures of that, since it sits exactly the same, and it's not cycled for larger shocks yet.
-
Becks_Bronco
- Posts: 1244
- Joined: Sun Dec 20, 2009 2:12 pm
- Bronco Info: 96 Eddie Bauer, 5.8
- Location: Antioch
Re: CrazyJim's 1994 F1 Build
Awesome. Love the 93-96 body style. After seeing what you managed with an xj, this should be a pretty awesome build.
Scott Strong may be able to build an F-1 version of his awesome bronco rear light bar.
Scott Strong may be able to build an F-1 version of his awesome bronco rear light bar.
Re: CrazyJim's 1994 F1 Build
Thanks man! I hope she turns out as good if not better than the XJ, she'll definitely be getting the same love and attention once things settle a bit here.
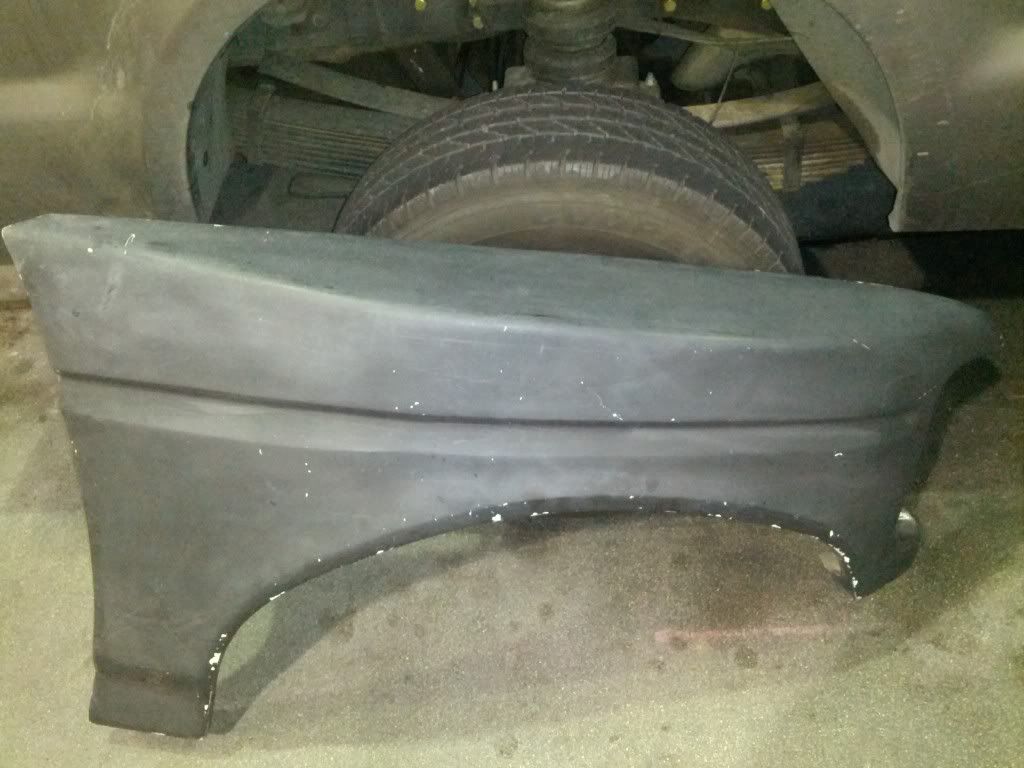
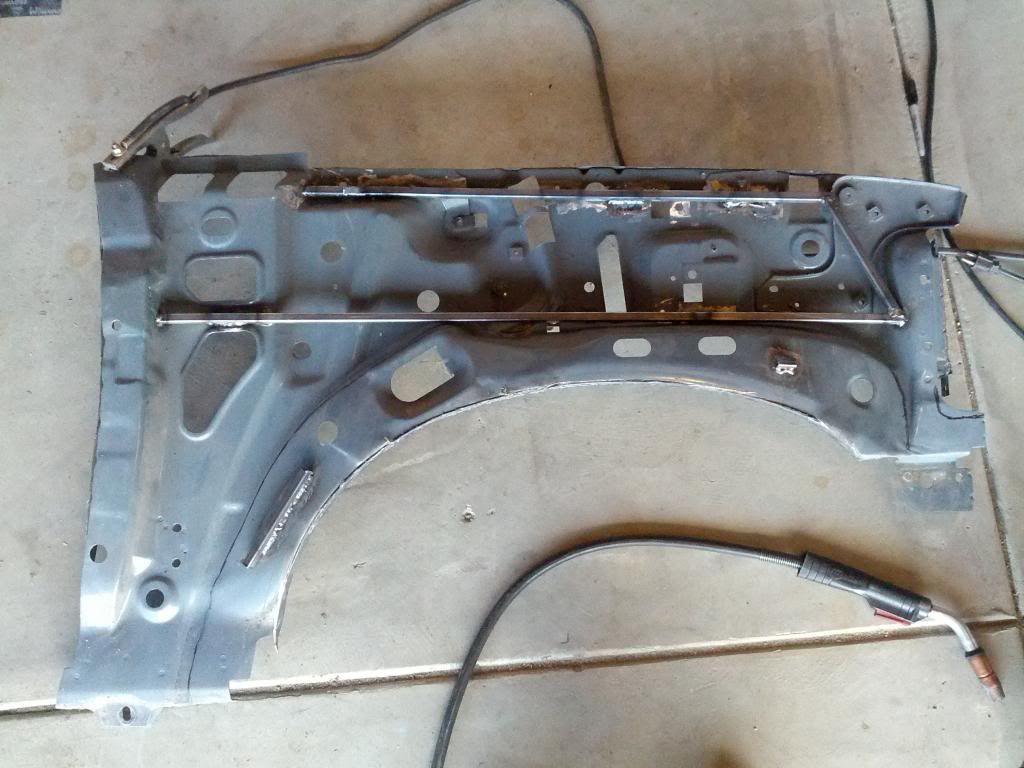
Got some updates today. In order to run the Camburg kit on the front end, I'll obviously be needing glass. I picked up some Hannemann fenders and bedsides a while back, and wasn't sure whether I wanted to skin my stock fenders or build a tube structure underneath. Both have their upsides and downsides. After seeing Tony's skinned fenders cracking, I was leaning towards doing a full tube structure. However after many convo's with him, we figured out a good way of re-inforcing the stock inners to where they HOPEFULLY will hold up and not crack. This will get me by until I go coilovers with an engine cage at the very least, I'll re-evaluate the fender skins at that point.

Here's the skins in the process and finished!
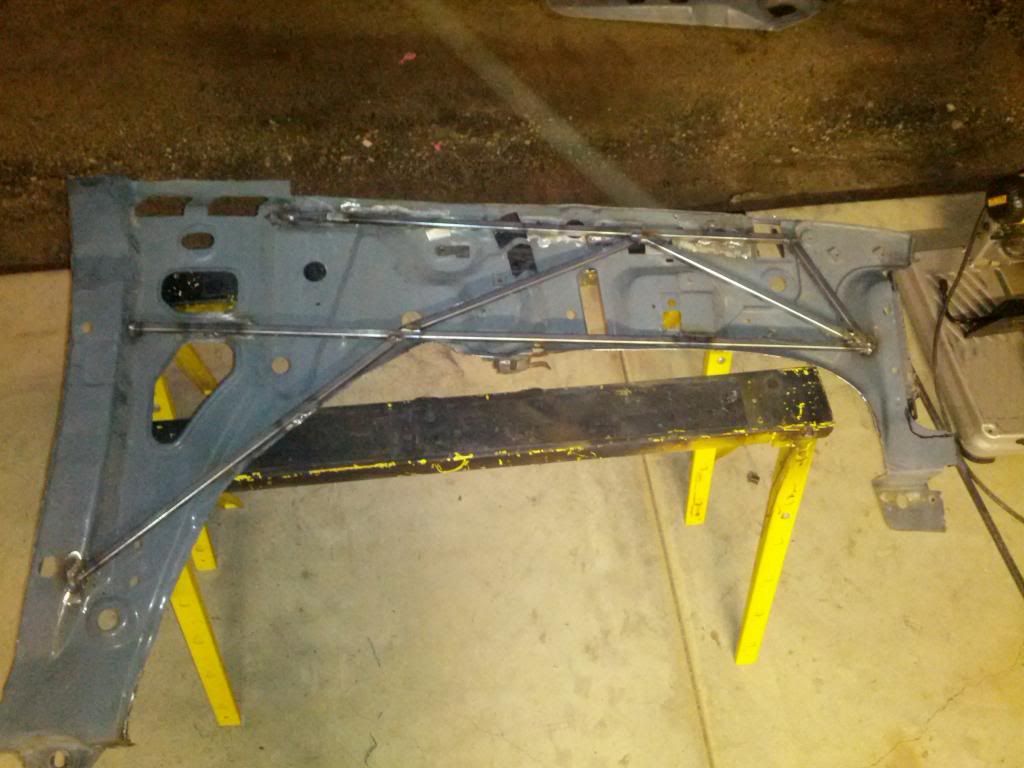
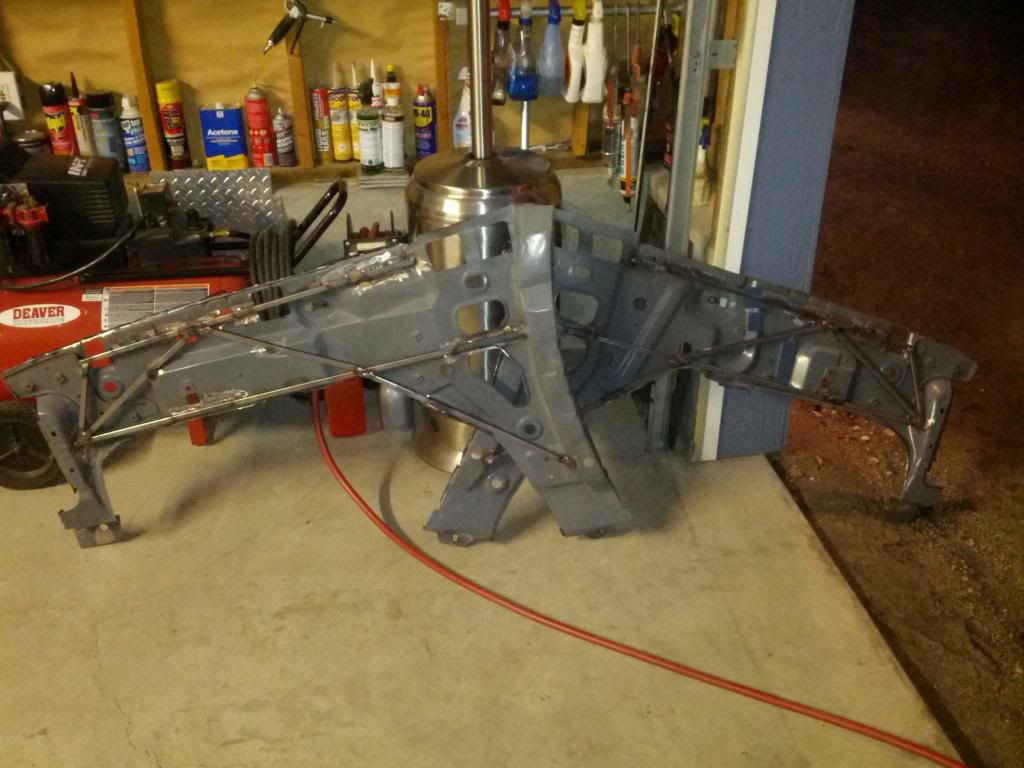
Stay tuned to further updates coming soon hopefully!
Got some updates today. In order to run the Camburg kit on the front end, I'll obviously be needing glass. I picked up some Hannemann fenders and bedsides a while back, and wasn't sure whether I wanted to skin my stock fenders or build a tube structure underneath. Both have their upsides and downsides. After seeing Tony's skinned fenders cracking, I was leaning towards doing a full tube structure. However after many convo's with him, we figured out a good way of re-inforcing the stock inners to where they HOPEFULLY will hold up and not crack. This will get me by until I go coilovers with an engine cage at the very least, I'll re-evaluate the fender skins at that point.
Here's the skins in the process and finished!
Stay tuned to further updates coming soon hopefully!
-
tcm glx

- Peanut Butter
- Posts: 7303
- Joined: Tue Dec 08, 2009 11:19 am
- Bronco Info: 93 Ford Bronco 5.8
- Location: Riverside Ca
- Contact:
Re: CrazyJim's 1994 F1 Build
Good stuff man, looks like they are ready for Powdercoat.
-
ChaseTruck754
- Spy/Ninja
- Posts: 9194
- Joined: Thu Jan 28, 2010 9:46 am
- Bronco Info: Don't have one - just old Ford trucks
- Location: Huntington Beach, CA
Re: CrazyJim's 1994 F1 Build
Unfortunately I think cracks are part of the game with these things. Thicker metal attaching to thinner metal & a bit of heat placed on the thinner metal at the attachment point on a part that WILL flex a bit no matter what & cracks are bound to happen. The setup looks to be a good way to try & combat this, but I'm not sure you can totally stop the cracking. It just kind of is what it is with what we do.
Owner of only dead and forgotten projects
-
tcm glx
- Peanut Butter
- Posts: 7303
- Joined: Tue Dec 08, 2009 11:19 am
- Bronco Info: 93 Ford Bronco 5.8
- Location: Riverside Ca
- Contact:
Re: CrazyJim's 1994 F1 Build
Hey Steve,
Interestingly enough, I had no cracks where you reinforced the skins, the cracks where where we left them untouched so I'm thinking the additional tube will absolutely do the trick.
Interestingly enough, I had no cracks where you reinforced the skins, the cracks where where we left them untouched so I'm thinking the additional tube will absolutely do the trick.
-
ChaseTruck754
- Spy/Ninja
- Posts: 9194
- Joined: Thu Jan 28, 2010 9:46 am
- Bronco Info: Don't have one - just old Ford trucks
- Location: Huntington Beach, CA
Re: CrazyJim's 1994 F1 Build
I certainly hope it does work, but keep watching them just in case.
Owner of only dead and forgotten projects
-
cs_drums
- Posts: 2912
- Joined: Wed Dec 22, 2010 10:39 am
- Bronco Info: 94 5.8 Bronco w/dreams of being finished
Re: CrazyJim's 1994 F1 Build - "Penny"
ChaseTruck754 wrote:Unfortunately I think cracks are part of the game with these things. Thicker metal attaching to thinner metal & a bit of heat placed on the thinner metal at the attachment point on a part that WILL flex a bit no matter what & cracks are bound to happen. The setup looks to be a good way to try & combat this, but I'm not sure you can totally stop the cracking. It just kind of is what it is with what we do.
Silicon bronze wire would help too
-
ChaseTruck754
- Spy/Ninja
- Posts: 9194
- Joined: Thu Jan 28, 2010 9:46 am
- Bronco Info: Don't have one - just old Ford trucks
- Location: Huntington Beach, CA
-
tcm glx
- Peanut Butter
- Posts: 7303
- Joined: Tue Dec 08, 2009 11:19 am
- Bronco Info: 93 Ford Bronco 5.8
- Location: Riverside Ca
- Contact:
Re: CrazyJim's 1994 F1 Build - "Penny"
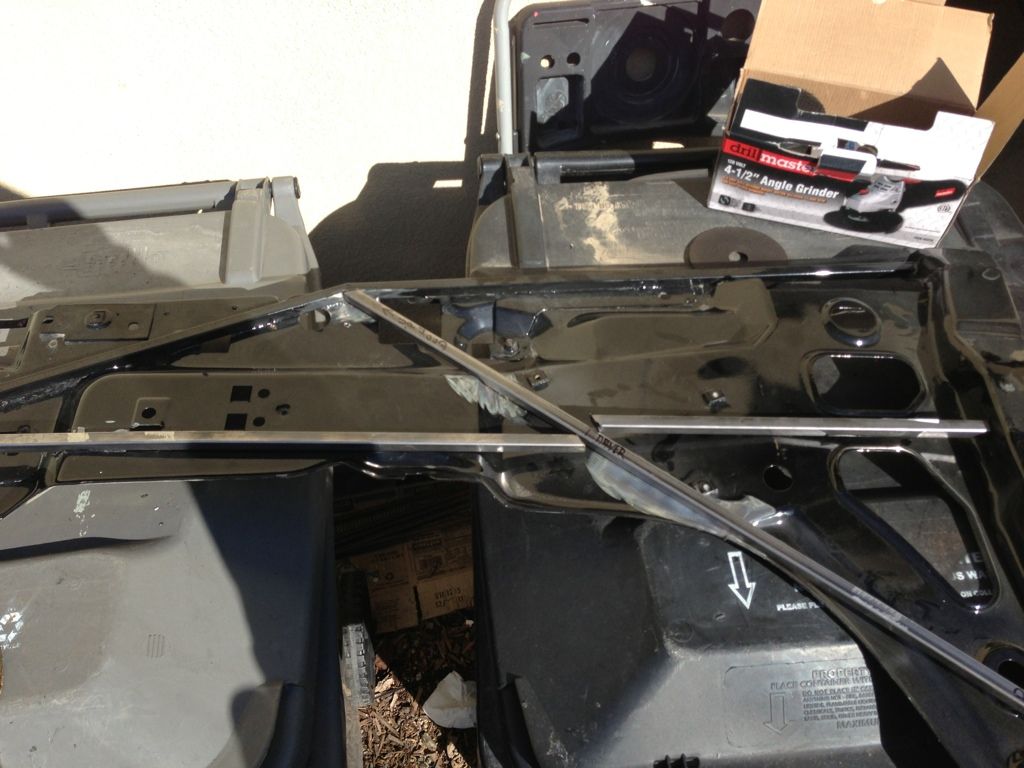
Guys..... you might be missing the point. NOTHING CRACKED where tube was added, reinforced and it was welded. The inner skins had cracks on the sheetmetal, where there was no reinforcement. Hence the reason for more structure to be added to build a stronger structure.
Red arrow shows major cracks, and the purple arrows are minor cracks starting to come through.
Red arrow shows major cracks, and the purple arrows are minor cracks starting to come through.
- Attachments
-
- modified inner skin.jpg (290.03 KiB) Viewed 745 times
-
tcm glx
- Peanut Butter
- Posts: 7303
- Joined: Tue Dec 08, 2009 11:19 am
- Bronco Info: 93 Ford Bronco 5.8
- Location: Riverside Ca
- Contact:
Re: CrazyJim's 1994 F1 Build - "Penny"
And what it will look like when all welded up
-
cs_drums
- Posts: 2912
- Joined: Wed Dec 22, 2010 10:39 am
- Bronco Info: 94 5.8 Bronco w/dreams of being finished
Re: CrazyJim's 1994 F1 Build - "Penny"
I wasn't referencing your work I was more or less just saying silicon bronze wire helps avoid cracks in general when attaching thinner metal to thicker metal. At least that's what I was told.