Rod's 84 BabyBajaF100

User avatar
AussieRod
Posts: 2804
Joined: Sun Sep 05, 2010 1:43 am
Bronco Info: 81 Bronco XLT, 250 alloy head crossflow 6, NP435/NP208, 4:10 gears, 31-10.5R15 M/Ts.
Location: Downunder

Re: Rod's 84 BabyBajaF100

Post by AussieRod »

Sept 23:
I gave the canopy a rough pressure wash yesterday and when Dad and my youngest brother turned up, we carefully lifted it onto the bed of the F100. After a bit of juggling and clearance checking, I've decided that it will get some repairs and go back on eBay or Gumtree to be sold off:
P1010084.JPG
P1010084.JPG (66.15 KiB) Viewed 5238 times
P1010085.JPG
P1010085.JPG (89.57 KiB) Viewed 5238 times
P1010086.JPG
P1010086.JPG (86.05 KiB) Viewed 5238 times
It was worth a try for $150.

After Dad and Matt left, I got the Dana 60 up onto my stands and started a detailed inspection. The results are both good and disappointing. First, I pulled the cover and inspected the ring and pinion. A couple of cans of spray degreaser and the insides look like new. The R & P are in excellent condition and the backlash is spot-on. The centre pinion gears all all perfect and tight. No LSD, though. I'm betting this was a 6 cylinder truck:
P1010090.JPG
P1010090.JPG (74.09 KiB) Viewed 5238 times
Next I started on the RH side and removed the axle. The not-so-tight bolts rang the alarm bells. When I rotated the drum, half the axle studs were loose and I noticed the drum wasn't pulled hard against the hub. The studs were also the wrong ones for the application. A few taps with the hammer knocked all the wheel studs into the drum. :shock: :? Something definately wrong there. The axle locknut was butchered by a cold chisel, so I used a punch to carefully un-do it and remove it. The inner nut was also chisel damaged, but it came off ok. The bearings were suspiciously dry when I pulled the hub from the drum off the spindle. The oil seal was loose on the spindle, with NO seal left in it. I managed to get the drum off and found these:
P1010093.JPG
P1010093.JPG (87.29 KiB) Viewed 5238 times
I would say the truck has lost a wheel at some stage recently and they used disc brake passenger car studs to replace the damaged originals, then WELDED them to the inside of the drum to stop them spinning, because they are smaller than the drum and hub bores. These have been there for a while, so clearly a butcher job:
P1010094.JPG
P1010094.JPG (88.03 KiB) Viewed 5238 times
I undid the 4 bolts and removed the backing plate complete. The spindle measures up ok @ 1.9971" for both inner and outer.
User avatar
AussieRod
Posts: 2804
Joined: Sun Sep 05, 2010 1:43 am
Bronco Info: 81 Bronco XLT, 250 alloy head crossflow 6, NP435/NP208, 4:10 gears, 31-10.5R15 M/Ts.
Location: Downunder

Re: Rod's 84 BabyBajaF100

Post by AussieRod »

Sept 23 Cont:
I put everything aside and started on the LH side. This is where the fun started. The drum was jammed tight on the brakes and I could NOT move it. Using my trusty punch, I managed to knock out all 8 studs without damaging them and proceeded to remove the axle, bearing retaining nuts and hub. Using 2 screwdrivers through the hub opening, I wound the adjuster back all the way, but the wear lip on the inner edge won't allow the drum to come off. The wheel cylinder is also siezed, so that explains the wear inside the drum. I just un-did the backing plate bolts and removed both drum and plate as a unit. I'll seperate them later. I had a good look at everything tonight and the LH side looks fine, the spindle miked up @ 1.9973" inner and 1.9971" outer so that was a relief:
P1010089.JPG
P1010089.JPG (70.55 KiB) Viewed 5238 times
P1010088.JPG
P1010088.JPG (74.38 KiB) Viewed 5238 times
The disappointment started when I inspected the RH hub. The seal will not stay in the hub, because the hub seal bore has been gouged out. The bearing race also fell out easily, as it looks to have been spinning in the hub and has destroyed the bearing race bore. The race has wear marks on the outer circumference, so clearly there has been a serious issue. The good thing is, the spindle is NOT DAMAGED:
P1010091.JPG
P1010091.JPG (82.34 KiB) Viewed 5238 times
P1010092.JPG
P1010092.JPG (88.79 KiB) Viewed 5238 times
So, I am up for:
1 hub
2 drums
1 set of linings
2 wheel cylinders
A full set of wheel bearings and seals
2 park brake cables (F250 cables are different at the drum ends than the F100/F150 cables)

Without the hub, my parts cost ATM is around AU$640.

My options are:
1/ RuffStuff, JBG and Lugnut 4x4 (all US suppliers) have disc brake kits for the Ford D60 FF, but only JBG and Lugnut 4x4 have E brake kits (unfortunately, I need the E brake option to remain legal here). Lugnut 4x4's kit with E brake calipers runs me AU$1,120 shipped.
I'm waiting on a shipping quote from JBG and Ruff Stuff. I'll need new studs for both sides (Dorman 610-180) with a 9/16" UNF thread instead of the 1/2" UNF thread of the originals. These are also slightly longer.

2/ All these kits use the 71 - 87 K2500 Chevy front rotor, which I can get a pair here for around $240 posted. All I will need then is the caliper brackets and e brake calipers. Hoses and stuff I can source here as well. That might save me a considerable amount of money and I can get this done sooner. I'll look into this option closer.

The hub I could save by machining out the back, making up an interference fit sleeve to shrink and press in, then re-machine the bearing and seal bores. Alternately, I'll have to source a hub from somewhere. I have options.

If anyone knows of or has a D60 30 spline LSD centre for 4.11:1 and down, or a Lock Rite or Detroit they will part with cheap, hit me up, I might be interested.

Other than that, that is where I am at this time. More later in the week. Cheers.
User avatar
ChaseTruck754
Spy/Ninja
Posts: 9194
Joined: Thu Jan 28, 2010 9:46 am
Bronco Info: Don't have one - just old Ford trucks
Location: Huntington Beach, CA

Re: Rod's 84 BabyBajaF100

Post by ChaseTruck754 »

Rod, that canopy would be snatched up quick by the 73-79 guys here. Hopefully the guys are the same down by you & will get your $ back to you quickly.

Good luck on the d60 stuff. I know over here the brakes can be added pretty dirt cheap, but I'm sure the parts aren't near as common down there. Are all the suppliers using the late 70's El Dorado calipers with the cable stlye e-brake? That is what is commonly done here.
Owner of only dead and forgotten projects
User avatar
AussieRod
Posts: 2804
Joined: Sun Sep 05, 2010 1:43 am
Bronco Info: 81 Bronco XLT, 250 alloy head crossflow 6, NP435/NP208, 4:10 gears, 31-10.5R15 M/Ts.
Location: Downunder

Re: Rod's 84 BabyBajaF100

Post by AussieRod »

ChaseTruck754 wrote:Rod, that canopy would be snatched up quick by the 73-79 guys here. Hopefully the guys are the same down by you & will get your $ back to you quickly.

Good luck on the d60 stuff. I know over here the brakes can be added pretty dirt cheap, but I'm sure the parts aren't near as common down there. Are all the suppliers using the late 70's El Dorado calipers with the cable stlye e-brake? That is what is commonly done here.
Hey, Steve. Gumtree is an Aussie "ebay" of sorts, but it's free to use, unlike the euro version. There are quite a few 70's trucks on there and parts as well, so I will post it up on both and see what happens. Hopefully, I can recoup my cost at least. I have to spend 3 south pacific pesos to your 2 us$, plus being butt-fucked on postage, but prices on brake parts once the currency conversion is taken into account are surprisingly almost break even. All the new parts to fix the drum brakes are available here at "reasonable" prices. JBG and Lugnut 4x4 use the '76 - 78 Eldorado rear E brake caliper in their kit (these are no longer made new, but still available for now), so that would keep the wallopers off my back. Lugnut's kit has everything but the E brake cables, so that might be the go-to, unless I source all the parts seperate and do it myself, now I know what nits I need. Bruin was the source of my new E brake cables for the 9 in brakes, and are the best priced by far, with F250 cables available for the same prices.
I'll troll ebay some more and see what I come up with.
User avatar
AussieRod
Posts: 2804
Joined: Sun Sep 05, 2010 1:43 am
Bronco Info: 81 Bronco XLT, 250 alloy head crossflow 6, NP435/NP208, 4:10 gears, 31-10.5R15 M/Ts.
Location: Downunder

Re: Rod's 84 BabyBajaF100

Post by AussieRod »

Sept 27:
It's a public holiday today, for the football grand final, so later I will install the new fuel pump/sender, jury rig the transfer pump wiring to a battery and transfer 2/3 of the fuel from the side tank to the rear one, test the pump flow and start the engine. Half the harness is built for the side tank and transfer pump, just need some more covering and I can get it covered and secured to the chassis harness. Then I'll work on building the section to the dash, etc. I've also set in a small trailer type plug at the towbar to wire the propane tanks on the trailer for fuel reserve. These will have a on/off switch in them, so I can control when/how I use the extra fuel. The tanks are fitted with electric shut-offs, so if the trailer detaches, the gas flow will be cut off instantly. I'll post up pics tonight.
User avatar
AussieRod
Posts: 2804
Joined: Sun Sep 05, 2010 1:43 am
Bronco Info: 81 Bronco XLT, 250 alloy head crossflow 6, NP435/NP208, 4:10 gears, 31-10.5R15 M/Ts.
Location: Downunder

Re: Rod's 84 BabyBajaF100

Post by AussieRod »

Sept 29:
Today, finally, I tackled the Saginaw P/S pump. A good cleaning, a thourough inspection and together it went. More on that later. :? :roll: Anyway, I cleaned and painted the pulley and adjuster mount, fasteners and got it ready to install. Next was the new hose. It took a battle, but I finally got the fitting onto the hose and screwed up. I gotta stop being a cheap bastard and buy myself a bloody vise! I'm getting old and my "visegrip" fingers aren't as good as they were 10 years ago :oops: so I need to invest in one. Anyway, pics....
The P/S pump assembled and ready to fit:
P1010097.JPG
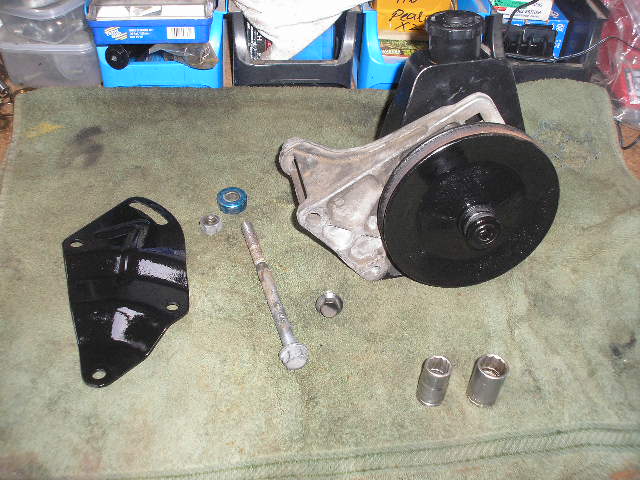
P1010097.JPG (72.31 KiB) Viewed 5179 times
The hi-pressure hose made up:
P1010098.JPG
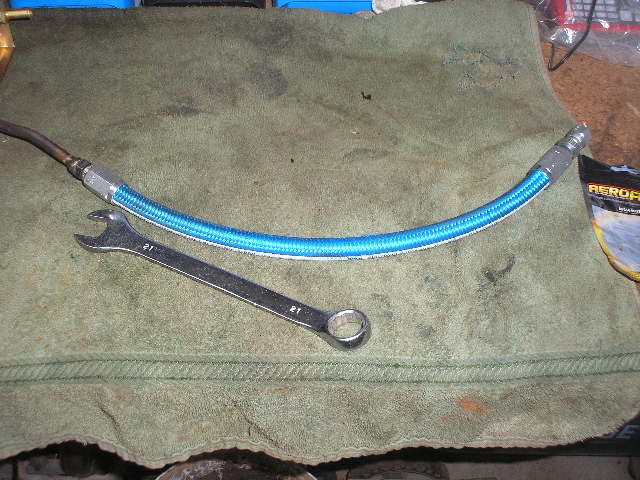
P1010098.JPG (70.28 KiB) Viewed 5179 times
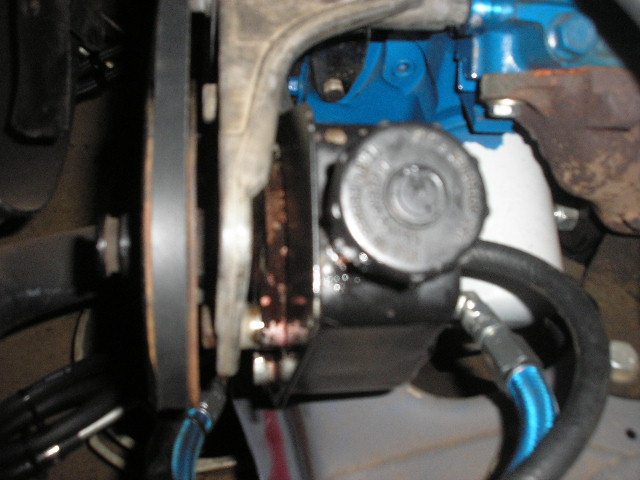
All installed, ready for fluid:
P1010099.JPG
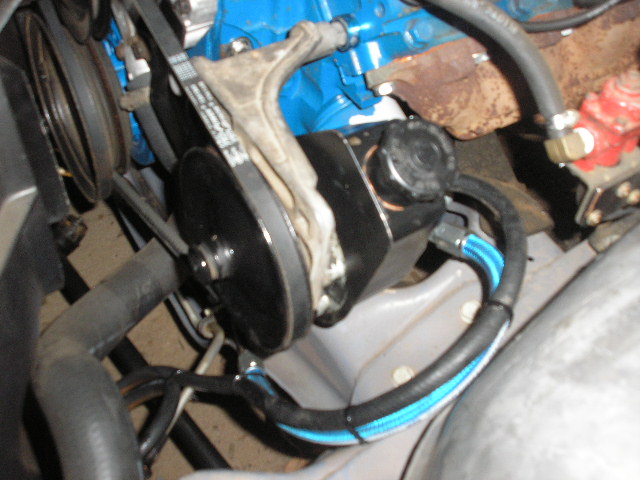
P1010099.JPG (89.86 KiB) Viewed 5179 times
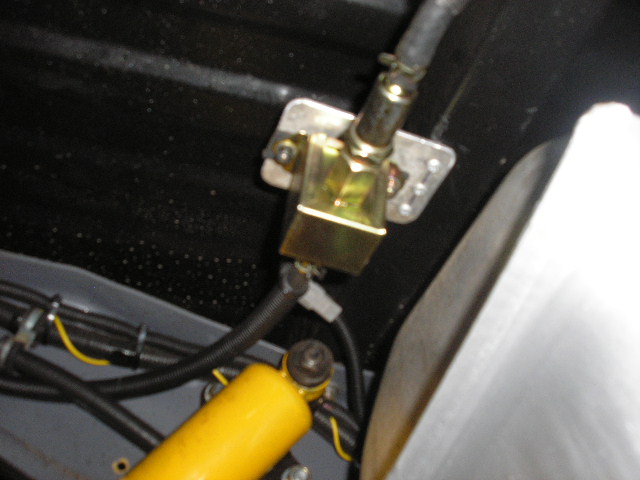
The return hose is longer and looped while I fab cooler mounts and finish it off:
P1010100.JPG
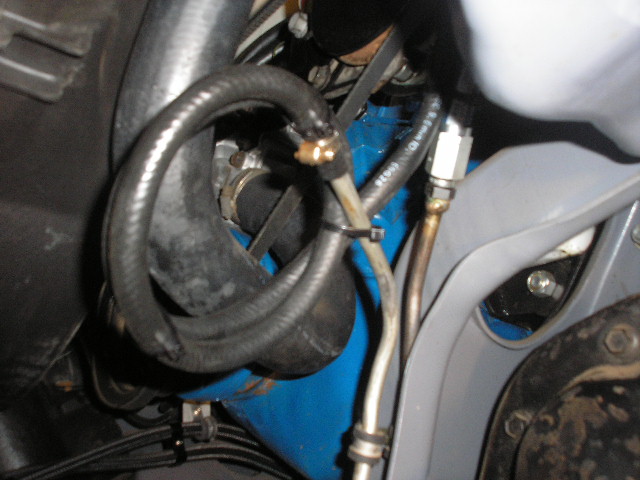
P1010100.JPG (89.45 KiB) Viewed 5179 times
Filled the can and started it up, topping up as needed. Once the engine settled to idle cold, I checked for leaks. :oops: :oops: Now I remembered I should have replaced the can seal. It's leaking at the top of the res O ring. Luckily, I can replace this without removing the pump, so when the seal kit arrives, it'll get done. I want to drive it again. Not sure if the leak is visible, but:
P1010105.JPG
P1010105.JPG (85.53 KiB) Viewed 5179 times
Since re-doing the exhaust, the engine idles much smoother, and isn't anywhere as loud as it was before. Usually, fitting a tailpipe, especially a mandrel tailpipe means MORE noise and bark, not less. I can only put it down to moving the hot dog bullet to the front of the muffler, instead of behind it. :roll: Not going to complain, stealth is always good. :D A tailpipe also increases torque, so I'm interested to see what the difference is.
P1010101.JPG
P1010101.JPG (70 KiB) Viewed 5179 times
I'm also going to re-fit the Carter fuel pump as the transfer pump. The Facet one is loud and extremely slow at transfering fuel. I'll just re-bend the mounting bracket on the Carter pump and change the nipples from 3/8" to 5/16" hose and fit it up. Other than that, and making the harness for the gauge and switches, it's almost there. More later in the week. ;)
User avatar
AussieRod
Posts: 2804
Joined: Sun Sep 05, 2010 1:43 am
Bronco Info: 81 Bronco XLT, 250 alloy head crossflow 6, NP435/NP208, 4:10 gears, 31-10.5R15 M/Ts.
Location: Downunder

Re: Rod's 84 BabyBajaF100

Post by AussieRod »

Sept 30:
Well, I've done the sums and decided I'm going to stick with the factory drum brakes. With taxes and import duties, the Lugnut kit will cost me just over AU$1,400, buying all the components seperately ends up cheaper for the parts, but adds almost AU$250 to the shipping costs. Buying the kit, 1/3rd of the total cost is shipping and taxes; buying all the parts seperately from here and o/s will be 'parts cheaper' but just over 2/5ths the total cost in shipping and "import" duties. So far, by shopping carefully online and locally, I can buy everything for the drum brakes (drums, shoes, cylinders, bearings and seals) here, plus have left-over cash for studs, a Spartan Locker, park brake cables and a decent rear cover from the States to spruce it up for AU$50 over the same layout financially. The only 'extra' is for the replacement hub.
I did a heap of research on drop-in lockers and the Spartan appears to be the best value for money, as it comes with a hardened pin and rollpin to replace the factory one. If I decide I don't like the locker, I'll refit the spiders and go back to the open-wheeler.
My P/S pump seal kit should arrive Wednesday, the sector shaft seal Thursday (yes, it's weeping) and after Thursday, I'll start ordering the parts for the D60 up to $200 each week until I get to the locker, then order that and once all the stuff is in a box ready to go, I'll clean, assemble and paint everything and have it ready to fit. I have a few feelers out for a complete D50 TTB for it (preferably a frame cut), plus I'm watching beam mounts and a few other things on ebay for it to get the ball rolling. In the meantime, I'm also tracking down parts for my own 351C and I'll do a build on that too.
More later in the week. ;)
User avatar
AussieRod
Posts: 2804
Joined: Sun Sep 05, 2010 1:43 am
Bronco Info: 81 Bronco XLT, 250 alloy head crossflow 6, NP435/NP208, 4:10 gears, 31-10.5R15 M/Ts.
Location: Downunder

Re: Rod's 84 BabyBajaF100

Post by AussieRod »

Oct 2:
Something must have changed the exchange rate last night, as I noticed the Spartan was priced way lower in my watched list than what I was watching it for on ebay. After comparing the difference (AU$62) I hit the buy it now button and got it paid for. The cover will be ordered tomorrow night once my pay hits the bank.

I haven't completely given up on going discs on the rear, as once the truck is on the road, I can do without the park brake for a while. I have JB6 calipers from an old FSJ front axle (same as the Chev GMC equiv.) so I'm still watching the disc brake brackets and stuff, just in case I get a bargain, but I'm not holding my breath just yet. RuffStuff wants US$80 to mail 2 caliper brackets from the States, JBG around the same and the cheapest on ebay runs US$72 shipping, duties and taxes included. The bracket prices vary around $10 - $15, so I'll keep my eye on them and wait.

Still waiting for my P/S pump O ring kit to arrive, which should be tomorrow. Wanna get this thing going again so I can drive it everyday and fine-tune it for rego. I have some minor changes to the engine bay wiring to do, mainly to re-route the propane/ gasoline change-over wiring through a different hole in the firewall, along with the wiring for the lights, fan(s), etc. The 4 speed manual is still in the pipeline if I find the auto problematic or unsuitable for towing the caravan and I have a source for a decent one at a reasonable price. I've ordered a used hub to replace the damaged one on the Dana 60, so when it arrives, I'll clean all the bits up and buy/install new wheel bearings and seals and get it all ready to assemble once I decide 100% on what brakes I'm gonna stick with.
More on the weekend.
User avatar
ChaseTruck754
Spy/Ninja
Posts: 9194
Joined: Thu Jan 28, 2010 9:46 am
Bronco Info: Don't have one - just old Ford trucks
Location: Huntington Beach, CA

Re: Rod's 84 BabyBajaF100

Post by ChaseTruck754 »

Rod, does it make sense to have the disk parts purchased separately sent to a US address to be compiled into 1 box and then shipped to Oz? If so send um here & I can put everything in 1 box (which will be HEAVY I'm sure!) and we can get them off to you. PM me if you want to go this route.

On a side note, Ruff Stuff has had some sales and discount codes going recently, so not sure if those may help things. I can dig up my deleted emails & look if you want.
Owner of only dead and forgotten projects
User avatar
AussieRod
Posts: 2804
Joined: Sun Sep 05, 2010 1:43 am
Bronco Info: 81 Bronco XLT, 250 alloy head crossflow 6, NP435/NP208, 4:10 gears, 31-10.5R15 M/Ts.
Location: Downunder

Re: Rod's 84 BabyBajaF100

Post by AussieRod »

ChaseTruck754 wrote:Rod, does it make sense to have the disk parts purchased separately sent to a US address to be compiled into 1 box and then shipped to Oz? If so send um here & I can put everything in 1 box (which will be HEAVY I'm sure!) and we can get them off to you. PM me if you want to go this route.

On a side note, Ruff Stuff has had some sales and discount codes going recently, so not sure if those may help things. I can dig up my deleted emails & look if you want.
Thanks, Steve, I might just take you up on that. ;)

On a side note, the P/S pump O ring kit arrived today, so I whipped the pump off and installed all the seals I could. It went back on and now, no leaks. :D I'd bent the Carter pump bracket at work today and drilled some screw holes in it, picked up the correct fittings on the way home and after removing the Facet pump, got it set up. Because it's attached to the tub floor crossmember, it still makes some noise, but it moves the fuel quicker. The only thing I have to do is use some silicone on the pump terminals to seal them from moisture and to make sure they stay on.
I then pulled out the old highway sign I use for aluminium panels and cut out a piece for the dash insert. Put the 2" hole saw through it, drilled 2 12mm holes for the switches and gave it a clean up and a good coat of satin black. Over the weekend, I'll fit the gauge and switches, wire it to a deutsch plug and lead and install it in the dash for the transfer pump and trailer propane reserve. Then I need to attack the rear bumper and get it ready to take for sandblasting at work. I'm going to re-position a few plugs and lights to package everything better, then need to have it ready to fit once I paint the tub.
A few more bites outta that elephant :D :D
User avatar
AussieRod
Posts: 2804
Joined: Sun Sep 05, 2010 1:43 am
Bronco Info: 81 Bronco XLT, 250 alloy head crossflow 6, NP435/NP208, 4:10 gears, 31-10.5R15 M/Ts.
Location: Downunder

Re: Rod's 84 BabyBajaF100

Post by AussieRod »

Oct 10:
Parts arrived this week:
My replacement hub for the D60:
P1010118.JPG
P1010118.JPG (83.93 KiB) Viewed 5093 times
New (s/h) armrest for the driver's door trim:
P1010119.JPG
P1010119.JPG (82.53 KiB) Viewed 5093 times
Spartan Locker from RockRidge4WD (ebay):
P1010113.JPG
P1010113.JPG (74.14 KiB) Viewed 5093 times
Free stuff that came with it:
P1010114.JPG
P1010114.JPG (85.8 KiB) Viewed 5093 times
Some additions to the rear bumper, re-positioned trailer plug mount:
P1010115.JPG
P1010115.JPG (75.2 KiB) Viewed 5093 times
New plug mount for the propane wiring that connects the trailer mounted tanks to the truck's harness:
P1010116.JPG
P1010116.JPG (79.9 KiB) Viewed 5093 times
Cont.
User avatar
AussieRod
Posts: 2804
Joined: Sun Sep 05, 2010 1:43 am
Bronco Info: 81 Bronco XLT, 250 alloy head crossflow 6, NP435/NP208, 4:10 gears, 31-10.5R15 M/Ts.
Location: Downunder

Re: Rod's 84 BabyBajaF100

Post by AussieRod »

Oct 10, cont:
Some plugs in the bumper tube. I could fill it with oil, or use it as compressed air storage, etc:
P1010117.JPG
P1010117.JPG (88.81 KiB) Viewed 5093 times
Today I started on the tailgate. The tailgate on this thing has had a HARD life, to say the least. It is badly bent, has surface rust and has delaminated from the sides and where it was attached to the inner:
P1010120.JPG
P1010120.JPG (83.28 KiB) Viewed 5093 times
P1010121.JPG
P1010121.JPG (84.84 KiB) Viewed 5093 times
The latch areas on both sides are cracked and broken (RH worse than LH), the outer skin has broken and cracked at virtually every place it attached to something. The sides had been pop riveted to the inner at some stage, so they were the first to be drilled out. Then I started drilling out what spot welds still held along the bottom edge:
P1010122.JPG
P1010122.JPG (83.48 KiB) Viewed 5093 times
I then marked down 20mm from the inside top edge and run a thin cutting disc along the line until the outer was separated from the inner:
P1010123.JPG
P1010123.JPG (88.57 KiB) Viewed 5093 times
Using a blanket, I put the tailgate on the ground and used a hardened gasket scraper to separate the bottom inner/outer joint:
P1010124.JPG
P1010124.JPG (74.45 KiB) Viewed 5093 times
So far, so good.

Cont.
User avatar
AussieRod
Posts: 2804
Joined: Sun Sep 05, 2010 1:43 am
Bronco Info: 81 Bronco XLT, 250 alloy head crossflow 6, NP435/NP208, 4:10 gears, 31-10.5R15 M/Ts.
Location: Downunder

Re: Rod's 84 BabyBajaF100

Post by AussieRod »

Oct 10, cont.

My 2 lb block hammer and a piece of 4" x 2" pine helped to flatten out the inner skin until it could go back on the truck properly. This is probably the first time in at least 10 years the tailgate could be called "straight". :roll: :lol:
P1010125.JPG
P1010125.JPG (83.24 KiB) Viewed 5093 times
P1010126.JPG
P1010126.JPG (75.13 KiB) Viewed 5093 times
I carefully walked over the outer skin to bend it straighter than before, then some judicious use of the block hammer and pine wedge removed the major dents and deformed areas:
P1010127.JPG
P1010127.JPG (87.69 KiB) Viewed 5093 times
The inner will come up OK, once the latch areas are welded up and re-inforced with some sheet steel and it spends a few hours on the steel table at work getting all the dents and damaged areas straightened up. Some RHS and a couple of 2mm folded sections will add some much needed strength to the load surface area after the inner is sandblasted and painted with weld-through primer. The outer will get the same treatment, with a small reinforcement panel going in behind the broken area to add some strength and give me a backing plate of sorts to weld the skin back together. I'll take some more pics tomorrow of the latch damage. A new handle, rod clips and support cables have been ordered already. The cables are fine, but have a bad habit of breaking unexpectedly when you least want them to, so having new ones spare will be handy for later on.
Anyway, it's late. More tomorrow.
Cheers. :D
User avatar
ChaseTruck754
Spy/Ninja
Posts: 9194
Joined: Thu Jan 28, 2010 9:46 am
Bronco Info: Don't have one - just old Ford trucks
Location: Huntington Beach, CA

Re: Rod's 84 BabyBajaF100

Post by ChaseTruck754 »

This is a bit more than just a bite out of the 'ol elephant there! Nice work.
Owner of only dead and forgotten projects
User avatar
AussieRod
Posts: 2804
Joined: Sun Sep 05, 2010 1:43 am
Bronco Info: 81 Bronco XLT, 250 alloy head crossflow 6, NP435/NP208, 4:10 gears, 31-10.5R15 M/Ts.
Location: Downunder

Re: Rod's 84 BabyBajaF100

Post by AussieRod »

ChaseTruck754 wrote:This is a bit more than just a bite out of the 'ol elephant there! Nice work.
Thanks, Steve. :D With daylight saving here again, I get an extra hour every day to work on it, so now it's getting close to Xmas and my birthday, I'd like to have it on the road to drive during the holiday period. The step-daughter goes home tomorrow, so I can make more noise and do some painting without complaints and get a lot more done.
Anyway, pics.
The latch area on the LH side is cracked and needs some repair/re-inforcement:
P1010128.JPG
P1010128.JPG (89.17 KiB) Viewed 5074 times
The RH side is much worse. The top weld-nut is detached and came off with the latch. The top section is BARELY attached to the side plate:
P1010129.JPG
P1010129.JPG (85.52 KiB) Viewed 5074 times
The inner is riveted to the side plate where it has broken the spot welds:
P1010130.JPG
P1010130.JPG (81.37 KiB) Viewed 5074 times
Under the latch handle opening, there were 2 spot welds that held the inner and outer together. The outer has spider cracks eminating from both holes where the weld had pulled out. I might add a strip inside the skin to reinforce this area and give me a backing to weld repair the cracking around the holes. I'll decide whether to do this as I re-assemble the tailgate, or do it before. Either way the area needs some serious TLC, and I will likely add a couple more spot welds to help strengthen this spot.
I found 2 latch rod clips tonight, must have ordered these back when I was still driving it (the LH rod had no clip and would fall off regularly). Everything will get sandblasted, repaired and painted for assembly once all the required repairs are done, then I'll assemble the locks and handle and weld the two halves together. Saves me having to try and wriggle all the bits inside once I have zero access.

I could save myself all this trouble by just buying a repro tailgate for AU$299, but what fun would that be? :roll: :lol:
More Sunday.
Cheers.
User avatar
AussieRod
Posts: 2804
Joined: Sun Sep 05, 2010 1:43 am
Bronco Info: 81 Bronco XLT, 250 alloy head crossflow 6, NP435/NP208, 4:10 gears, 31-10.5R15 M/Ts.
Location: Downunder

Re: Rod's 84 BabyBajaF100

Post by AussieRod »

Sunday Oct 13:
Yesterday, I un-did the wrapping at the fuel pump solenoid and soldered on an extra tail to feed the transfer pump. To help with any future additions, I decided to incorporate a fuze block:
P1010131.JPG
P1010131.JPG (89.9 KiB) Viewed 5058 times
P1010133.JPG
P1010133.JPG (71.46 KiB) Viewed 5058 times
Aftre "wrapping" that up, I went inside and extended the power and dash light tails to extand to the other side of the cluster and after drilling some holes, was forced to pinch a few screws from the RH panel to secure the gauge panel:
P1010135.JPG
P1010135.JPG (89.99 KiB) Viewed 5058 times
The 2 wires for the propane switch are down under the dash, ready to be connected at a later date, although I did mount the earth lead. The only issue I have is that the fuel gauges, although now seperately wired seem a bit inconsistent with the possible tank contents. Once I get a couple of other details sorted, and a permit paid for, I'll go fill both tanks to see if they read correctly at full and go from there. I'm planning to bend the bed cage and roll bar tubing on Saturday coming and then drive down to Melb to give it a run and visit my Dad. I plan to finish the front and rear bumpers during the week and after next weekend, get them off ready to sand blast and paint and then start fabbing the bed cage. Once I have that to my liking, the tub will get some more filler, prepped and then painted, along with the hood, which has been fixed after the light bracket incident, but not re-painted.
Anyway, that's where I'm at today.
More during the week. :D
User avatar
AussieRod
Posts: 2804
Joined: Sun Sep 05, 2010 1:43 am
Bronco Info: 81 Bronco XLT, 250 alloy head crossflow 6, NP435/NP208, 4:10 gears, 31-10.5R15 M/Ts.
Location: Downunder

Re: Rod's 84 BabyBajaF100

Post by AussieRod »

Saturday Oct 19:
I've been using my smoko and lunch breaks at work to get some repairs done on the tailgate inner and outer. Sorry, but I don't have any pics of the progress at work, but suffice to say, a piece of 5/8" flat bar 4" long and a ball peen hammer made noisy but neat work of nearly all the dents and deformed areas on the inner deck surface. I them made up a plate to replicate the latch, but longer to stabilise the broken area and proceeded to repair the broken areas around the latch mount. Yesterday, I brought the tailgate home to test fit it and see how it works now it is more to it's original shape.
Latch area repairs. LH side before:
P1010128.JPG
P1010128.JPG (89.17 KiB) Viewed 5015 times
After:
P1010140.JPG
P1010140.JPG (76.04 KiB) Viewed 5015 times
RH side before:
P1010129.JPG
P1010129.JPG (85.52 KiB) Viewed 5015 times
After:
P1010141.JPG
P1010141.JPG (66.68 KiB) Viewed 5015 times
After re-fitting the tailgate, I Cleco'd the outer skin back on to check fit and gaps:
P1010136.JPG
P1010136.JPG (85.53 KiB) Viewed 5015 times
Whilst repairing the RH side plate at the latch point, I removed the pop rivets holding it on and spot welded them back up, both to remove the holes and to strengthen the attachment. Once done, the difference was amazing, to say the least.
This centre section of the outer will present to difficult part of the repair, as it is bent/bowed badly and torn through above the latch handle access hole in multiple directions:
P1010137.JPG
P1010137.JPG (89.66 KiB) Viewed 5015 times
More on that later.
User avatar
AussieRod
Posts: 2804
Joined: Sun Sep 05, 2010 1:43 am
Bronco Info: 81 Bronco XLT, 250 alloy head crossflow 6, NP435/NP208, 4:10 gears, 31-10.5R15 M/Ts.
Location: Downunder

Re: Rod's 84 BabyBajaF100

Post by AussieRod »

Saturday Oct 19 Cont.
I'd forgotten to re-install the plastic pivot bush on the RH side, but with a screwdriver I carefully positioned the tailgate assembly in the opening and checked the alignment, which was surprisingly good.
LH side:
P1010139.JPG
P1010139.JPG (84.6 KiB) Viewed 5015 times
RH side:
P1010138.JPG
P1010138.JPG (83.95 KiB) Viewed 5015 times
The inner looks much better and is ruler flat across all the ribs:
P1010142.JPG
P1010142.JPG (87.37 KiB) Viewed 5015 times
Even the top edge is dead straight (well, almost):
P1010143.JPG
P1010143.JPG (68.89 KiB) Viewed 5015 times
No more "salad bowl" effect, open or closed:
P1010144.JPG
P1010144.JPG (75.11 KiB) Viewed 5015 times
I had to work this morning, welding new eyes onto hydraulic cylinders for another job related to the rail tamper I'm working on. I took both inner and outer in and worked on them in my morning break and an hour and a half after 12 o'clock finish time. I'll snap some progress pics on Monday.
The time was spent on the outer skin, first clamping it outside down onto the steel work bench, then using the flat bar and hammer working out all the dents and carefully reshaping the torn area for re-welding. Several clamps and pieces of flat bar later, I had most of the torn through area welded up, which had the secondary effect of helping to shrink the stretched and torn edges back where they should be. If there is too much shrinkage, I'll peen the welds until I have the proper tension to keep the skin smooth. Right now, it's coming together quite well, surprisingly enough. I have it Cleco'd together again to check the fit and see where I still need to work on both to keep them aligned and in the correct form and shape.
I'm having a rest day tomorrow. I'm getting too old to be flogging along like a 20-something anymore.
More Monday.
Cheers.
User avatar
AussieRod
Posts: 2804
Joined: Sun Sep 05, 2010 1:43 am
Bronco Info: 81 Bronco XLT, 250 alloy head crossflow 6, NP435/NP208, 4:10 gears, 31-10.5R15 M/Ts.
Location: Downunder

Re: Rod's 84 BabyBajaF100

Post by AussieRod »

Thursday 25 Oct:
Been busy at work and on the Discovery, but still getting the tailgate done in small steps:
The worktable:
P1010145.JPG
P1010145.JPG (75.67 KiB) Viewed 4982 times
The top is 20mm thick, so it's stable enough to use to pull the tailgate skin down with clamps to work and re-shape the dented and torn areas:
P1010146.JPG
P1010146.JPG (86.73 KiB) Viewed 4982 times
P1010147.JPG
P1010147.JPG (64.26 KiB) Viewed 4982 times
P1010148.JPG
P1010148.JPG (66.55 KiB) Viewed 4982 times
I'll have more later over the weekend (I hope).
User avatar
AussieRod
Posts: 2804
Joined: Sun Sep 05, 2010 1:43 am
Bronco Info: 81 Bronco XLT, 250 alloy head crossflow 6, NP435/NP208, 4:10 gears, 31-10.5R15 M/Ts.
Location: Downunder

Re: Rod's 84 BabyBajaF100

Post by AussieRod »

Sunday 27 Oct:
Yesterday was a wash weather wise, so I stayed indoors for the best part of the day, then did some domestic stuff once the weather calmed down and it stopped raining. I'd brought the tailgate home Friday to fit it up and see what else needed doing before I sand blasted it and began the filler work and re-assembly welding. Today, it got fitted up and I did some careful aligning and then seperated the two halves. The outer went over to the tub frame for a sandblast, although I ran out of media pretty fast, I got it mostly done on the top edge and around the rust patches. Then I hit it with the air sander and long board to start to clean up and see what further work it needs on the table at work:
The outer skin is MUCH straighter than before (pre sand/blast):
P1010157.JPG
P1010157.JPG (88.93 KiB) Viewed 4956 times
The repair around the release handle opening:
P1010158.JPG
P1010158.JPG (77.55 KiB) Viewed 4956 times
Closer up:
P1010159.JPG
P1010159.JPG (88.68 KiB) Viewed 4956 times
P1010160.JPG
P1010160.JPG (72.54 KiB) Viewed 4956 times
This area in the lower centre had obviously kissed a trailer coupling at some stage, but it is better now:
P1010161.JPG
P1010161.JPG (85.96 KiB) Viewed 4956 times
After blast and a preliminary sanding:
P1010162.JPG
P1010162.JPG (89.28 KiB) Viewed 4956 times
Cont.
Post Reply